The API builder
Creating app APIs as pipelines of steps — SQL, HTTP calls and scripts — with arguments, built-in testing and generated documentation.
Every Keplin API is a GraphQL operation of the app: a query that reads data or a mutation that writes it. The app's own screens, the reports, the workflows and the external systems all call the same APIs — what you define here is the application's only way in and out for data.
An API can have one of two natures:
| Nature | What it is | Where it is covered |
|---|---|---|
| Pipeline | A sequence of steps (SQL query, HTTP call, Script) that runs in order; the result of the last step is the response. | This page |
| Table | A single block bound to a table of the data model, which generates the read and write operations (get/add/update/delete) for you. | The GraphQL API of the model |
This page covers the builder itself: creating the API, defining arguments, assembling the pipeline, testing without saving and publishing.
Where APIs live
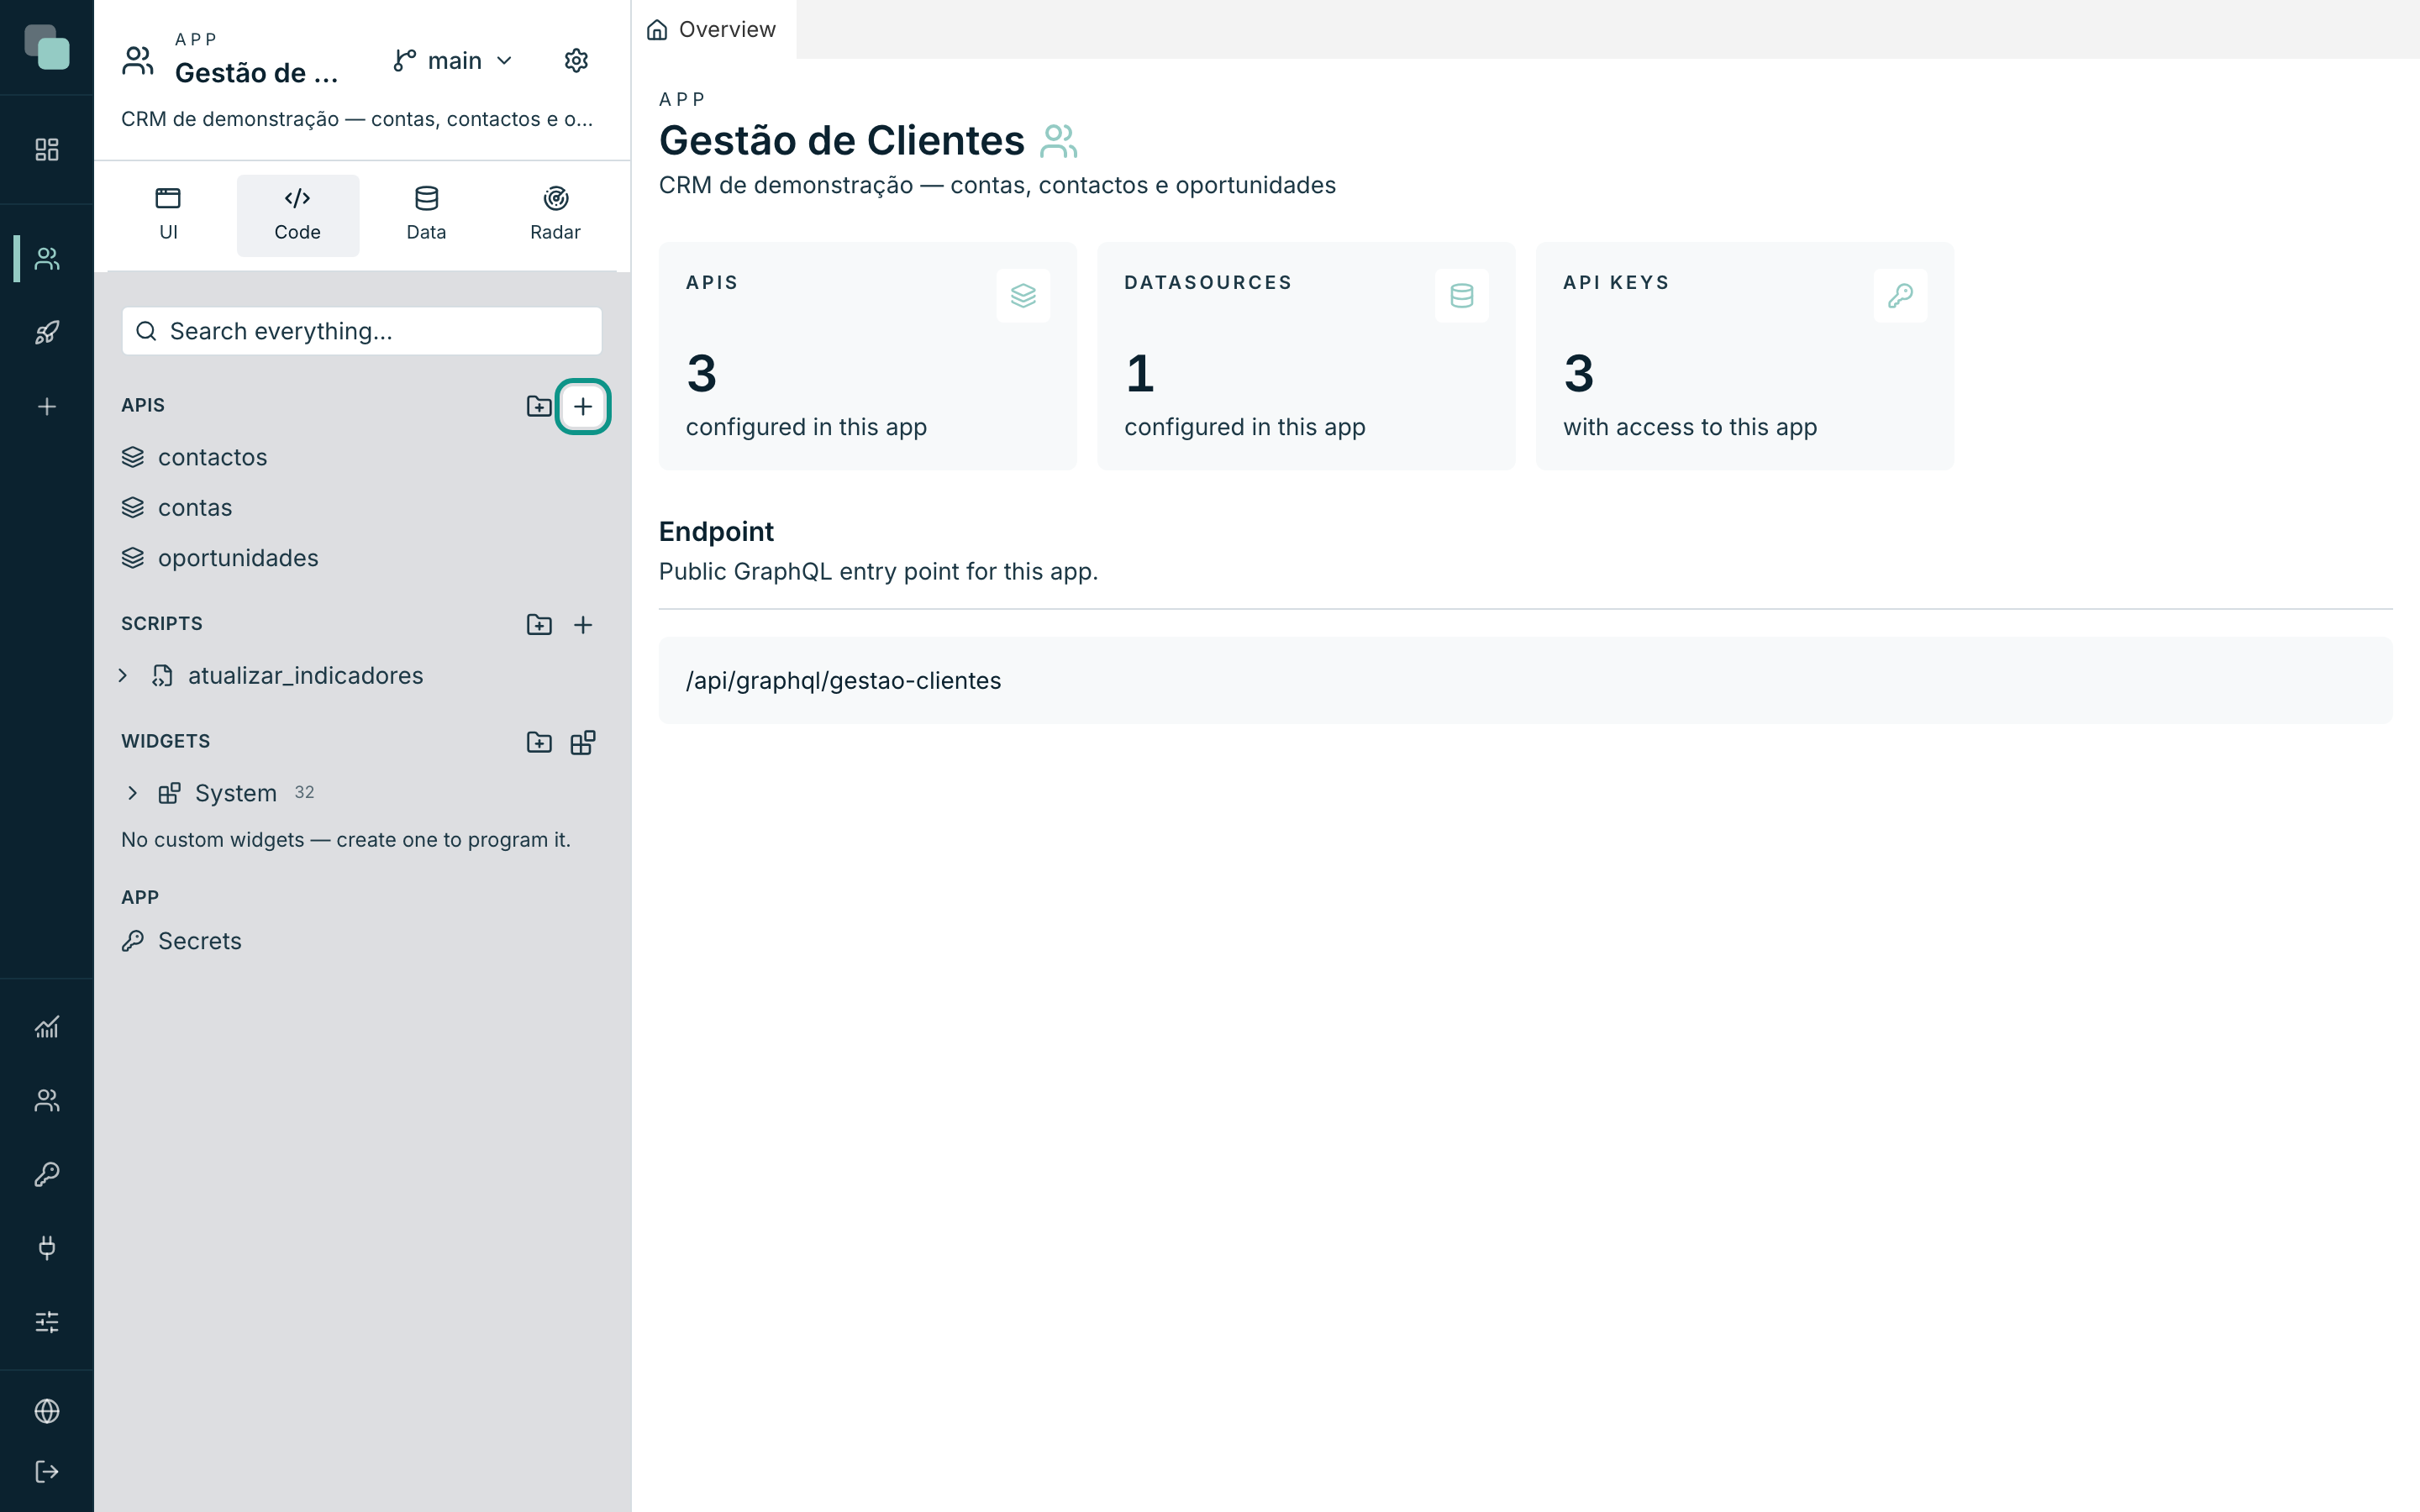
Inside an app, open the Code panel in the sidebar. The APIs section lists the existing APIs — you can organize them into folders with New folder — and each one opens as a workspace tab. The app also has an overview page with the complete list, the type and the state of each API, and the address they are served at.
Note
At the top of the list you see the app's address: every operation is
served at a single GraphQL endpoint, along the lines of
/api/graphql/gestao-clientes. There is no URL per API — there is one
GraphQL field per API.
Creating an API
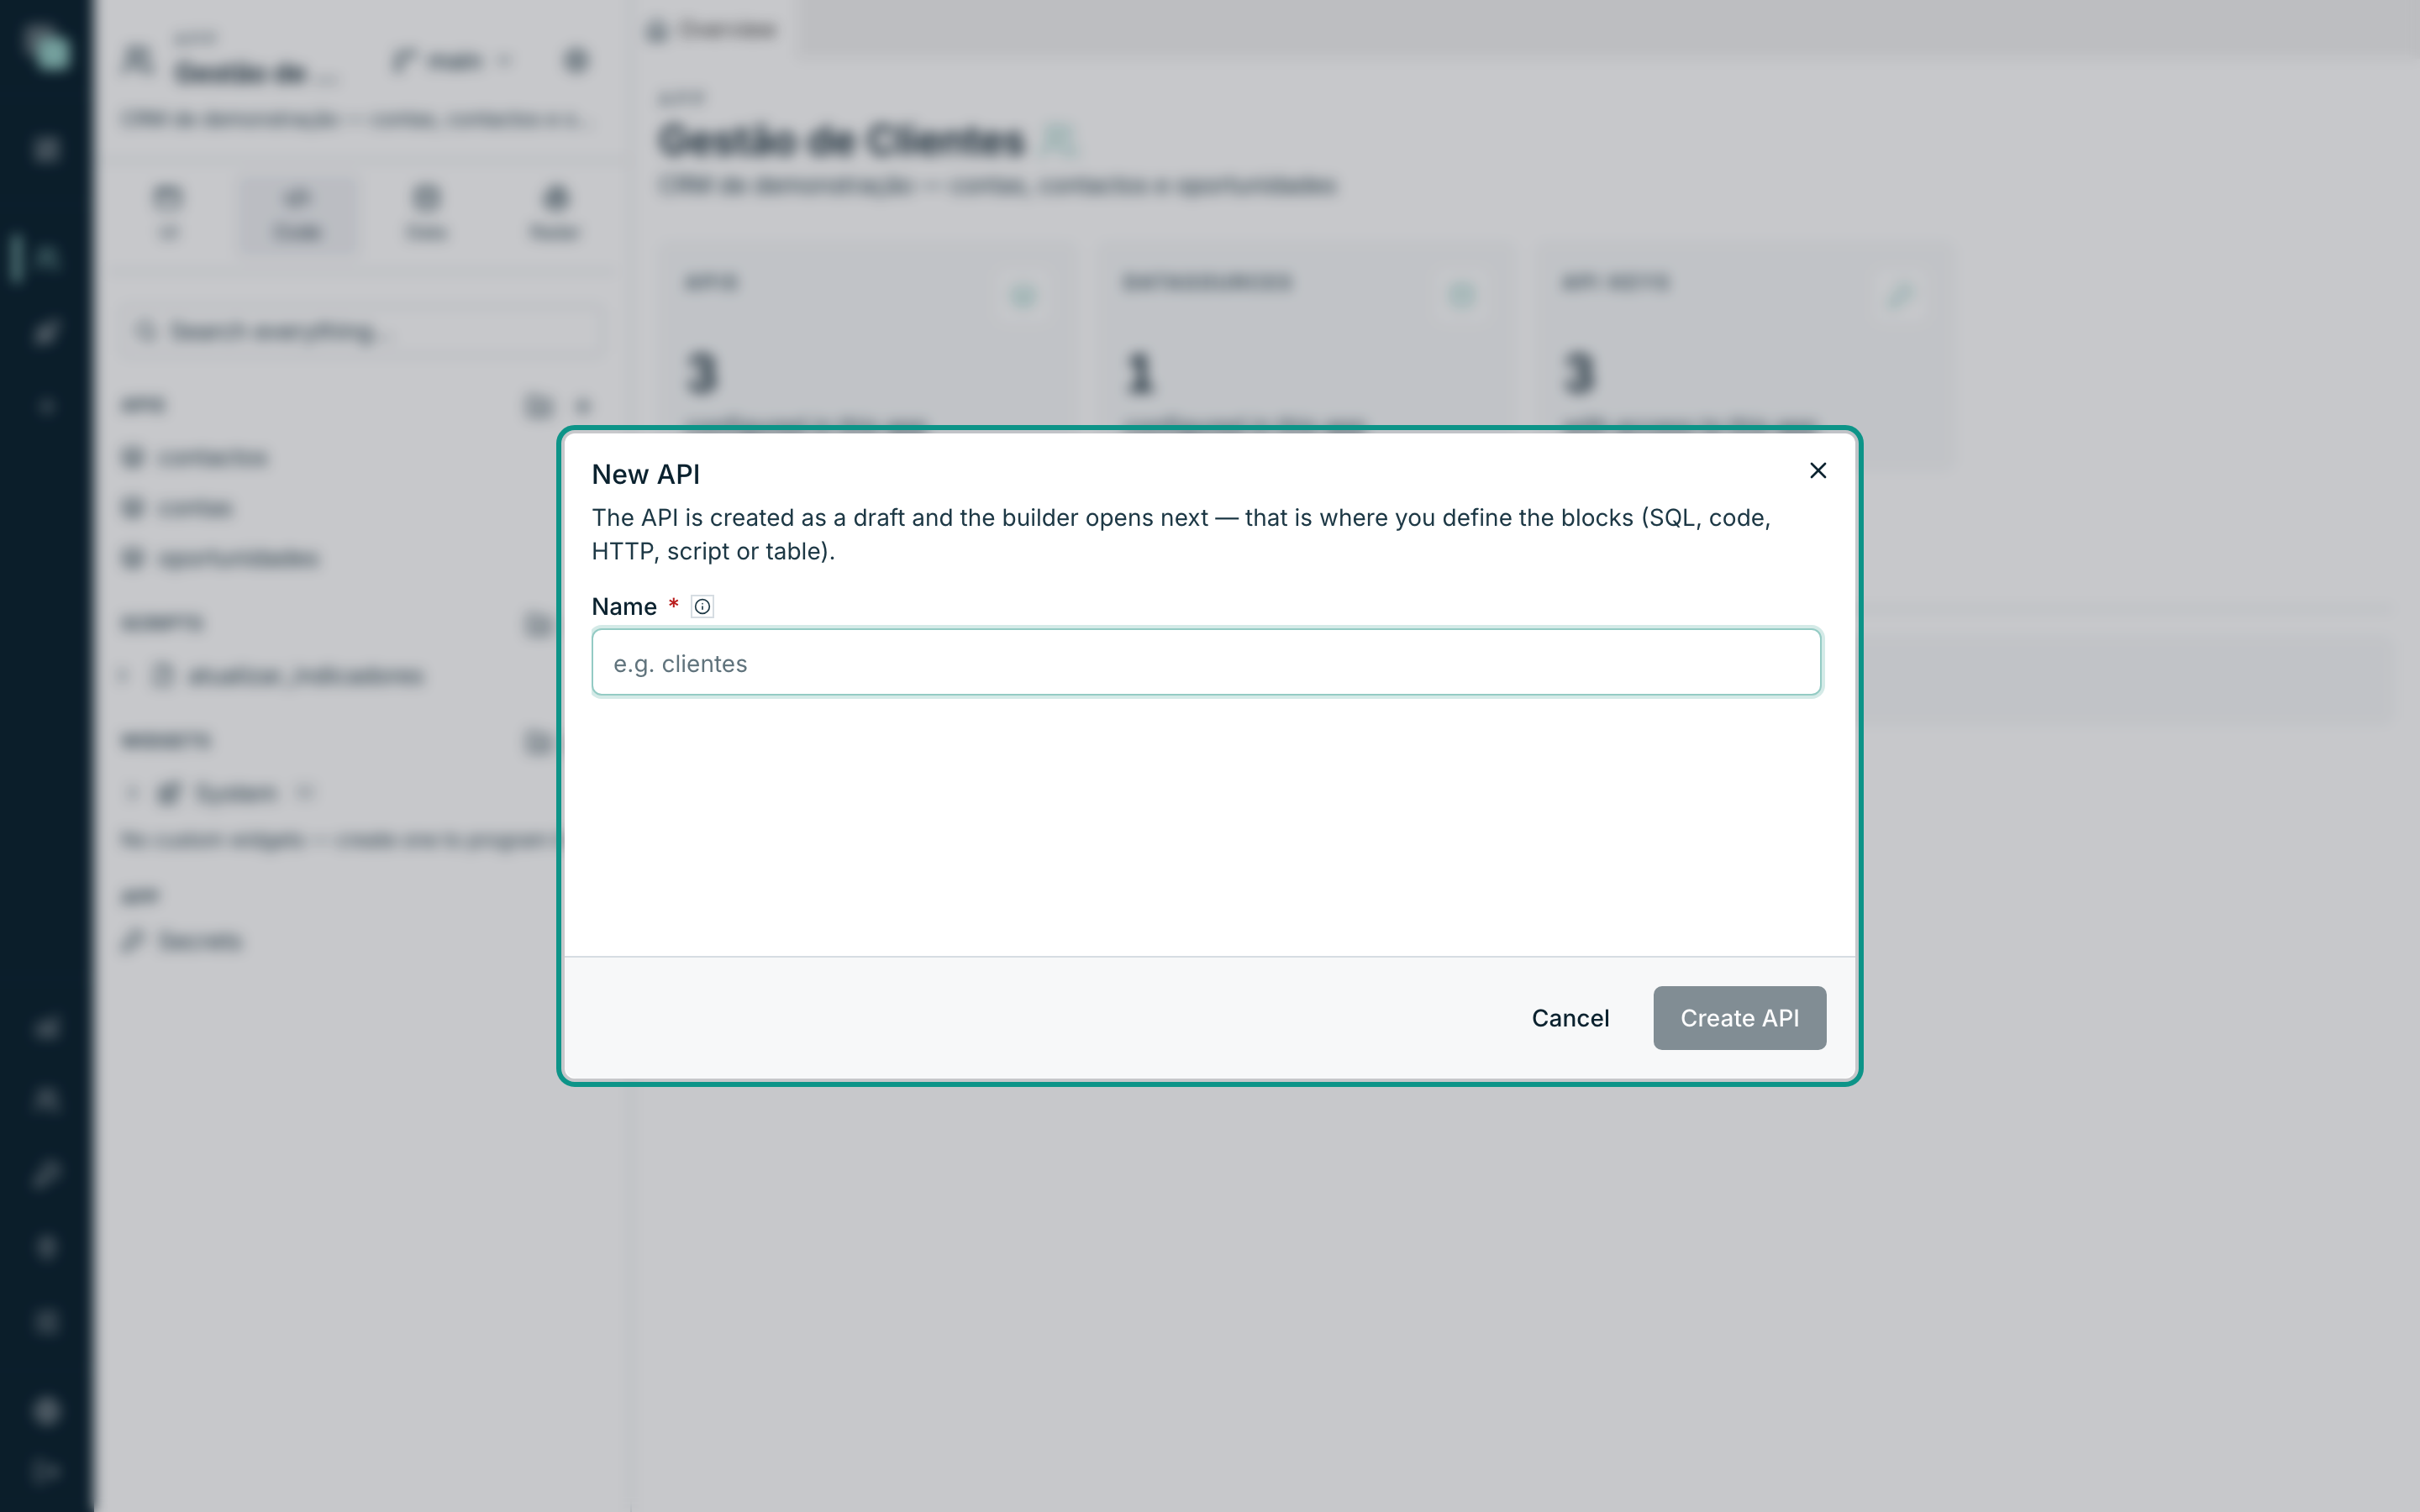
- In the Code panel, on the APIs row, click the + button (New API). The New API button on the overview page takes you to the same place: the app workspace.
- Give it a Name. The name is the GraphQL field the clients will call,
so follow the rule: letters, numbers and underscore, not starting with a
number — for example
getOportunidadesPorConta. - Click Create API. The API is born as a draft and the builder opens next — that is where you decide the nature (SQL, HTTP, script blocks or table).
Tip
If the API is going to be a Table one, do not use prefixes like get
or add in the name: the name is the BASE of the operations. On a table
API called contas, getContas, addContas, updateContas and
deleteContas are generated — according to the actions you enable.
The builder at a glance
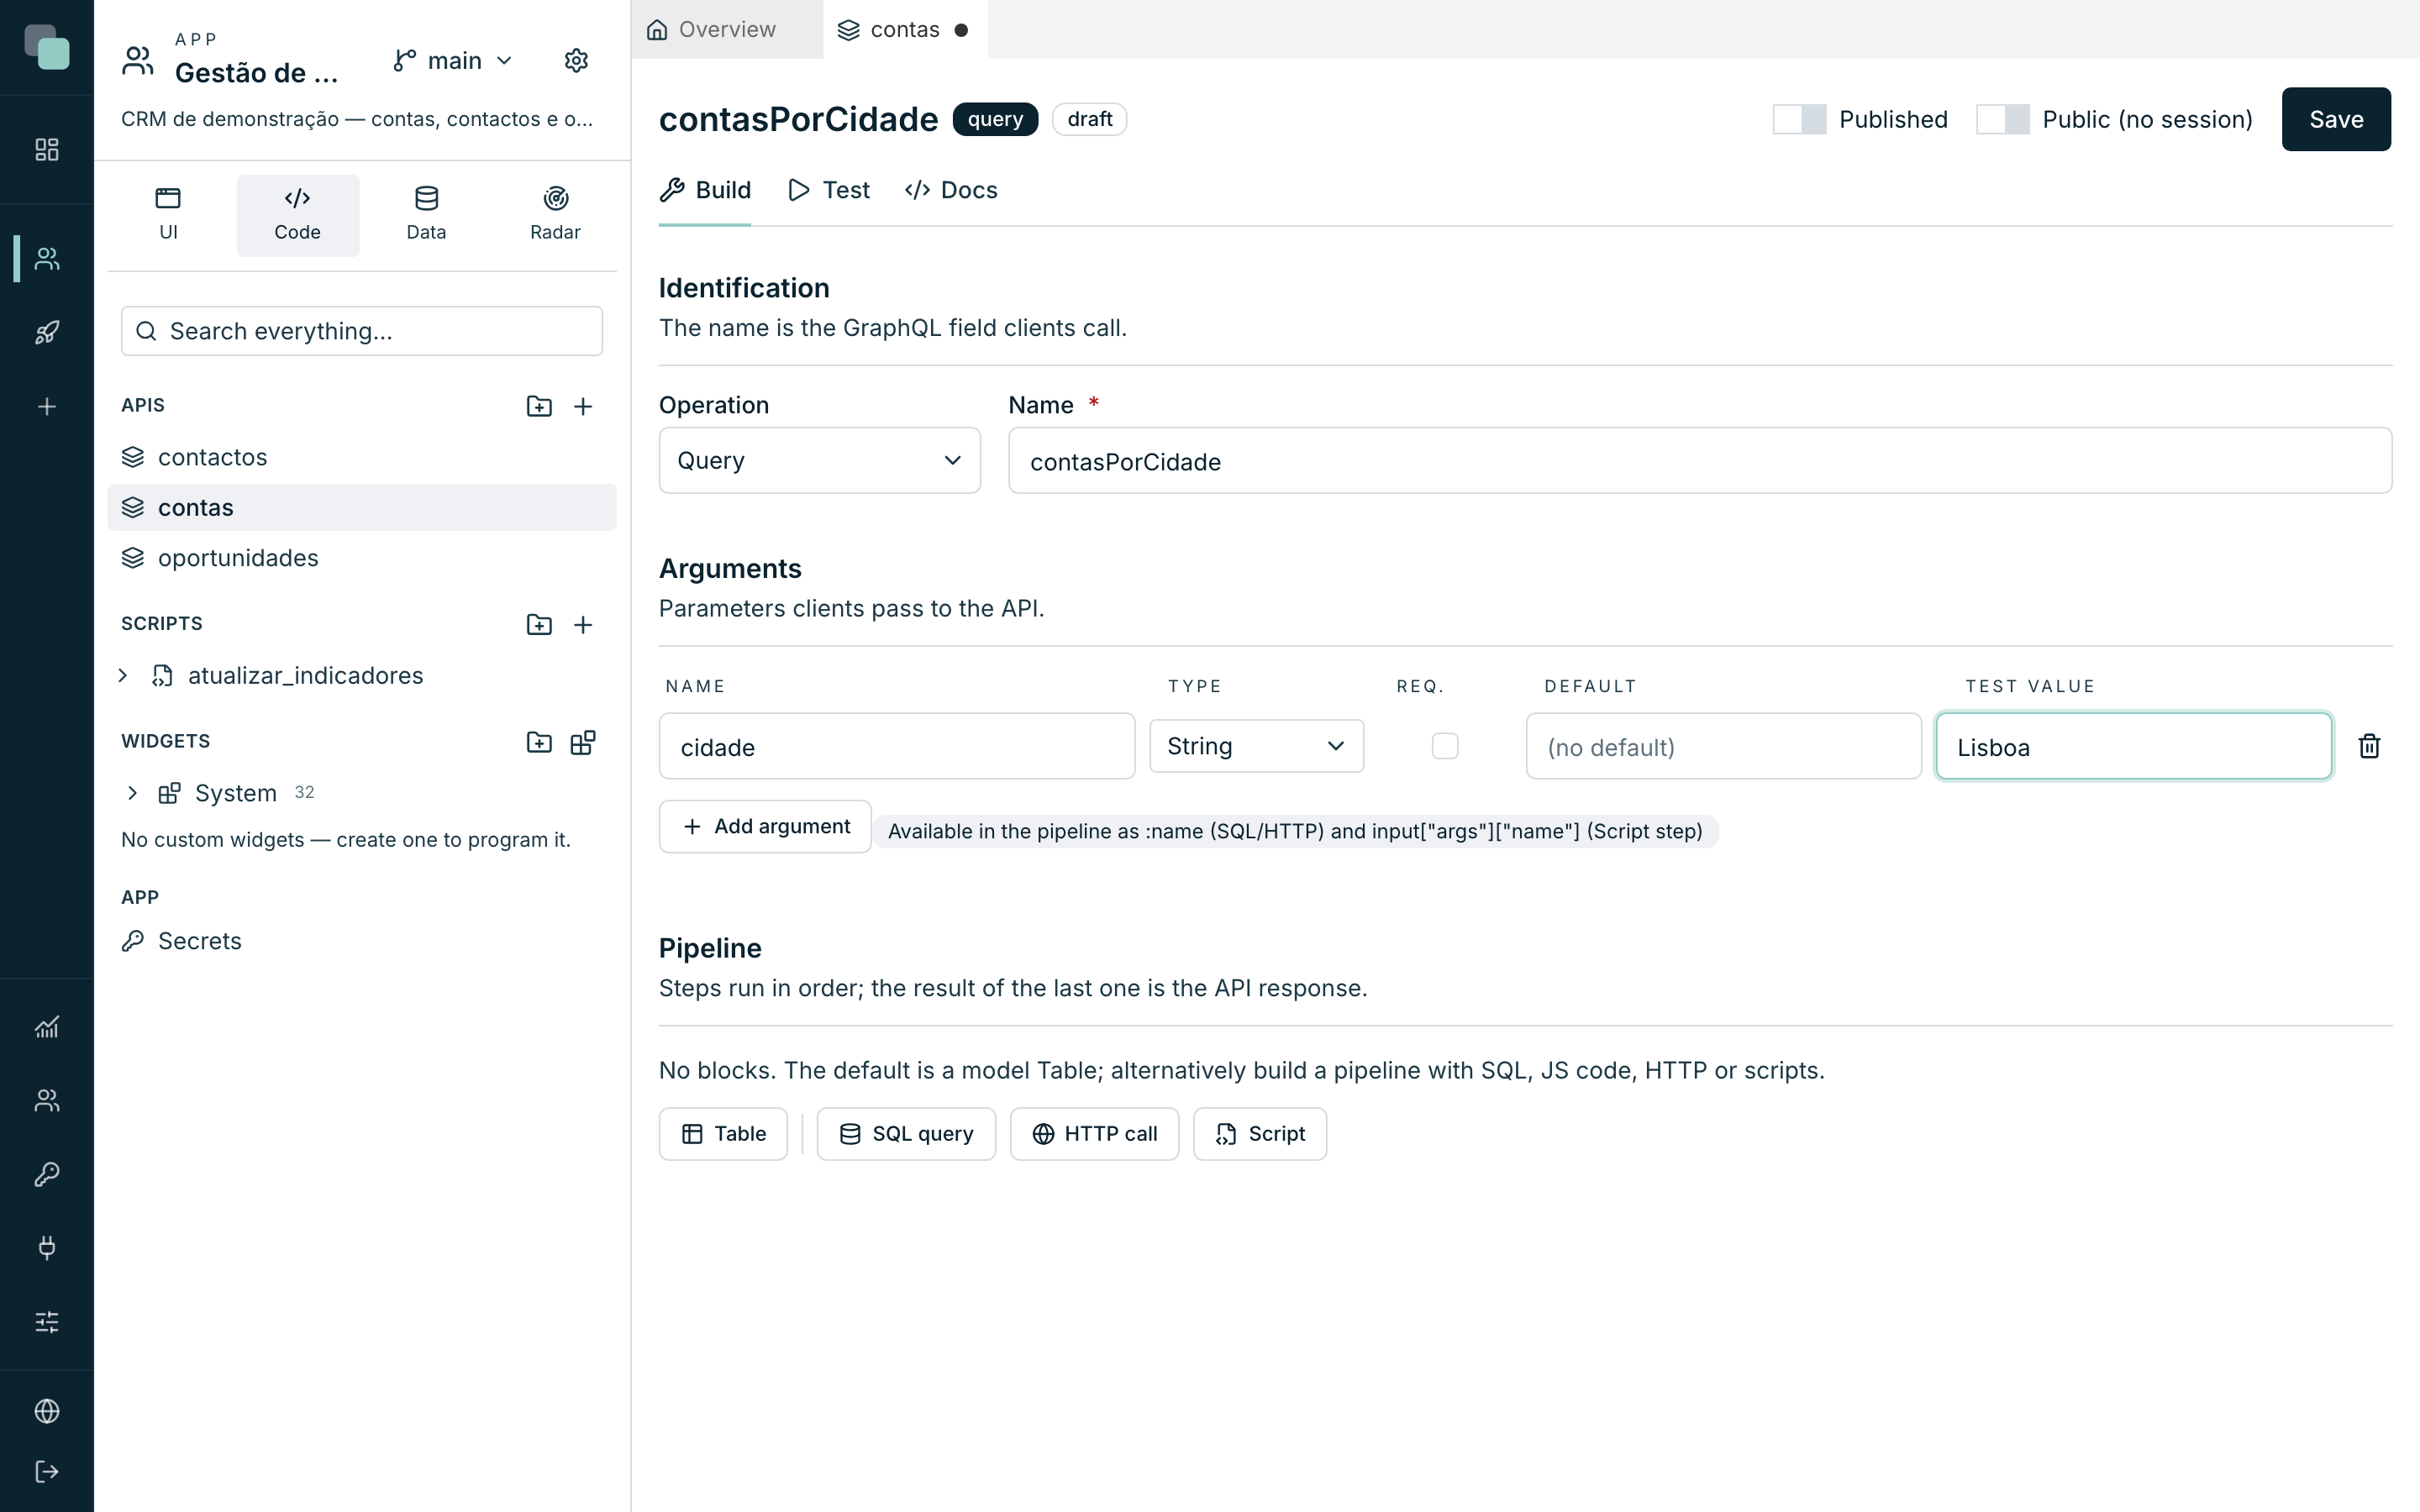
The builder's header shows the name, a badge with the type (query,
mutation or table) and the state (published or draft). On the
right sit the commands that apply to the whole API:
| Command | What it does |
|---|---|
| Published | Turns publishing on/off. A draft API is only visible to whoever builds; external clients do not see it. |
| Public (no session) | Makes the API reachable without a session or API key — for the app's public screens. See Public APIs. |
| Save | Saves the API as it is. Saving is always possible with a valid name and arguments — half-done work saves just the same. |
Underneath, the work splits into three tabs:
| Tab | What for |
|---|---|
| Build | Identification, arguments and the pipeline of steps. |
| Test | Running the draft pipeline and trying the API out as a client. |
| Docs | Ready-to-copy examples for calling the API from outside. |
Identification
In the Identification section you define:
- Operation — Query — reads data or Mutation — writes data. The choice is semantic and practical: mutations ask for confirmation before each test run, because they write for real.
- Name — the GraphQL field. If the name is invalid, the builder warns: "Simple camelCase: letters, numbers and underscore, not starting with a number."
On a Table API there is no operation choice — the operations derive from the CRUD actions you enable on the Table block.
Arguments
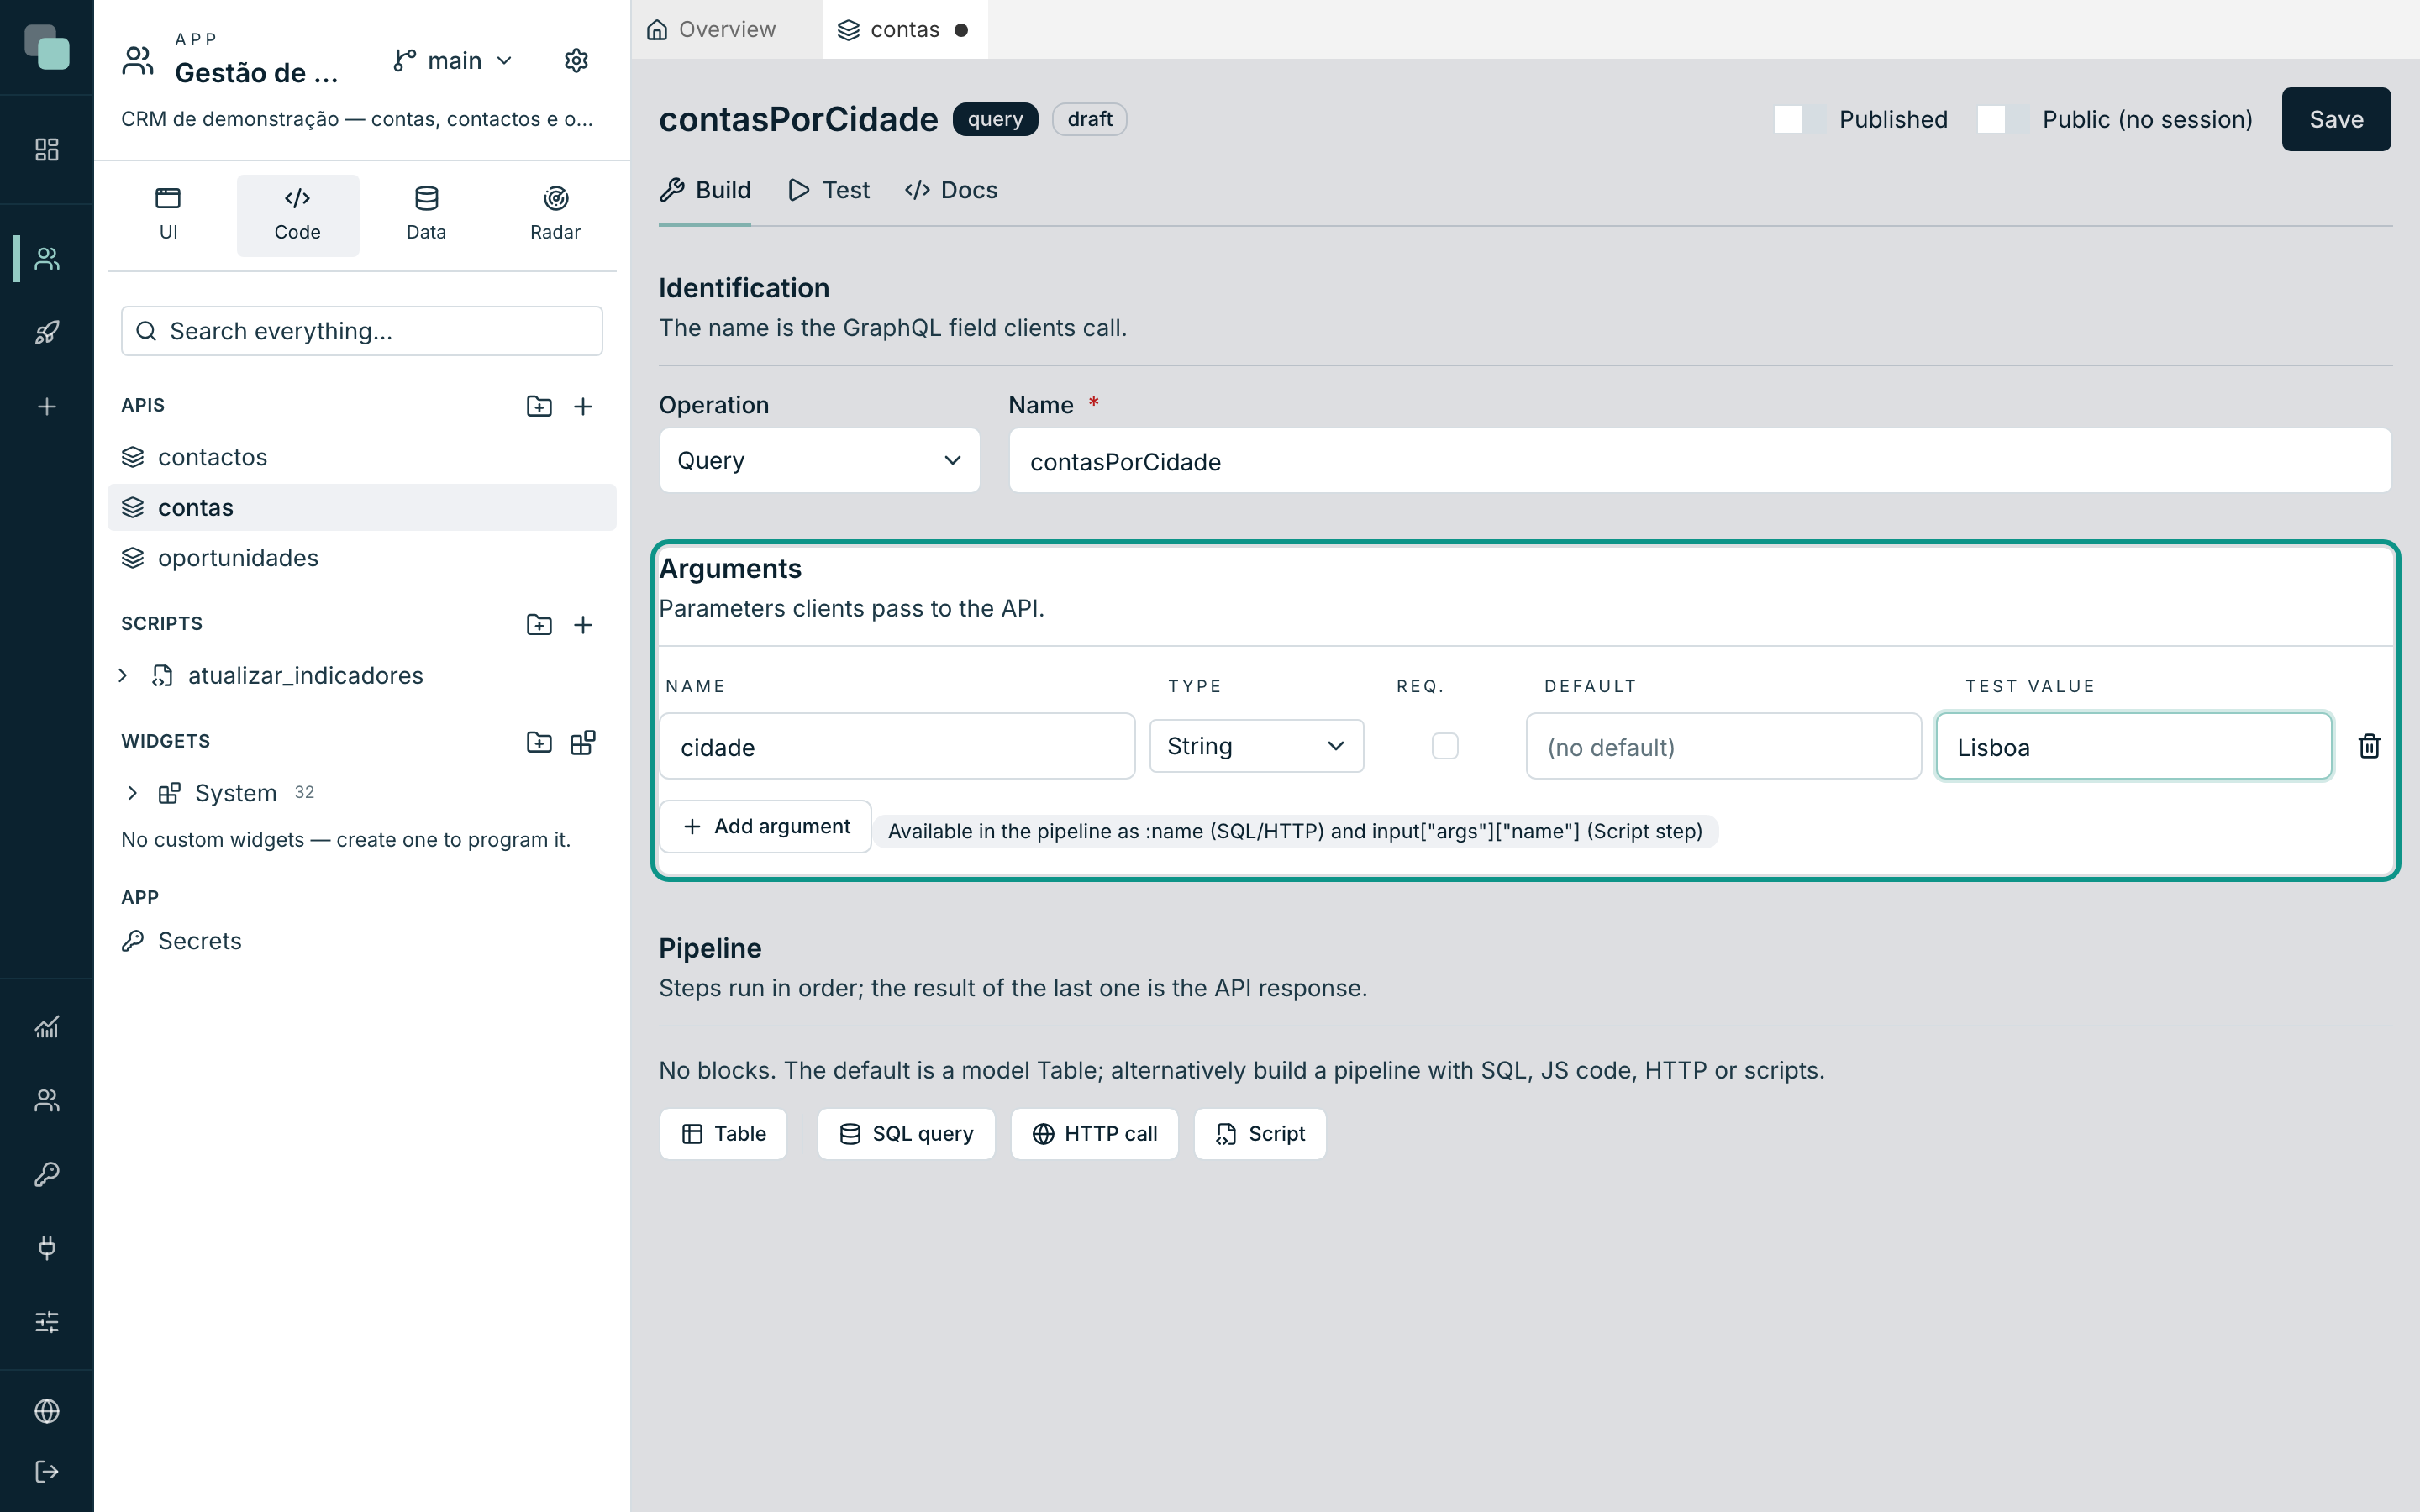
The Arguments section declares the parameters that clients pass to the API. Each argument has:
| Column | What it is |
|---|---|
| Name | The argument's identifier (letters, numbers, underscore; does not start with a number). |
| Type | One of: String, Int, Float, Boolean, ID, JSON, Upload. |
| Req. | Whether the client is required to send the argument. |
| Default | Value used when the client sends nothing. |
| Test value | Only for the Run button of the Test tab — it does not affect clients. |
Inside the pipeline, arguments are available as :nome in the SQL and HTTP
steps, and as input["args"]["nome"] in the Script step.
Tip
Write the pipeline first if you prefer: when you use :umNome in a step
without having declared it, the banner "Used in the pipeline but not
declared yet:" appears with one button per name — one click and the
argument is created.
Files as an argument (Upload type)
An argument of type Upload receives a file. In that case the Default
column gives way to the choice of storage: App default uses the
default storage; alternatively pick one of the storages configured in the
app settings (Storage section). That way, an API that receives invoices
and another that receives photographs do not have to keep the files in the
same place.
What happens when the API is called with a file:
- The file is saved in the chosen storage.
- In the pipeline, the argument stops being the raw file and becomes a
reference with
filename,mimeType,sizeand atoken— that is what a Script step receives ininput["args"]["nomeDoArg"]. - The app keeps the file's record, like any other file uploaded by the users.
For testing, the test value column turns into a file picker — choose one from your computer and click Run.
Warning
If the app has several storages and none marked as default, a call with
an Upload and no storage chosen is refused — the platform does not pick
one for you.
From the outside, the file is sent as a multipart variable of the GraphQL request (the standard GraphQL upload format); inside the platform, the screens handle that for you.
The pipeline
The Pipeline section is where the API takes shape. The rules are simple:
- The steps run in order; the result of the last one is the API's response.
- Each step (from the second on) can receive the previous one's result — the "receives the result of step N" badge reminds you.
- In the SQL and HTTP steps, the previous result sits in
:prev, and it accepts paths::prev.id,:prev.0.id. - You add steps with the SQL query, HTTP call and Script buttons; the Table button converts the API to the table nature (and does not combine with the other blocks).
While there are no blocks, the section suggests the path: the default is a Table of the model; alternatively, a pipeline is built with the steps described next.
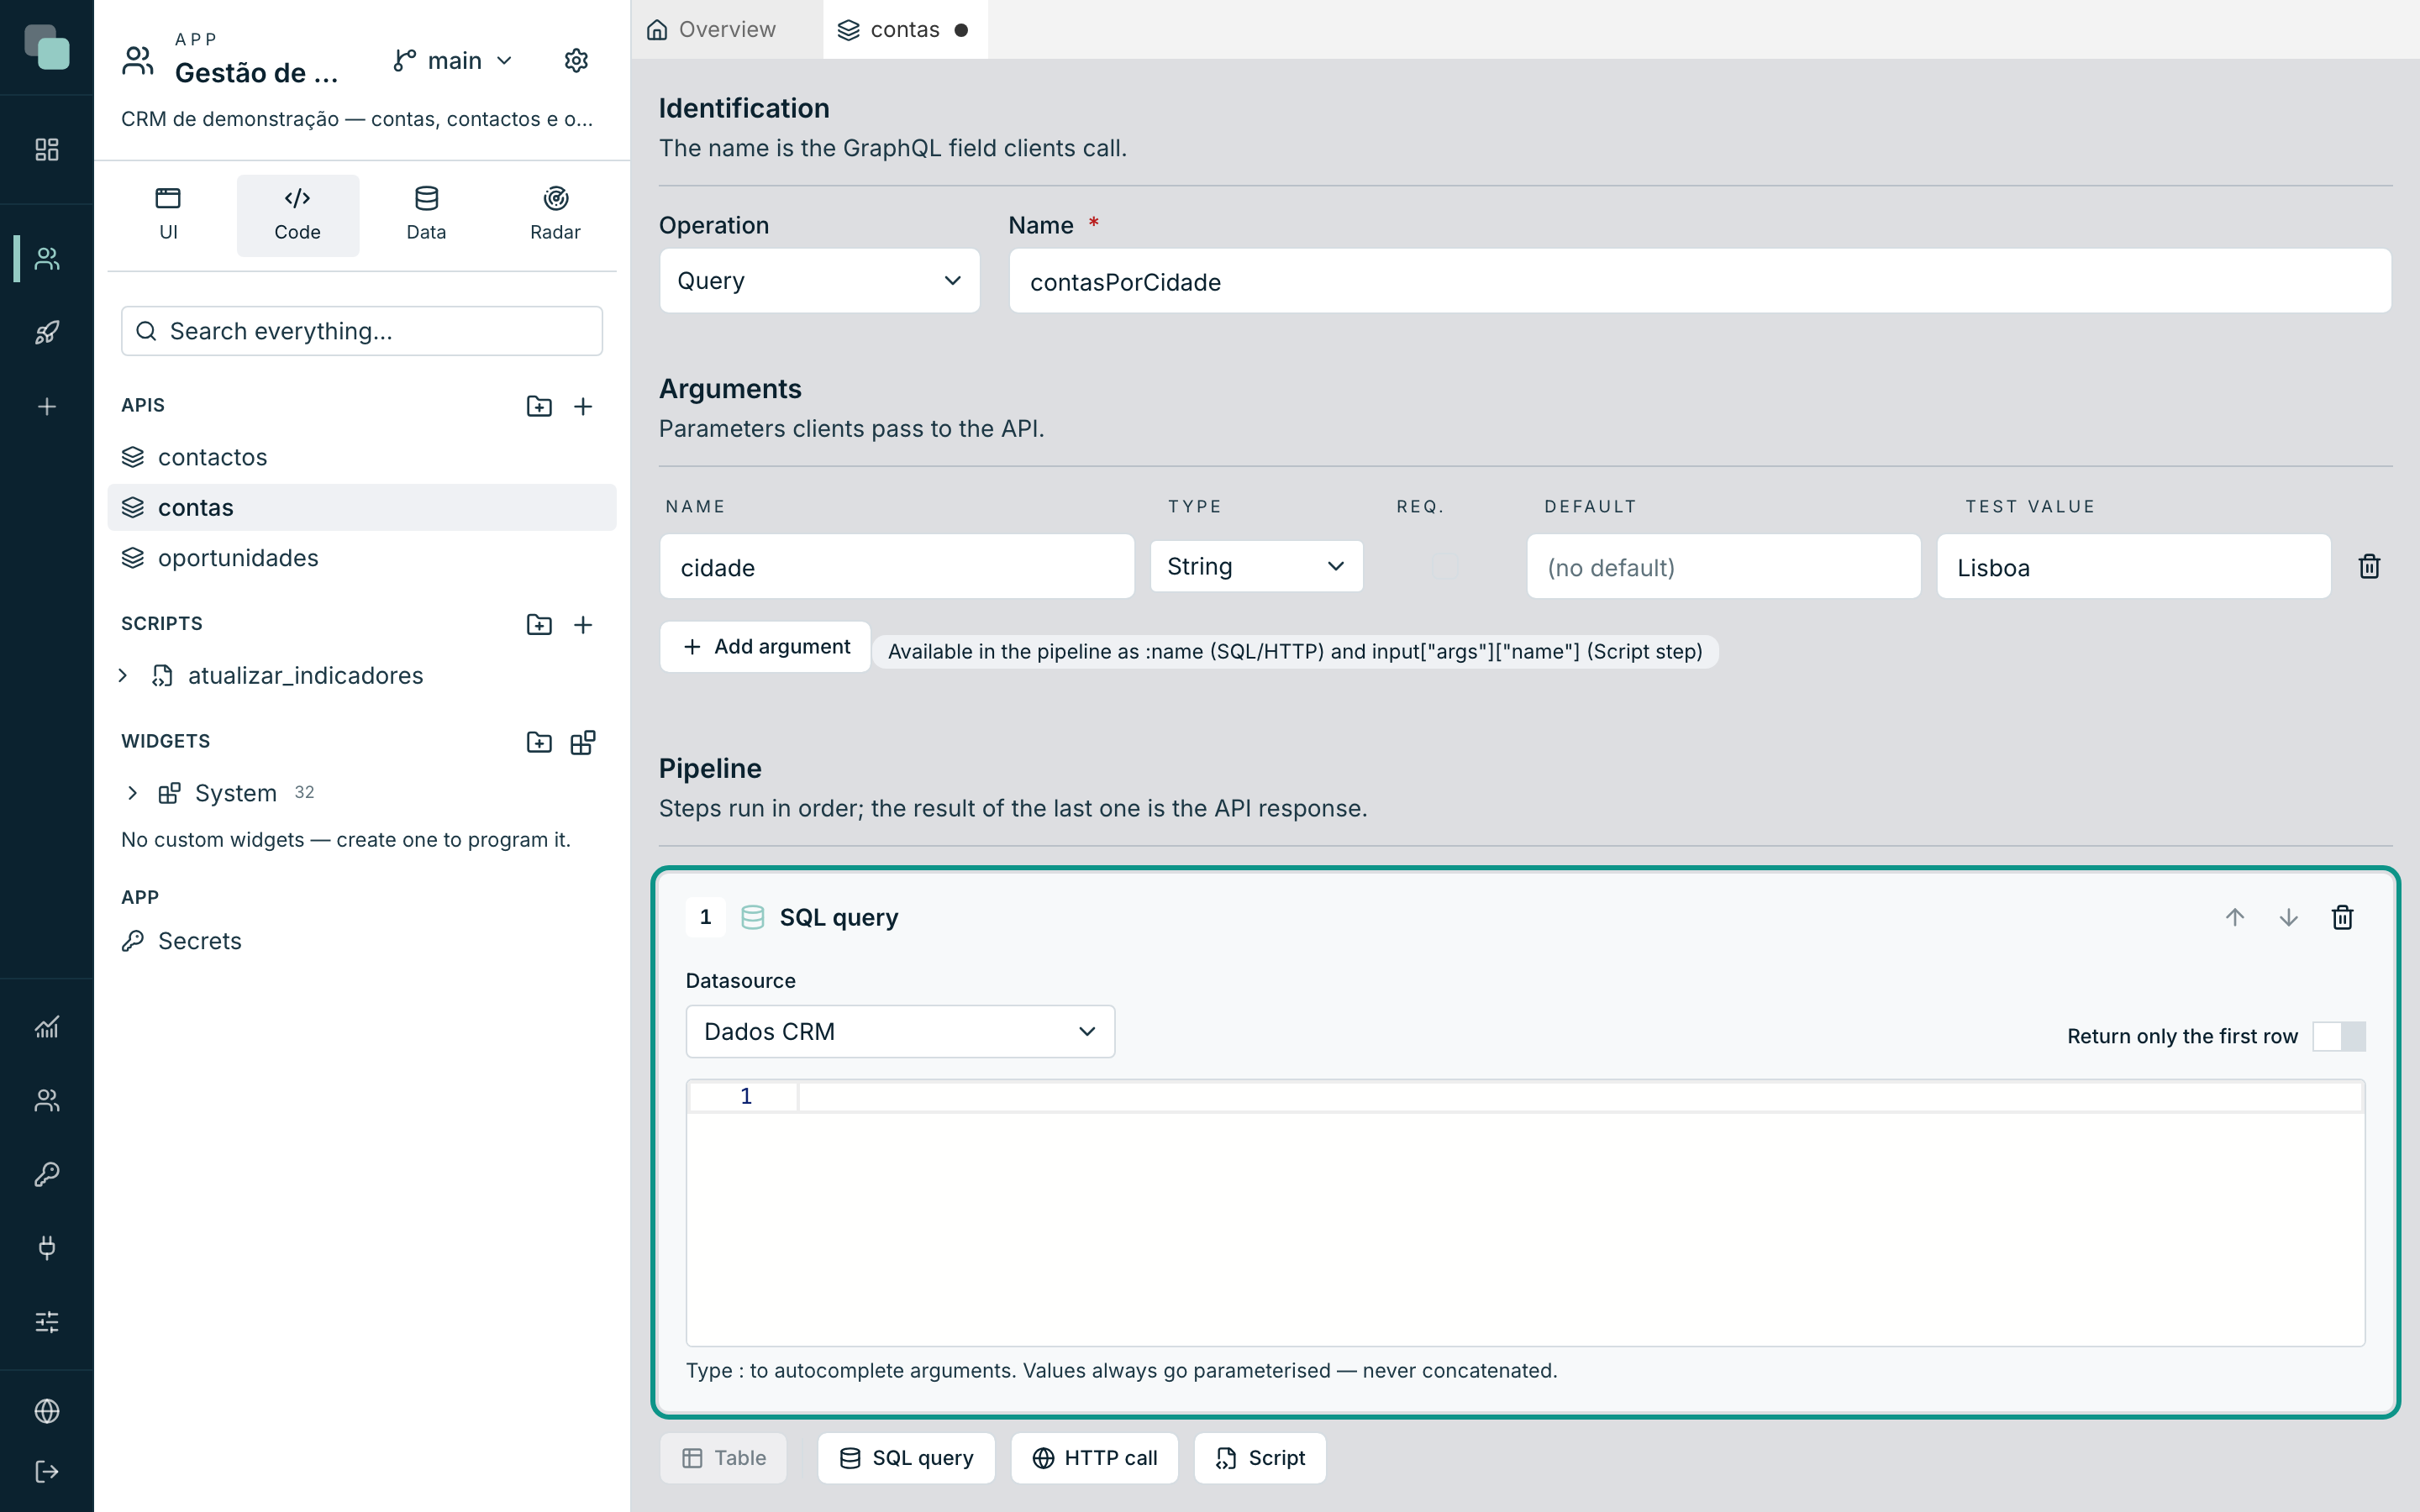
SQL query step
- Choose the Datasource — one of the databases registered in the app. With no datasources, the step shows the shortcut to create the first.
- Write the query in the editor. Type
:to autocomplete arguments; the editor knows the tables and columns of the chosen datasource and suggests them as you type. - If the query returns a single row by nature (a total, one record per key), switch on Return only the first row — the response goes from list to object.
The values of :argumento and :prev always go parameterized to the
database — never concatenated into the query text. That protects you from
SQL injection with no effort at all.
Tip
From the second step on, :prev also shows up in the autocomplete —
after a test run, the suggestions include the real paths of the previous
result (e.g. :prev.0.id). To transform large lists between steps, put a
code step in the middle.
A : is only an argument where the database reads it as one. Inside a
string (':x'), a quoted name, a comment or a PostgreSQL cast
(value::int), it stays as it is.
The step's SQL is saved formatted in the dialect of the chosen datasource.
Only spaces and line breaks change: words keep the case they had, and strings,
comments, casts and :name markers stay intact.
HTTP call step
For talking to external services:
- Choose the Method (GET, POST, PUT, PATCH or DELETE) and fill in the
URL — e.g.
https://api.exemplo.pt/clientes/:clienteId. - Add Headers with Add header — for example
Authorizationwith the valueBearer :token. - On the methods with a body, fill in the Body; switch on Send as JSON for the body to go with the correct content type.
:nomeDoArg and :prev are substituted in the URL, headers and body.
Each value is written for the place where it goes. In the URL it's
encoded (Silva & Filhos arrives as a single value). In a JSON body it gets
quotes and escapes: {"nome": ":nome"} stays valid even with quotes or line
breaks in the name, and outside quotes ({"id": :id}) a string gets the
quotes it's missing. A value at the start of the URL (the base,
:base/clientes) goes as it is.
The request waits up to 60 seconds for the response; after that the
step fails with "The service … didn't respond within 60 s". The step's
timeoutMs configuration field changes this time, up to 120 seconds.
Script step
The Script step runs a script of the app — the same logic you can run by hand or on a schedule, now as part of an API:
- Choose the Script from the list (the list shows each one's name and language; only active scripts appear). With no scripts, the step shows the shortcut to create the first.
- Decide whether the step Receives the result of the previous step — on the first step of the pipeline this switch does not apply.
The contract with the script is clear: the API's arguments arrive in
input["args"], the previous step's result in input["prev"], and the
value returned by the main(input) function moves on to the next step (or
is the response, if it is the last step).
Warning
If the chosen script has a high time limit, the builder warns you — the API's clients wait that long in the worst case. Pipelines with an interactive response deserve fast scripts.
Reordering and removing steps
Each step card has arrows to Move up / Move down and a bin to Remove step. Changing the pipeline invalidates the last test's result — hit Run again to see fresh results.
Testing without saving
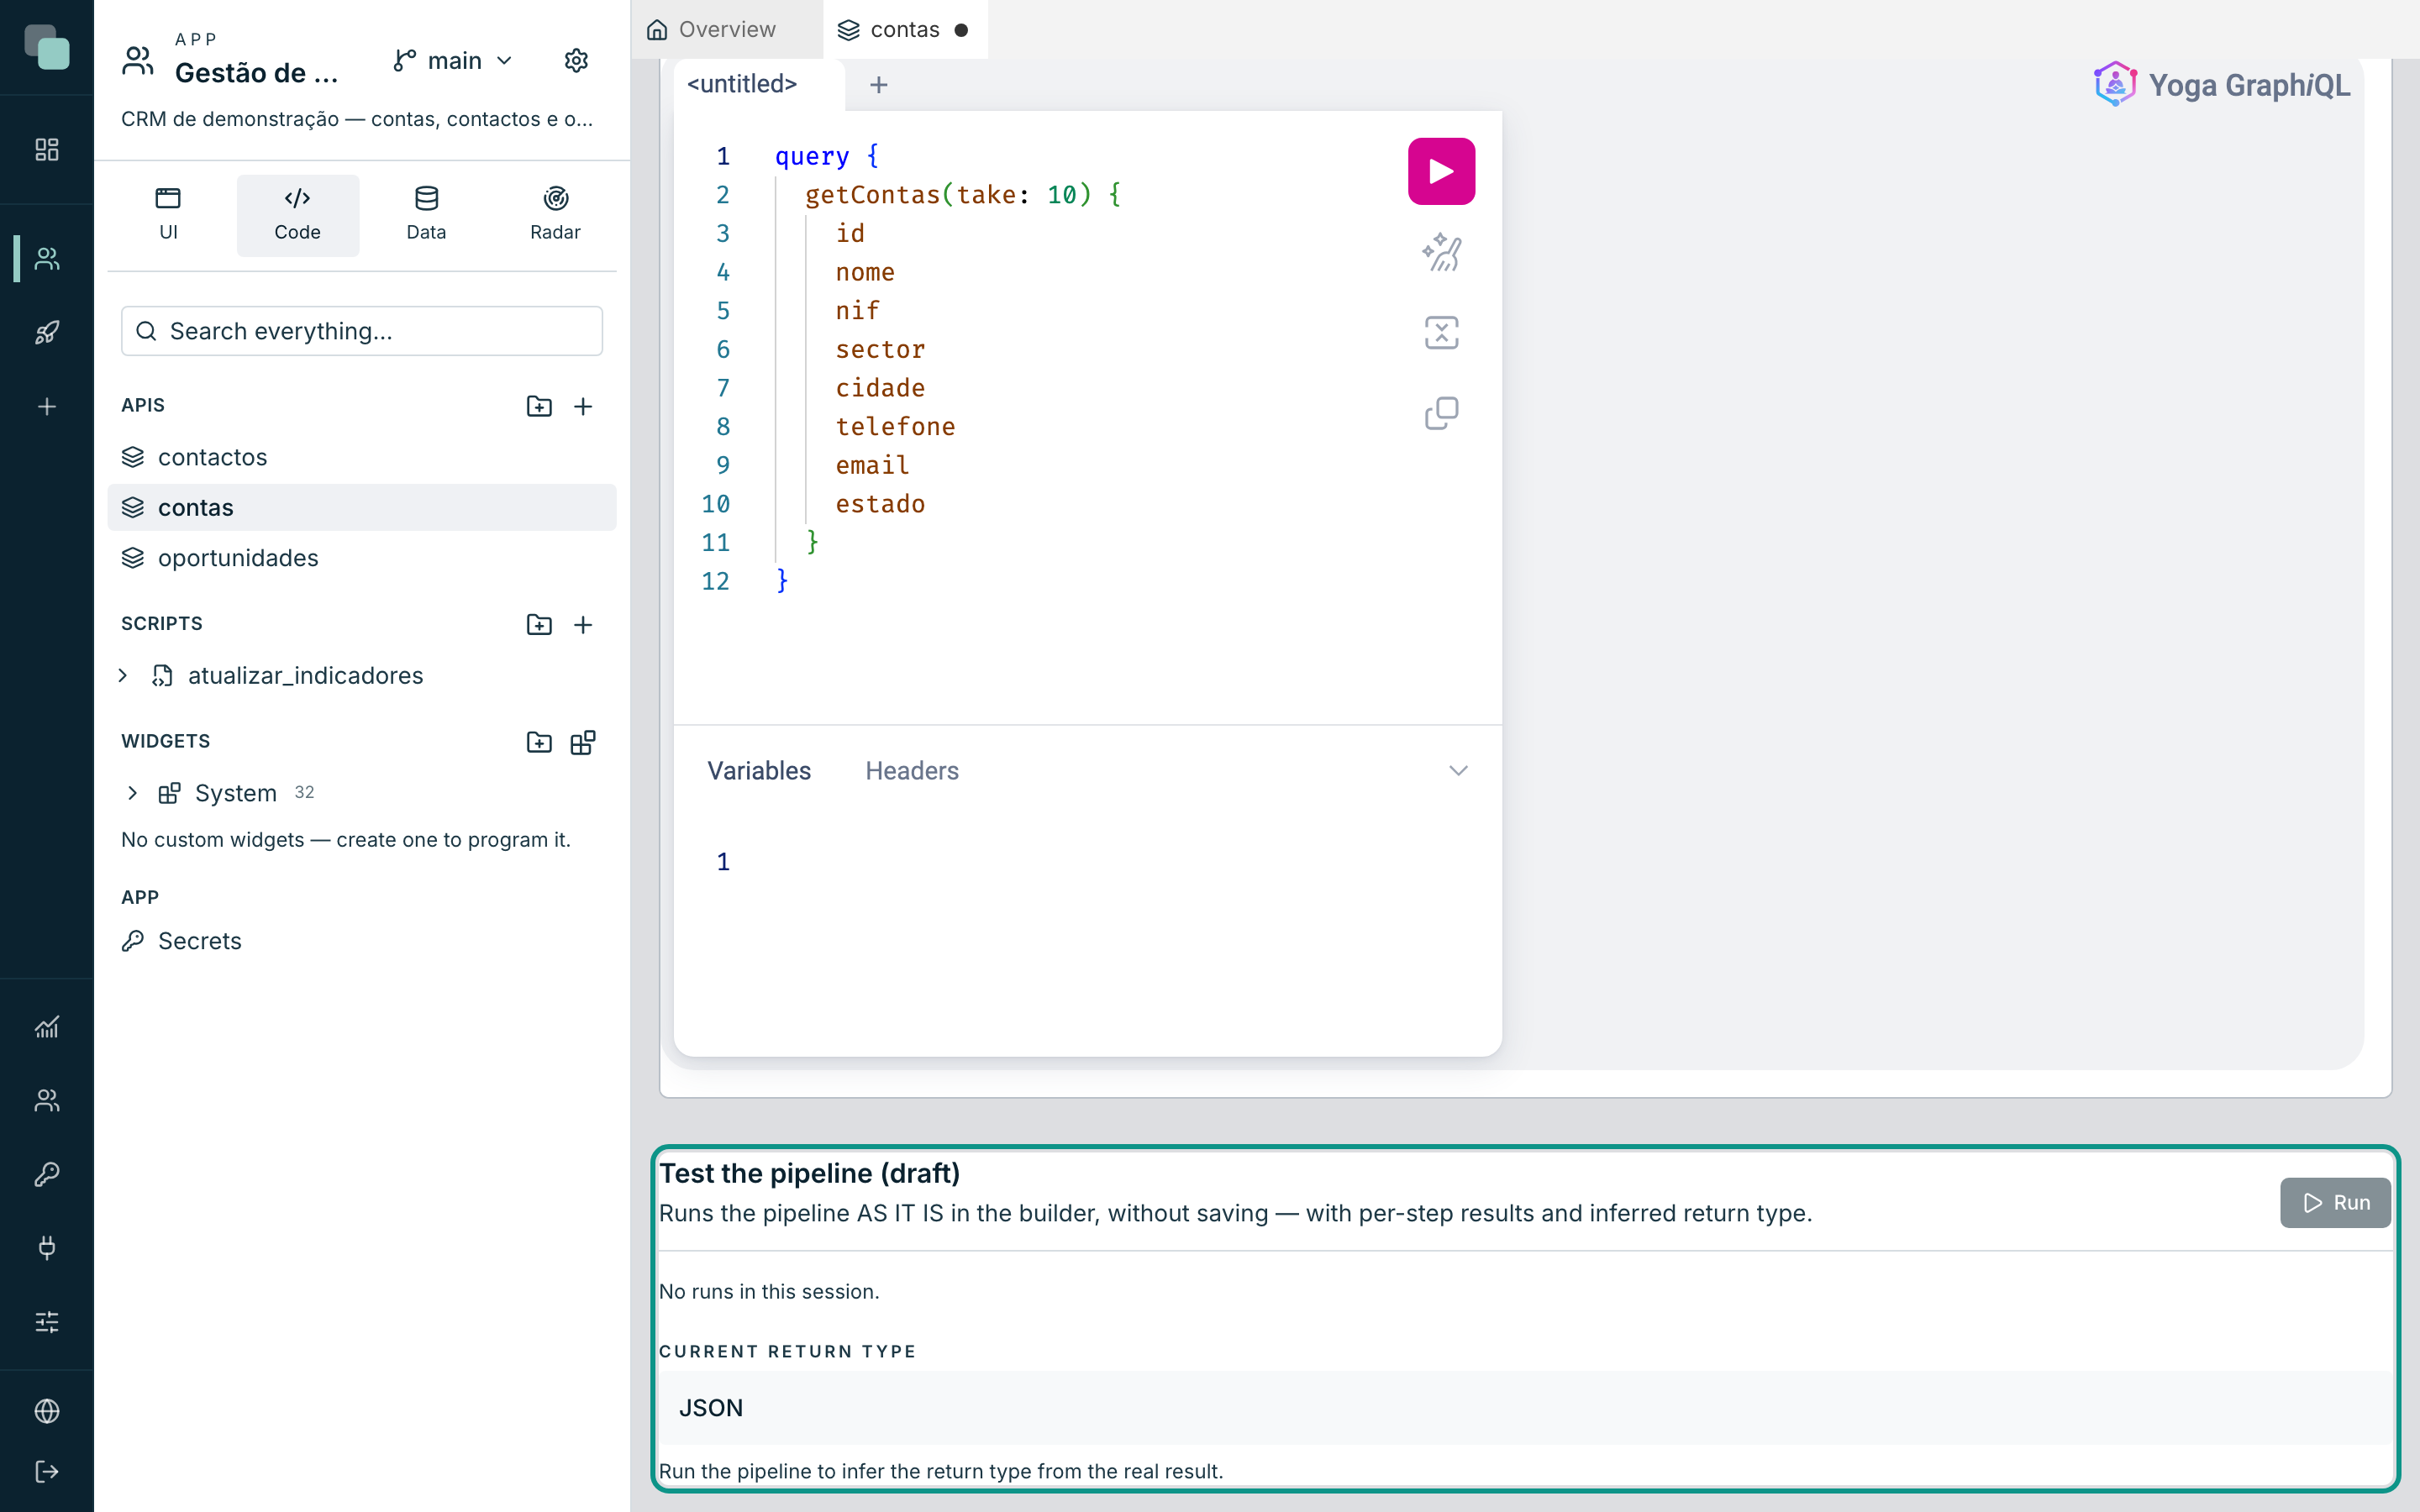
The Test tab has two tools. The first, Test the pipeline (draft), runs the pipeline EXACTLY AS IT IS in the builder, without saving:
- Fill in the arguments' test values (in the Arguments section).
- Click Run. On a mutation, the builder asks for confirmation — "Run the mutation now?" — because the test runs for real against the datasources and a mutation makes true writes.
- Read the result: the Success/Error badge with the duration, the
full Response (very large responses appear truncated), and with more
than one step, the Result per step — each step with an
ok/errobadge, so you see exactly where the pipeline broke. - If the steps wrote logs (a script that prints, for example), they appear in the Logs block.
The return type
The return type is the shape of the response in the GraphQL schema — it is what tells clients which fields they can select. The builder infers it from the real result: after each run see the Return type (inferred) block. If it differs from what is stored, the warning "This return type is not saved yet" appears with the Save return type button — and an amber dot on the Save button reminds you of the same.
Note
With no run at all, the tab shows the Current return type (the stored one). Run the pipeline to infer the return type from the real result — especially after changing the SQL or the script.
Trying it out as a client
The second tool of the Test tab is an interactive GraphQL environment pointed at the app's endpoint — you write operations, get schema autocomplete and see the responses. As you are authenticated, drafts show up too. The Open in window button opens the same environment in a browser tab. The details sit in the next chapter, in The GraphQL API of the model.
Publishing
The Published switch controls who sees the API:
- Draft — only whoever builds sees it (in authenticated sessions, the operations appear marked as draft). External clients and app users do not see it, not even by listing the schema.
- Published — it enters the schema for every client with access.
To save as published, the API has to be complete. The builder shows the blockers next to the header — for example "Step 2: the SQL is empty." or, on a table API, "To save as published, choose the table and at least one CRUD action." These warnings never prevent Save as a draft: they only prevent publishing.
Note
Deleting a published API takes the operation out of the schema immediately — the clients that called it start receiving errors. The platform warns you first: the deletion is permanent.
The generated documentation (Docs tab)
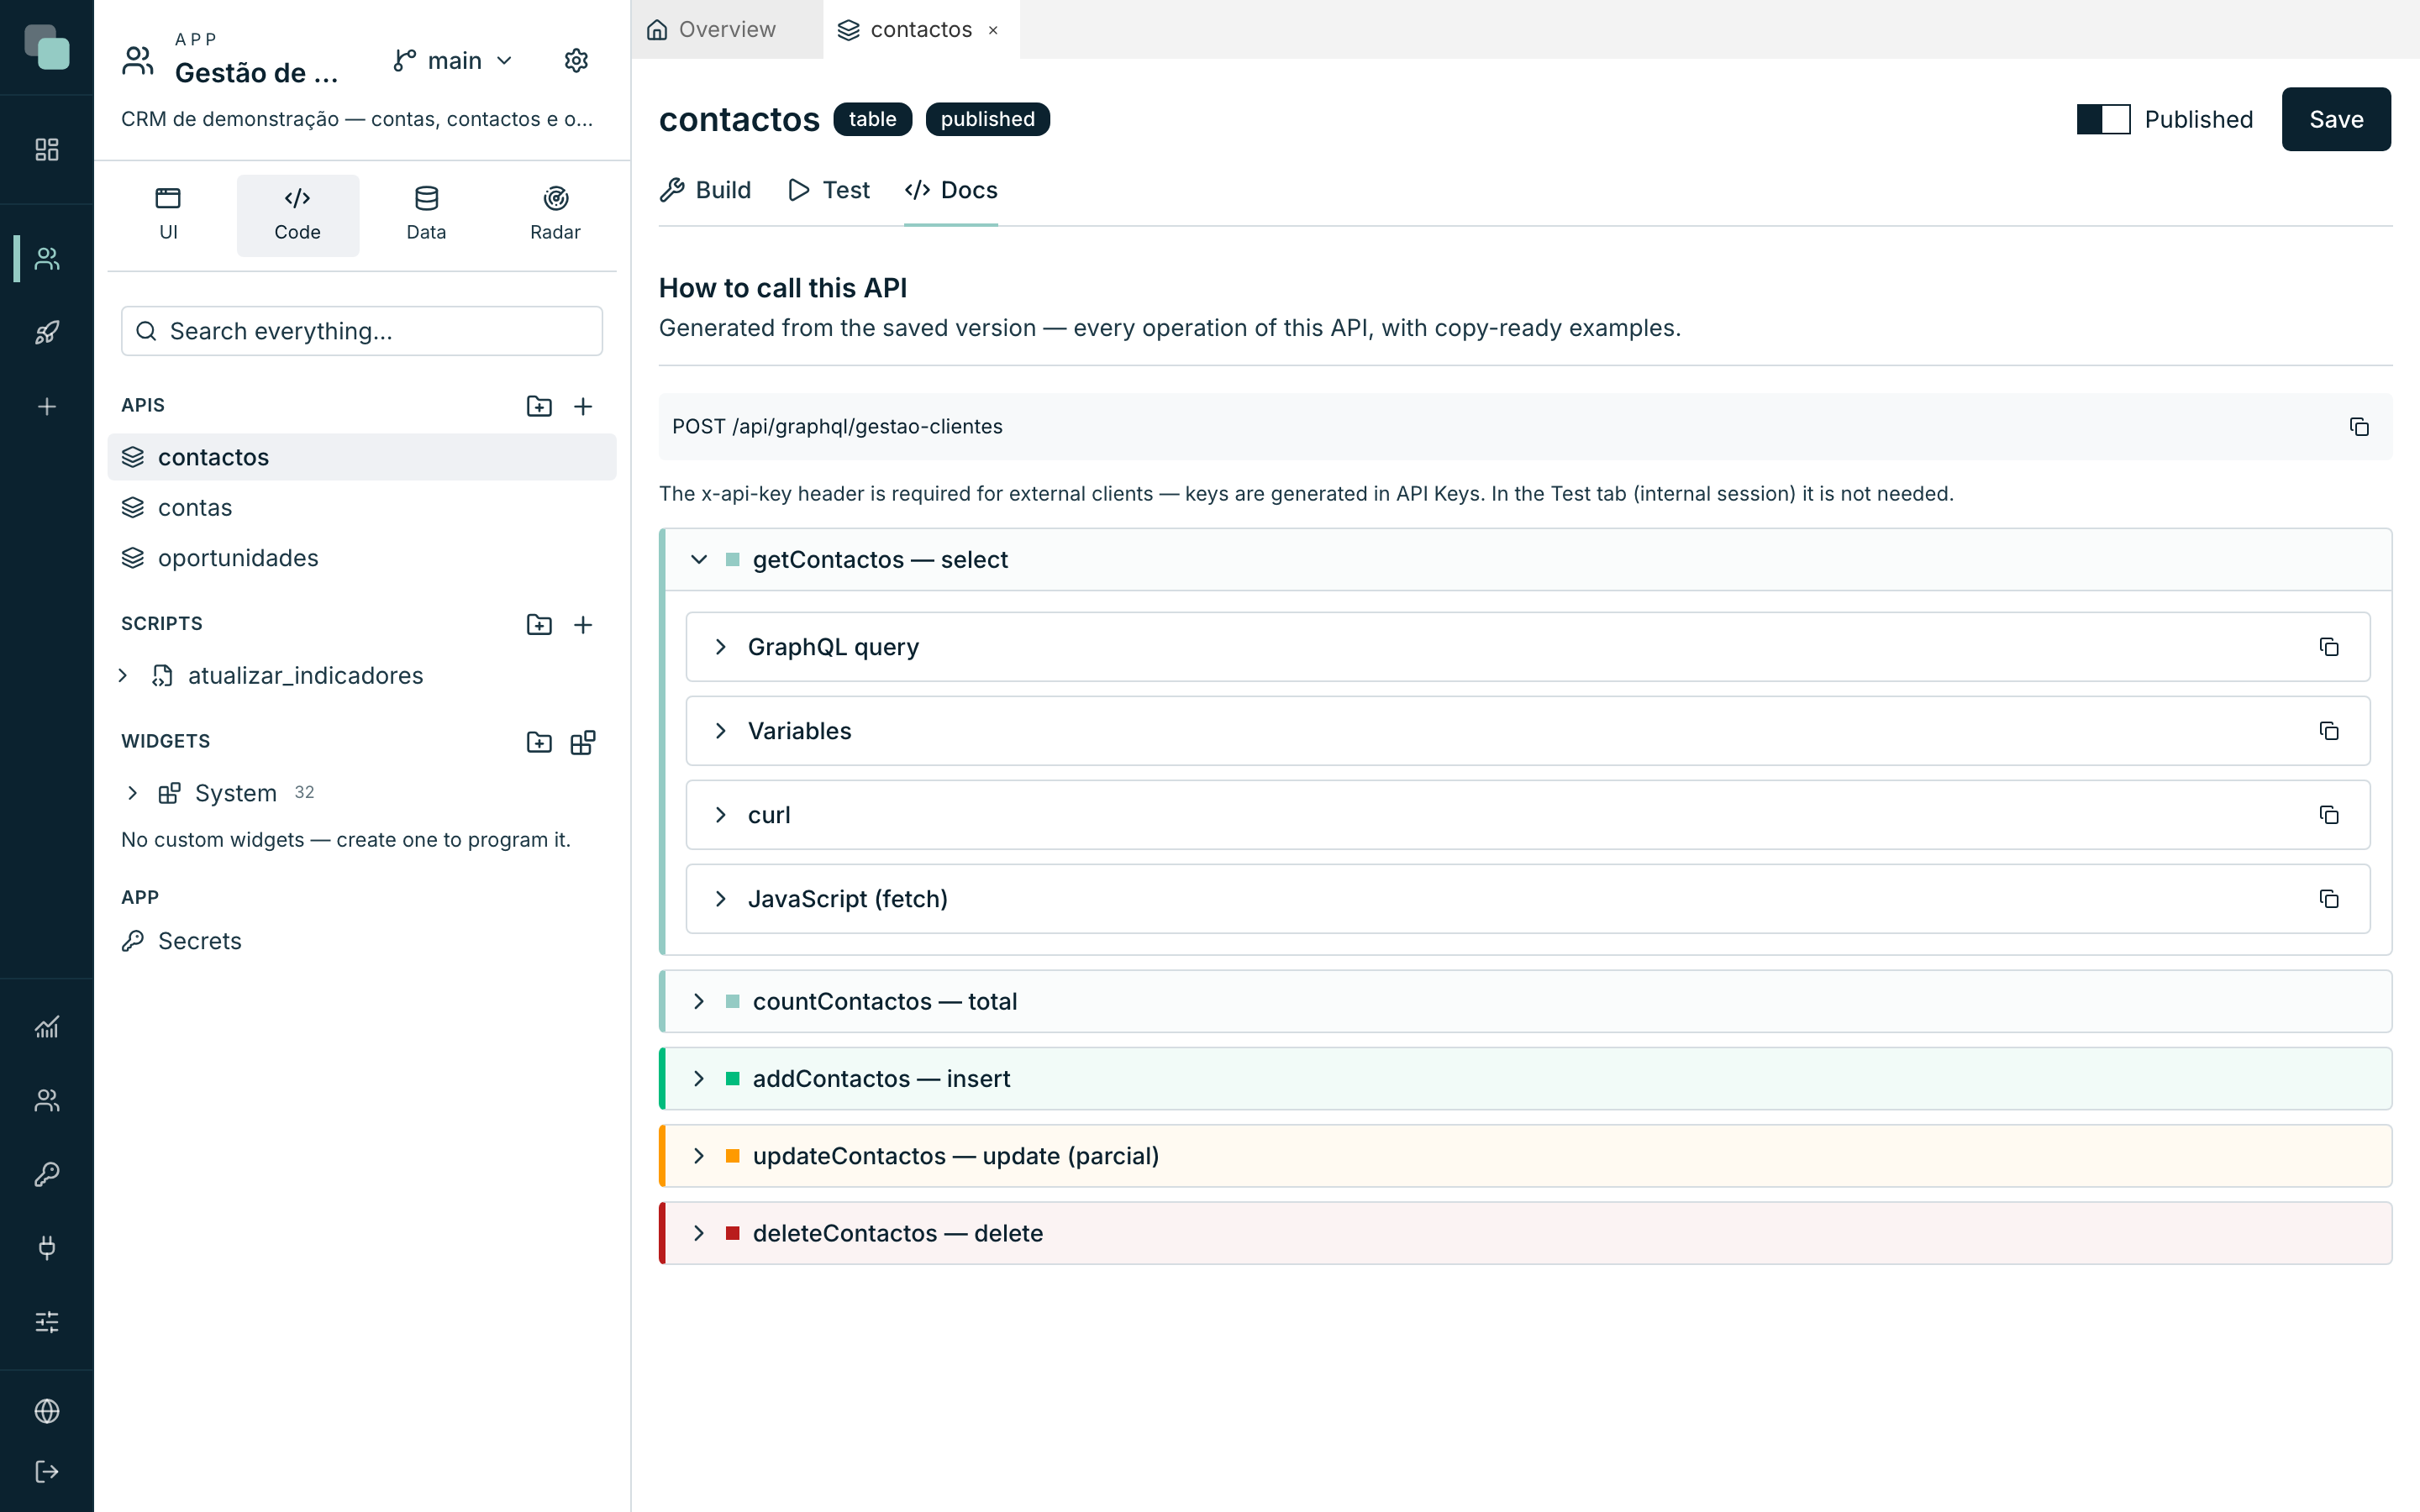
The Docs tab answers the question "how do I call this from outside?". It is generated from the saved version — save the API first — and shows:
- The endpoint (
POST /api/graphql/gestao-clientes), with a copy button. - The authentication note: the
x-api-keyheader is required for external clients — keys are generated in API Keys. On the Test tab (internal session) it is not needed. - One entry per operation of the API with four ready-to-copy blocks: GraphQL query, Variables, curl and JavaScript (fetch). On a table API, every active operation appears (get, count, add, update, delete).
Why doesn't…?
- Why can't I publish? The pipeline is not complete yet — read the blockers next to the header: each missing step is listed with the number and the reason.
- Why does Run ask me for confirmation? The API is a mutation: the test makes true writes. Make sure you are pointing at test data.
- Why don't I see my new API in the GraphQL test environment? Save first — the environment answers about the saved version. Saved drafts appear (you are authenticated); for external clients, only when you publish.
- Why can't I add a SQL step to a Table API? A Table API does not combine with other blocks — remove the Table block first (or the steps, the other way around).