The data model
Create the app's database, the three CRM tables and the model with the relations that the rest of the platform is going to use.
The Customer Management app exists and it is empty. This stage gives it its
foundation: the database where the records live, the tables contas,
contactos and oportunidades, and the model that ties everything together
— the map that the APIs, the screens and the scripts will read from now on.
By the end of this page you have real data: three tables created, linked to each other, and a console where queries return rows.
Two layers, and it is worth not confusing them
Keplin works with data in two overlapping layers. They do different things and are handled in different places:
| Layer | What it is | Where it is handled |
|---|---|---|
| Datasource | The database itself — the connection, the tables, the columns, the rows. | Data panel ▸ Datasources |
| Model | The portrait of that database inside the platform: entities, fields with friendly names and relations. | The datasource tab, in the model canvas |
The distinction is practical. Creating a column changes the database. Importing a table into the model changes nothing in the database — it only tells the platform "this table matters to me, and this is how it reads". It is the model that feeds the app's GraphQL API, the table APIs and, through them, the screens.
Note
In this guide the database is created from scratch, inside the app. If your organization already has a database with the customers in it, the path is the same from the step "Importing the tables into the model" — register the connection and import the tables that exist. The chapter Connecting databases covers that case.
Creating the Dados CRM datasource
The first step is to register the app's database. As we are not connecting anything external, we use the type that the platform creates and stores with the app itself: it asks for no server, port, user or password.
In the app workspace, choose the Data panel at the base of the sidebar.
In the Datasources section, click the + button (New datasource). The New datasource dialog opens — "Connect a database to this app. Everything is encrypted at rest."
In Internal name, type
Dados CRM. It is by this name — exactly this one — that the APIs and the scripts will refer to the connection further along the guide.Open the Type list. It shows every supported engine; choose the local database, the one that is stored with the app. Notice what happens next: the server, port, user and password fields disappear — there is nothing to connect to.
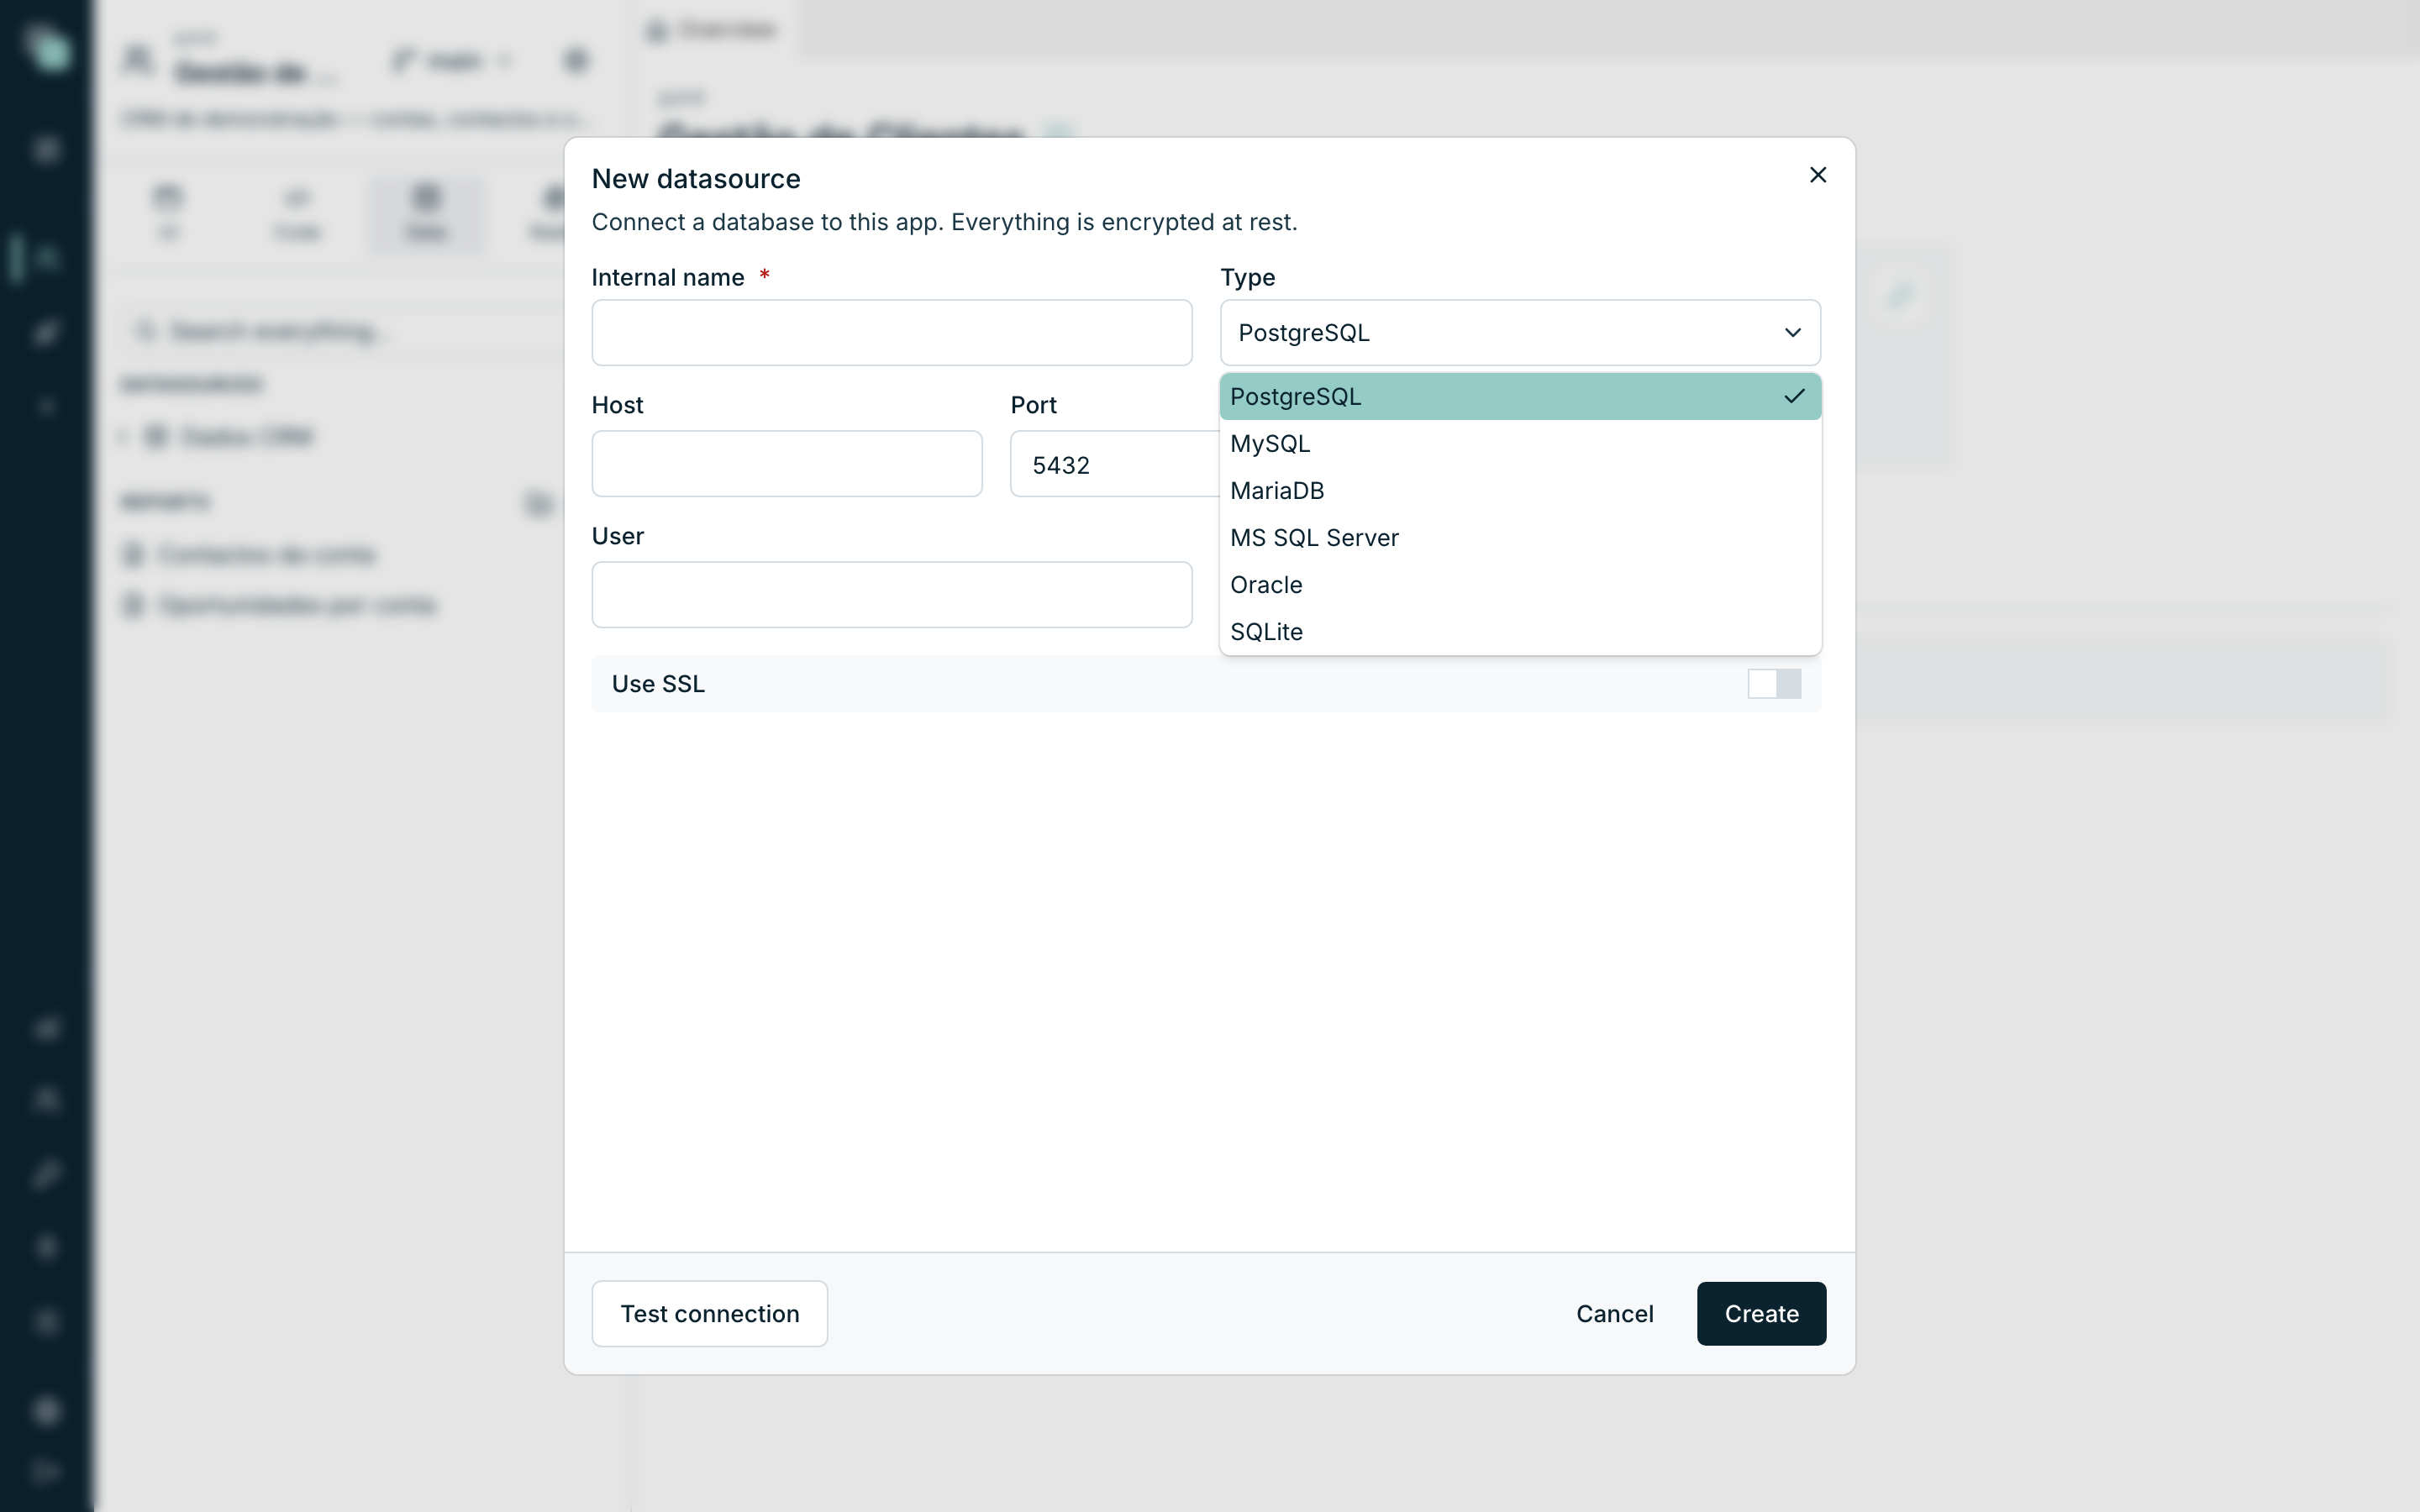
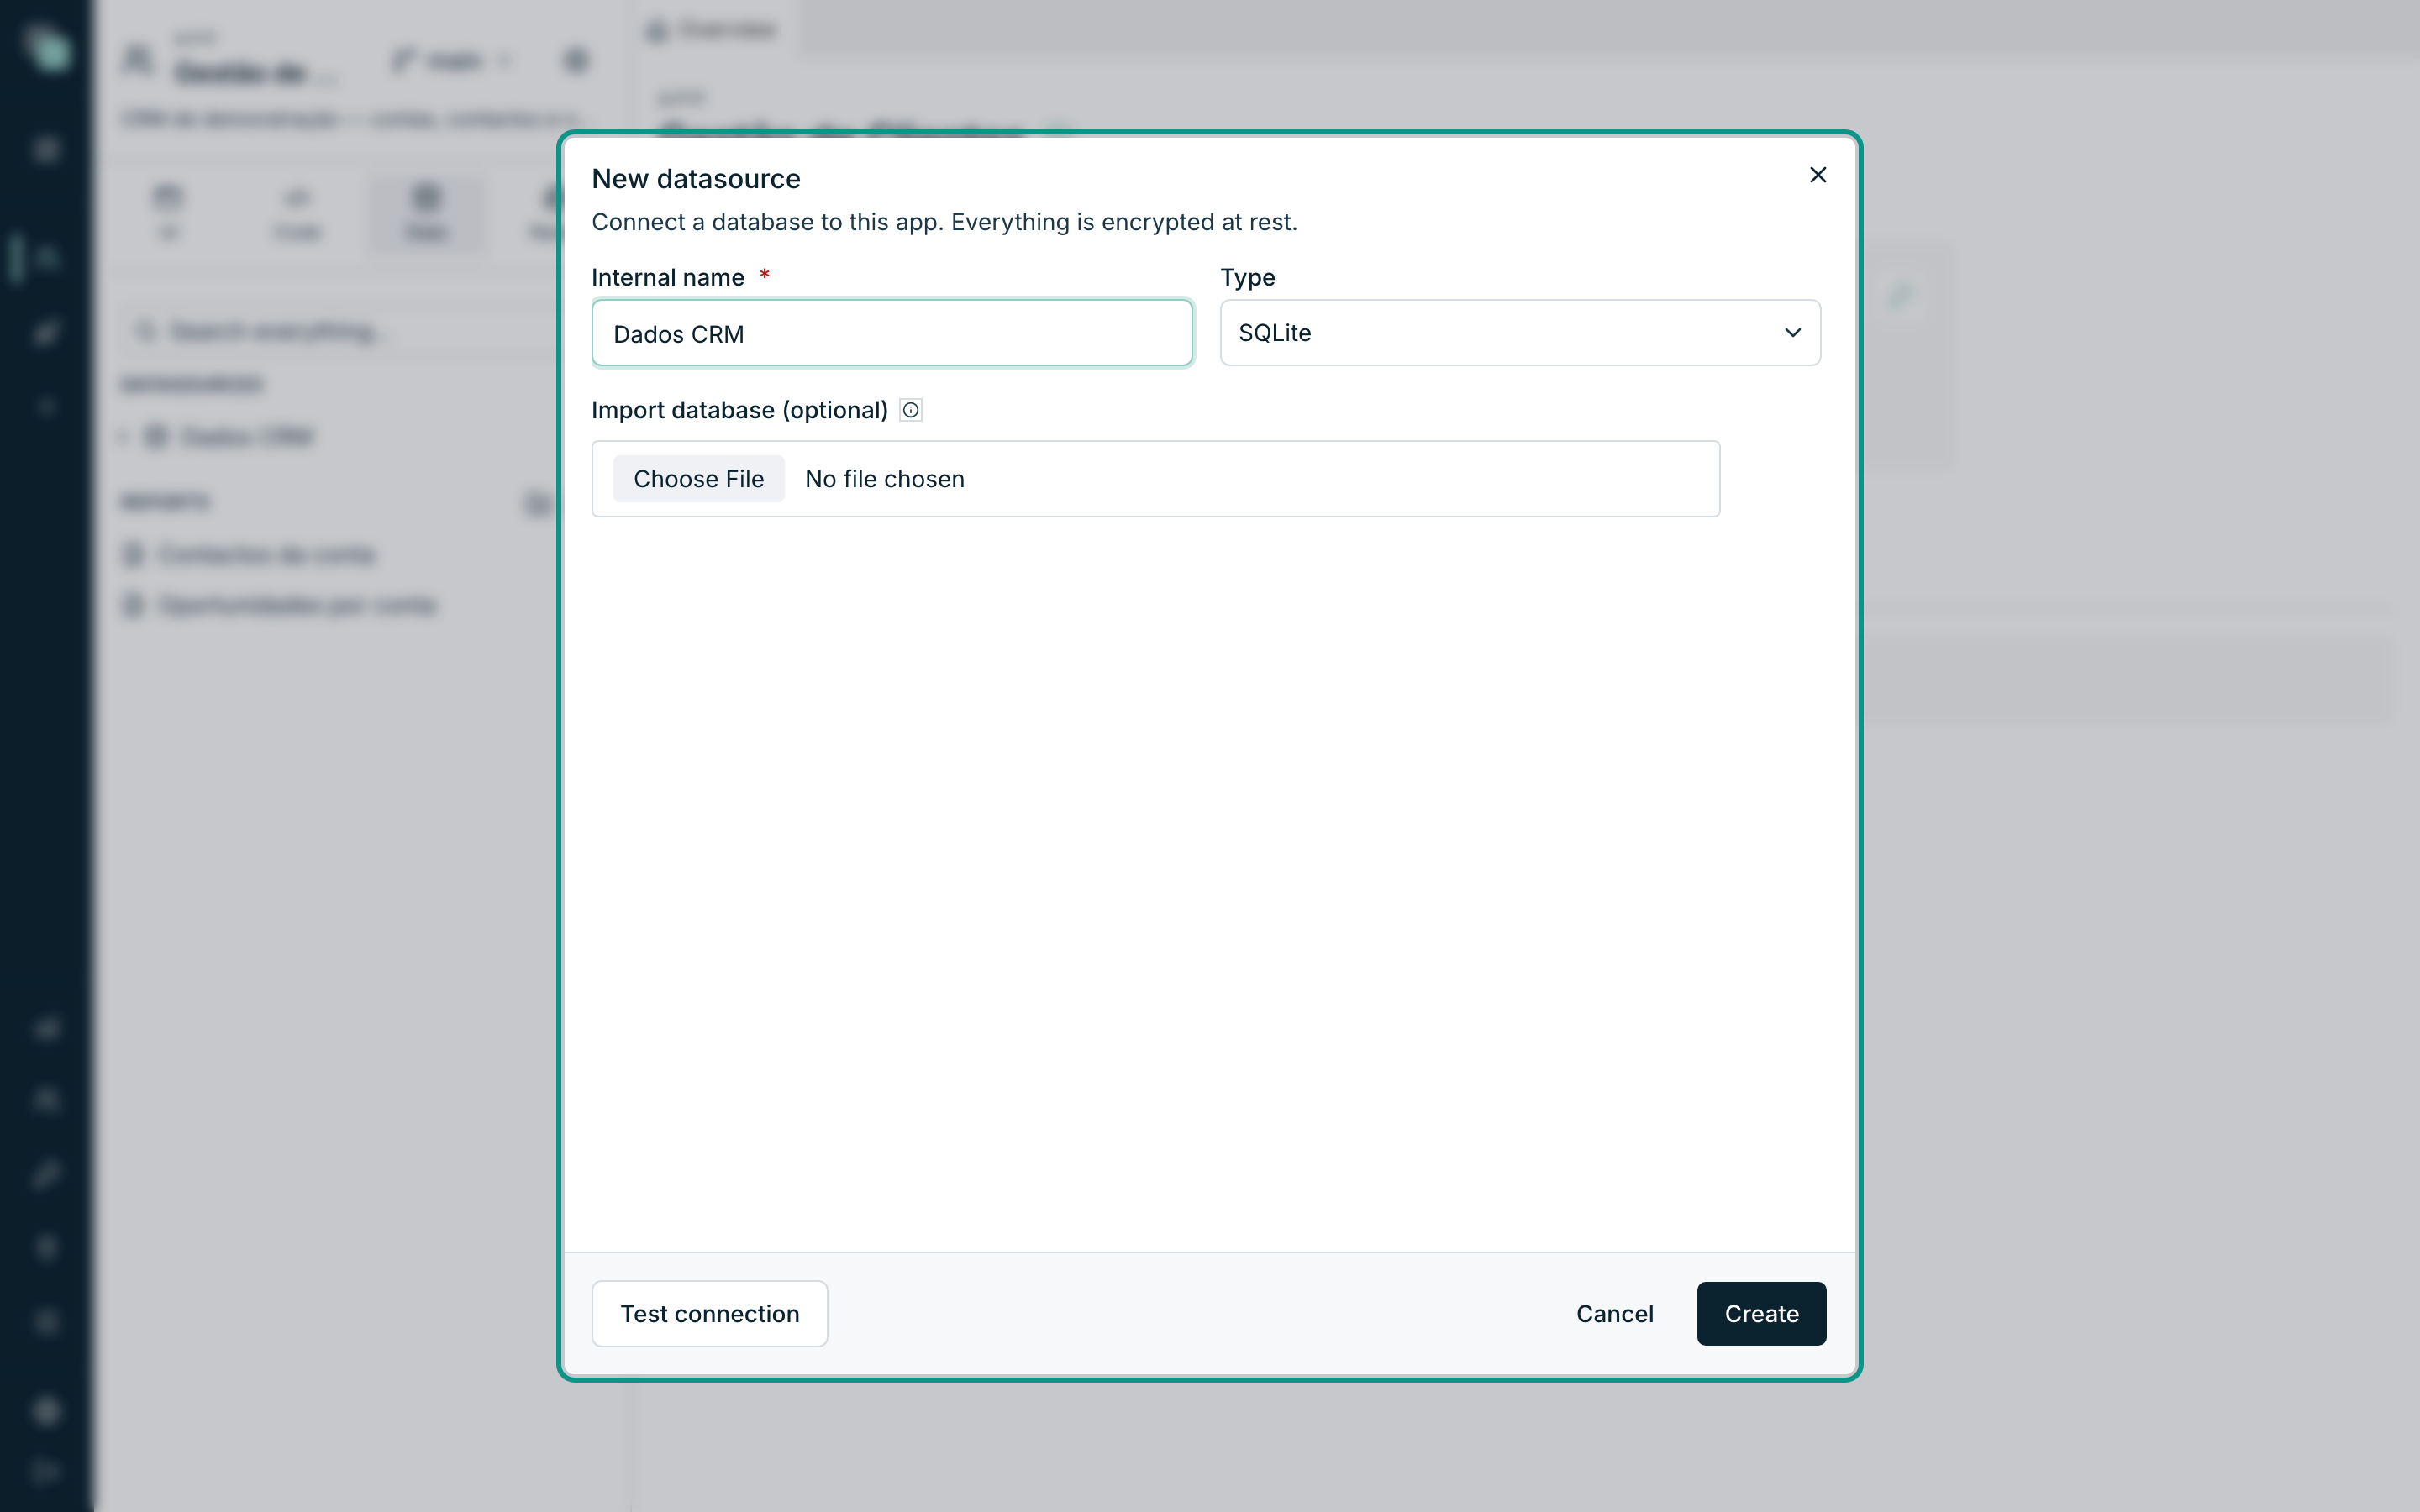
The list of database types in the New datasource dialog: the six supported engines. One field is left, Import database (optional). Leave it empty: "With no file, an empty database is created." That is what we want.
Click Test connection to confirm — the answer is Connection OK.
Click Create. The datasource appears in the tree and its tab opens right away, with the model canvas — still empty.
Warning
The Internal name is an identifier, not a label. Changing it later forces
you to review the scripts that call db("Dados CRM") and the SQL steps that
picked the connection by the old name.
Creating the contas table
With the datasource created, the tables are made without leaving the platform.
- In the tree, open the ⋯ menu of the Dados CRM datasource and choose New table.
- In Table name, type
contas. Leave Schema (optional) blank. - In Table description, write
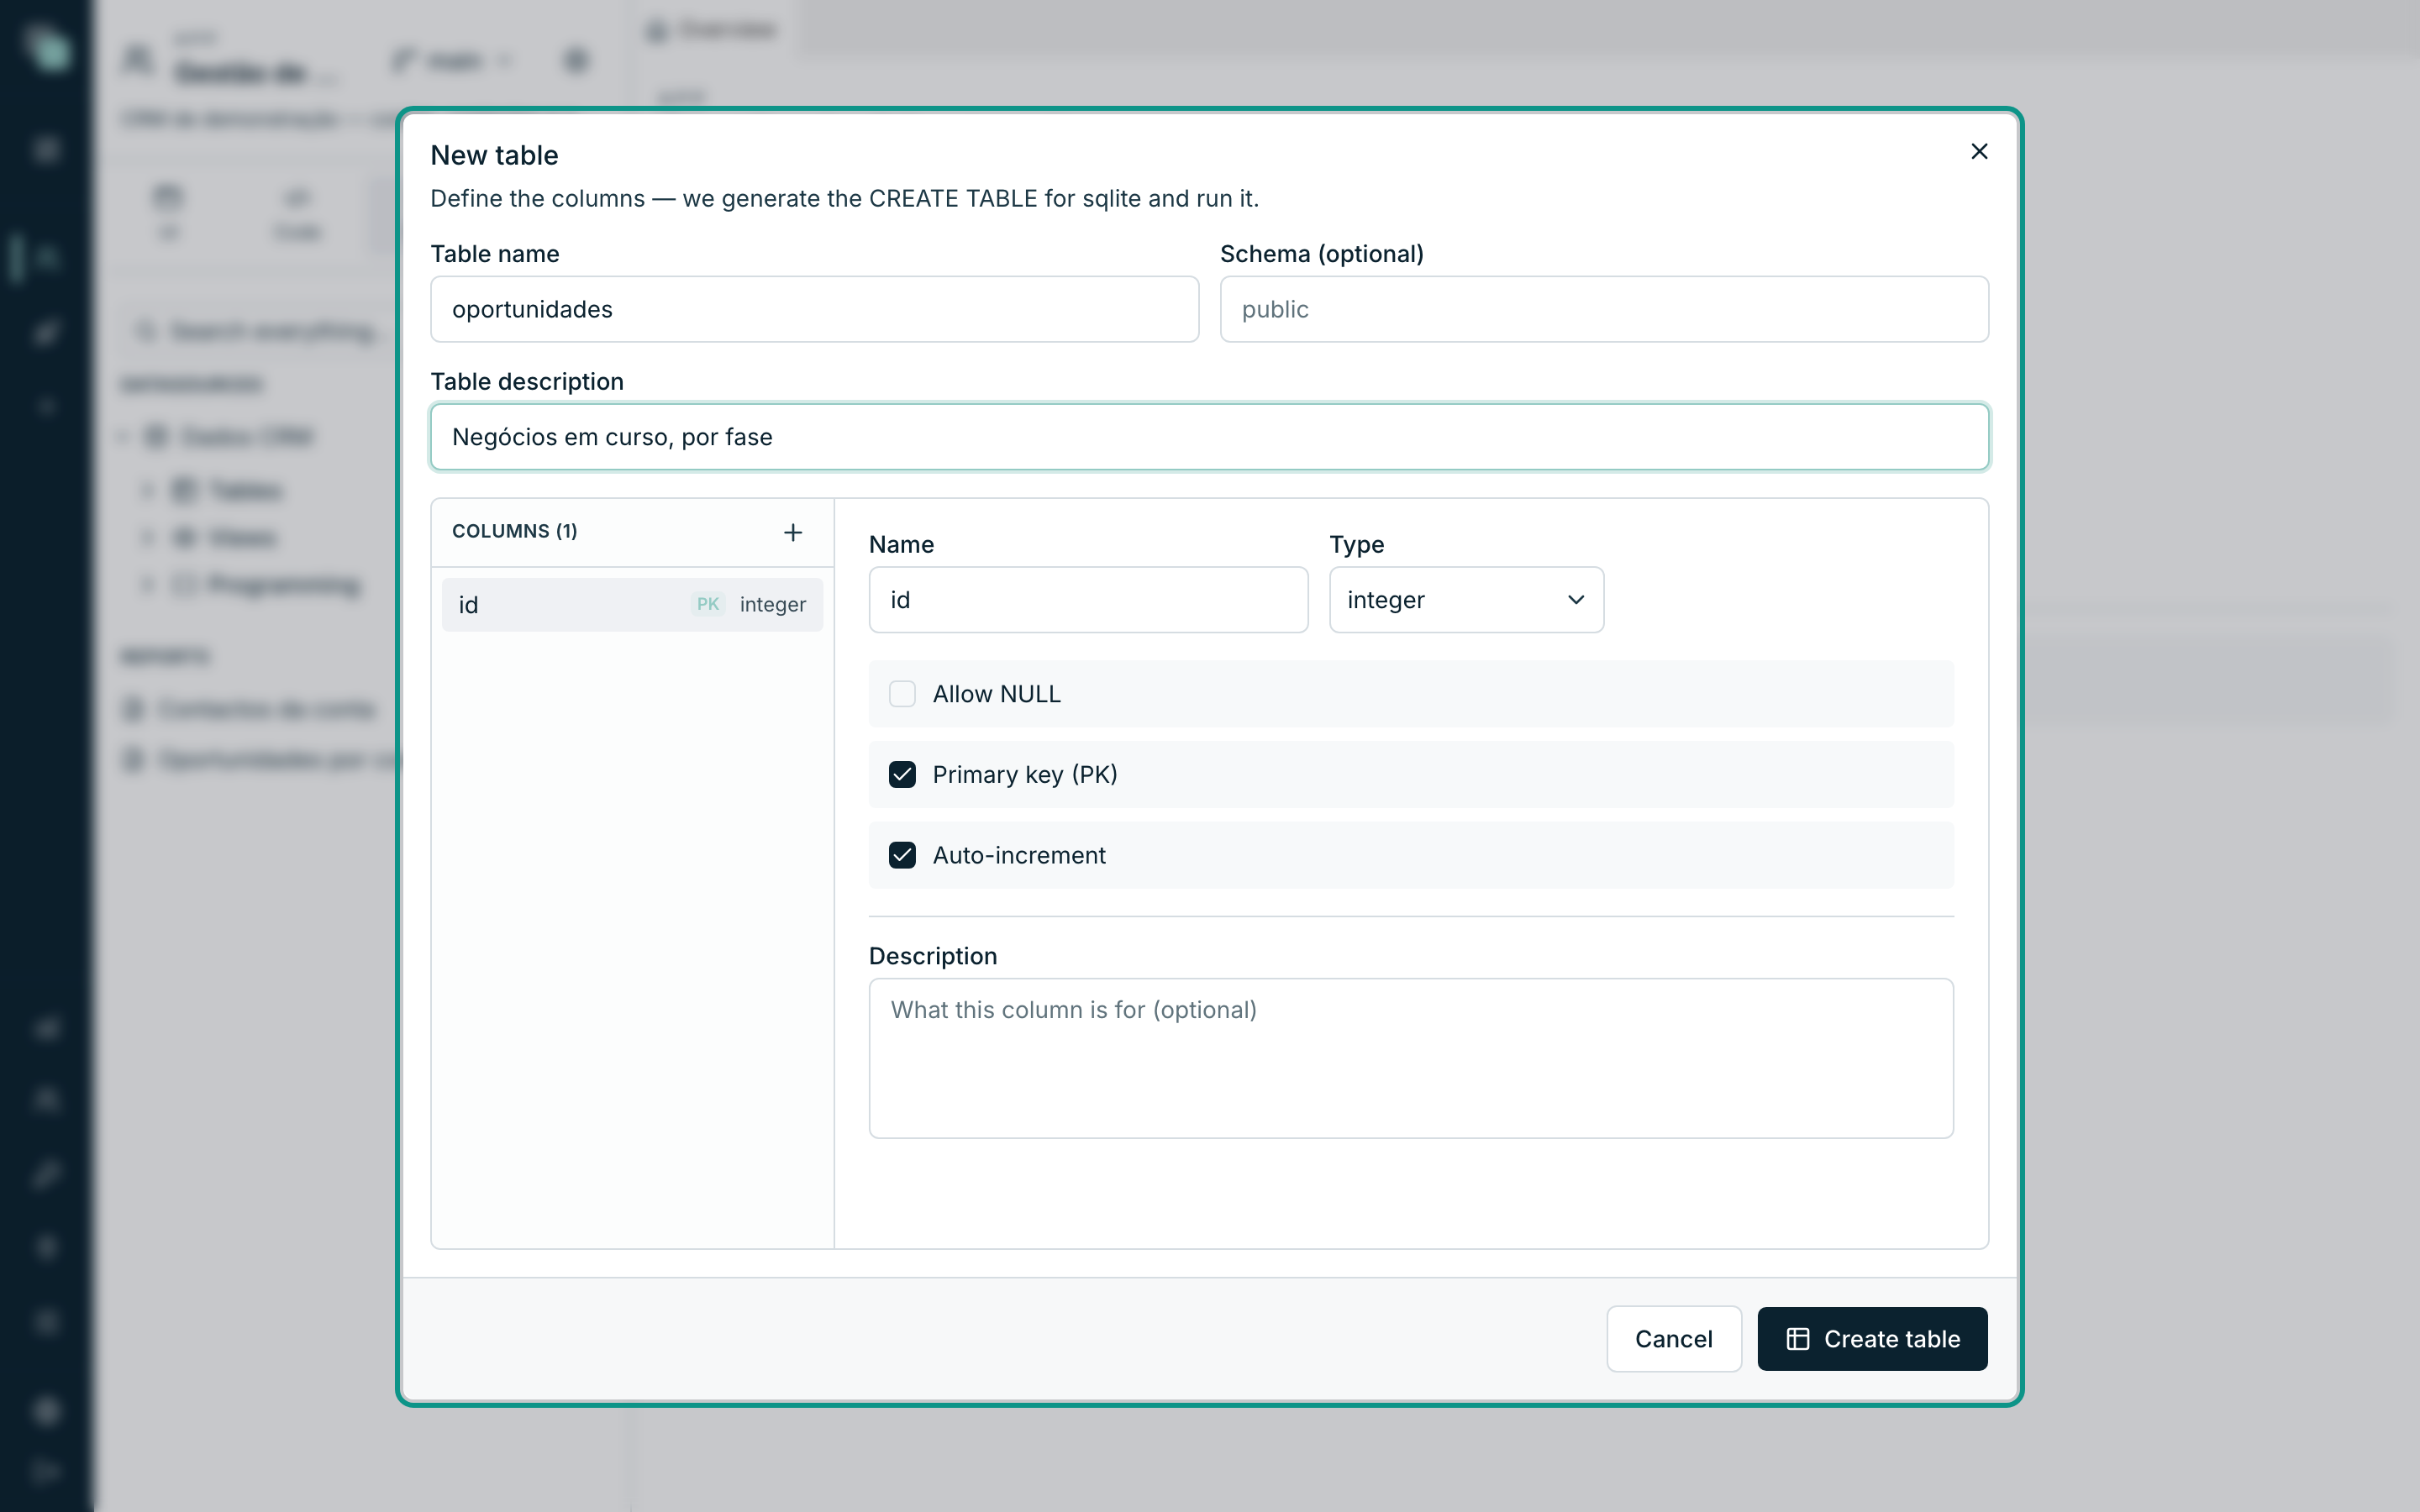
Empresas clientes e potenciais clientes. It is optional, but it is what you will be reading a year from now. - The Columns list already comes with an
idcolumn, of typeinteger, with Primary key (PK) and Auto-increment on. Leave it as it is — it is the identity of each record. - Click the + of Columns for each new column and fill in Name, Type and the switches. The table below says what to write.
- Confirm with Create table. The table is born in the database and starts appearing in the tree of objects.
The columns of the contas table:
| Column | Type | Allow NULL | What it is for |
|---|---|---|---|
id |
integer |
no | Primary key, with auto-increment |
nome |
text |
no | The company name |
nif |
text |
yes | Tax number |
sector |
text |
yes | Agrifood, Technology, Health… |
cidade |
text |
yes | Where the company is |
telefone |
text |
yes | General contact |
email |
text |
yes | General contact |
estado |
text |
no | ativo, prospeto or inativo |
Tip
Allow NULL switched off means required in the database. Save it for what is genuinely required — the name of a company, the account a contact belongs to. A field that is optional today and required tomorrow is changed in an instant; the other way round forces you to clean up data.
Creating the contactos and oportunidades tables
Repeat the gesture — datasource ⋯ menu ▸ New table — twice more.
contactos (description: Pessoas de contacto de cada conta):
| Column | Type | Allow NULL | What it is for |
|---|---|---|---|
id |
integer |
no | Primary key, with auto-increment |
nome |
text |
no | The person's name |
cargo |
text |
yes | Managing Director, Head of Purchasing… |
email |
text |
yes | |
telefone |
text |
yes | |
conta_id |
integer |
no | The account the person belongs to |
oportunidades (description: Negócios em curso, por fase):
| Column | Type | Allow NULL | What it is for |
|---|---|---|---|
id |
integer |
no | Primary key, with auto-increment |
titulo |
text |
no | The name of the deal |
conta_id |
integer |
no | The account of the deal |
valor |
real |
yes | Value in euros — number with decimals |
fase |
text |
no | The stage of the deal (see below) |
data_fecho |
text |
yes | Expected closing date, as YYYY-MM-DD |
responsavel |
text |
yes | Who is following the deal |
The fase column is a closed list of values. It is stored as text, and the
possible values are always these six:
| Stored value | What it means |
|---|---|
prospecao |
There has been no serious conversation yet |
qualificacao |
There is interest and we are working out the fit |
proposta |
Proposal delivered |
negociacao |
Discussing terms |
fechada_ganha |
Deal closed |
fechada_perdida |
Deal lost |
Note
We store the "technical" value (fechada_ganha) and show the pretty label
("Won") on screen. It is that separation that makes the kanban board of the
next stage work: each column of the board is one of these values, with its
label and its color. The estado (of the accounts) and fase columns follow
the same idea.
Reviewing and changing the structure of a table
You got a type wrong, a column is missing, the name is not the best. None of that is final:
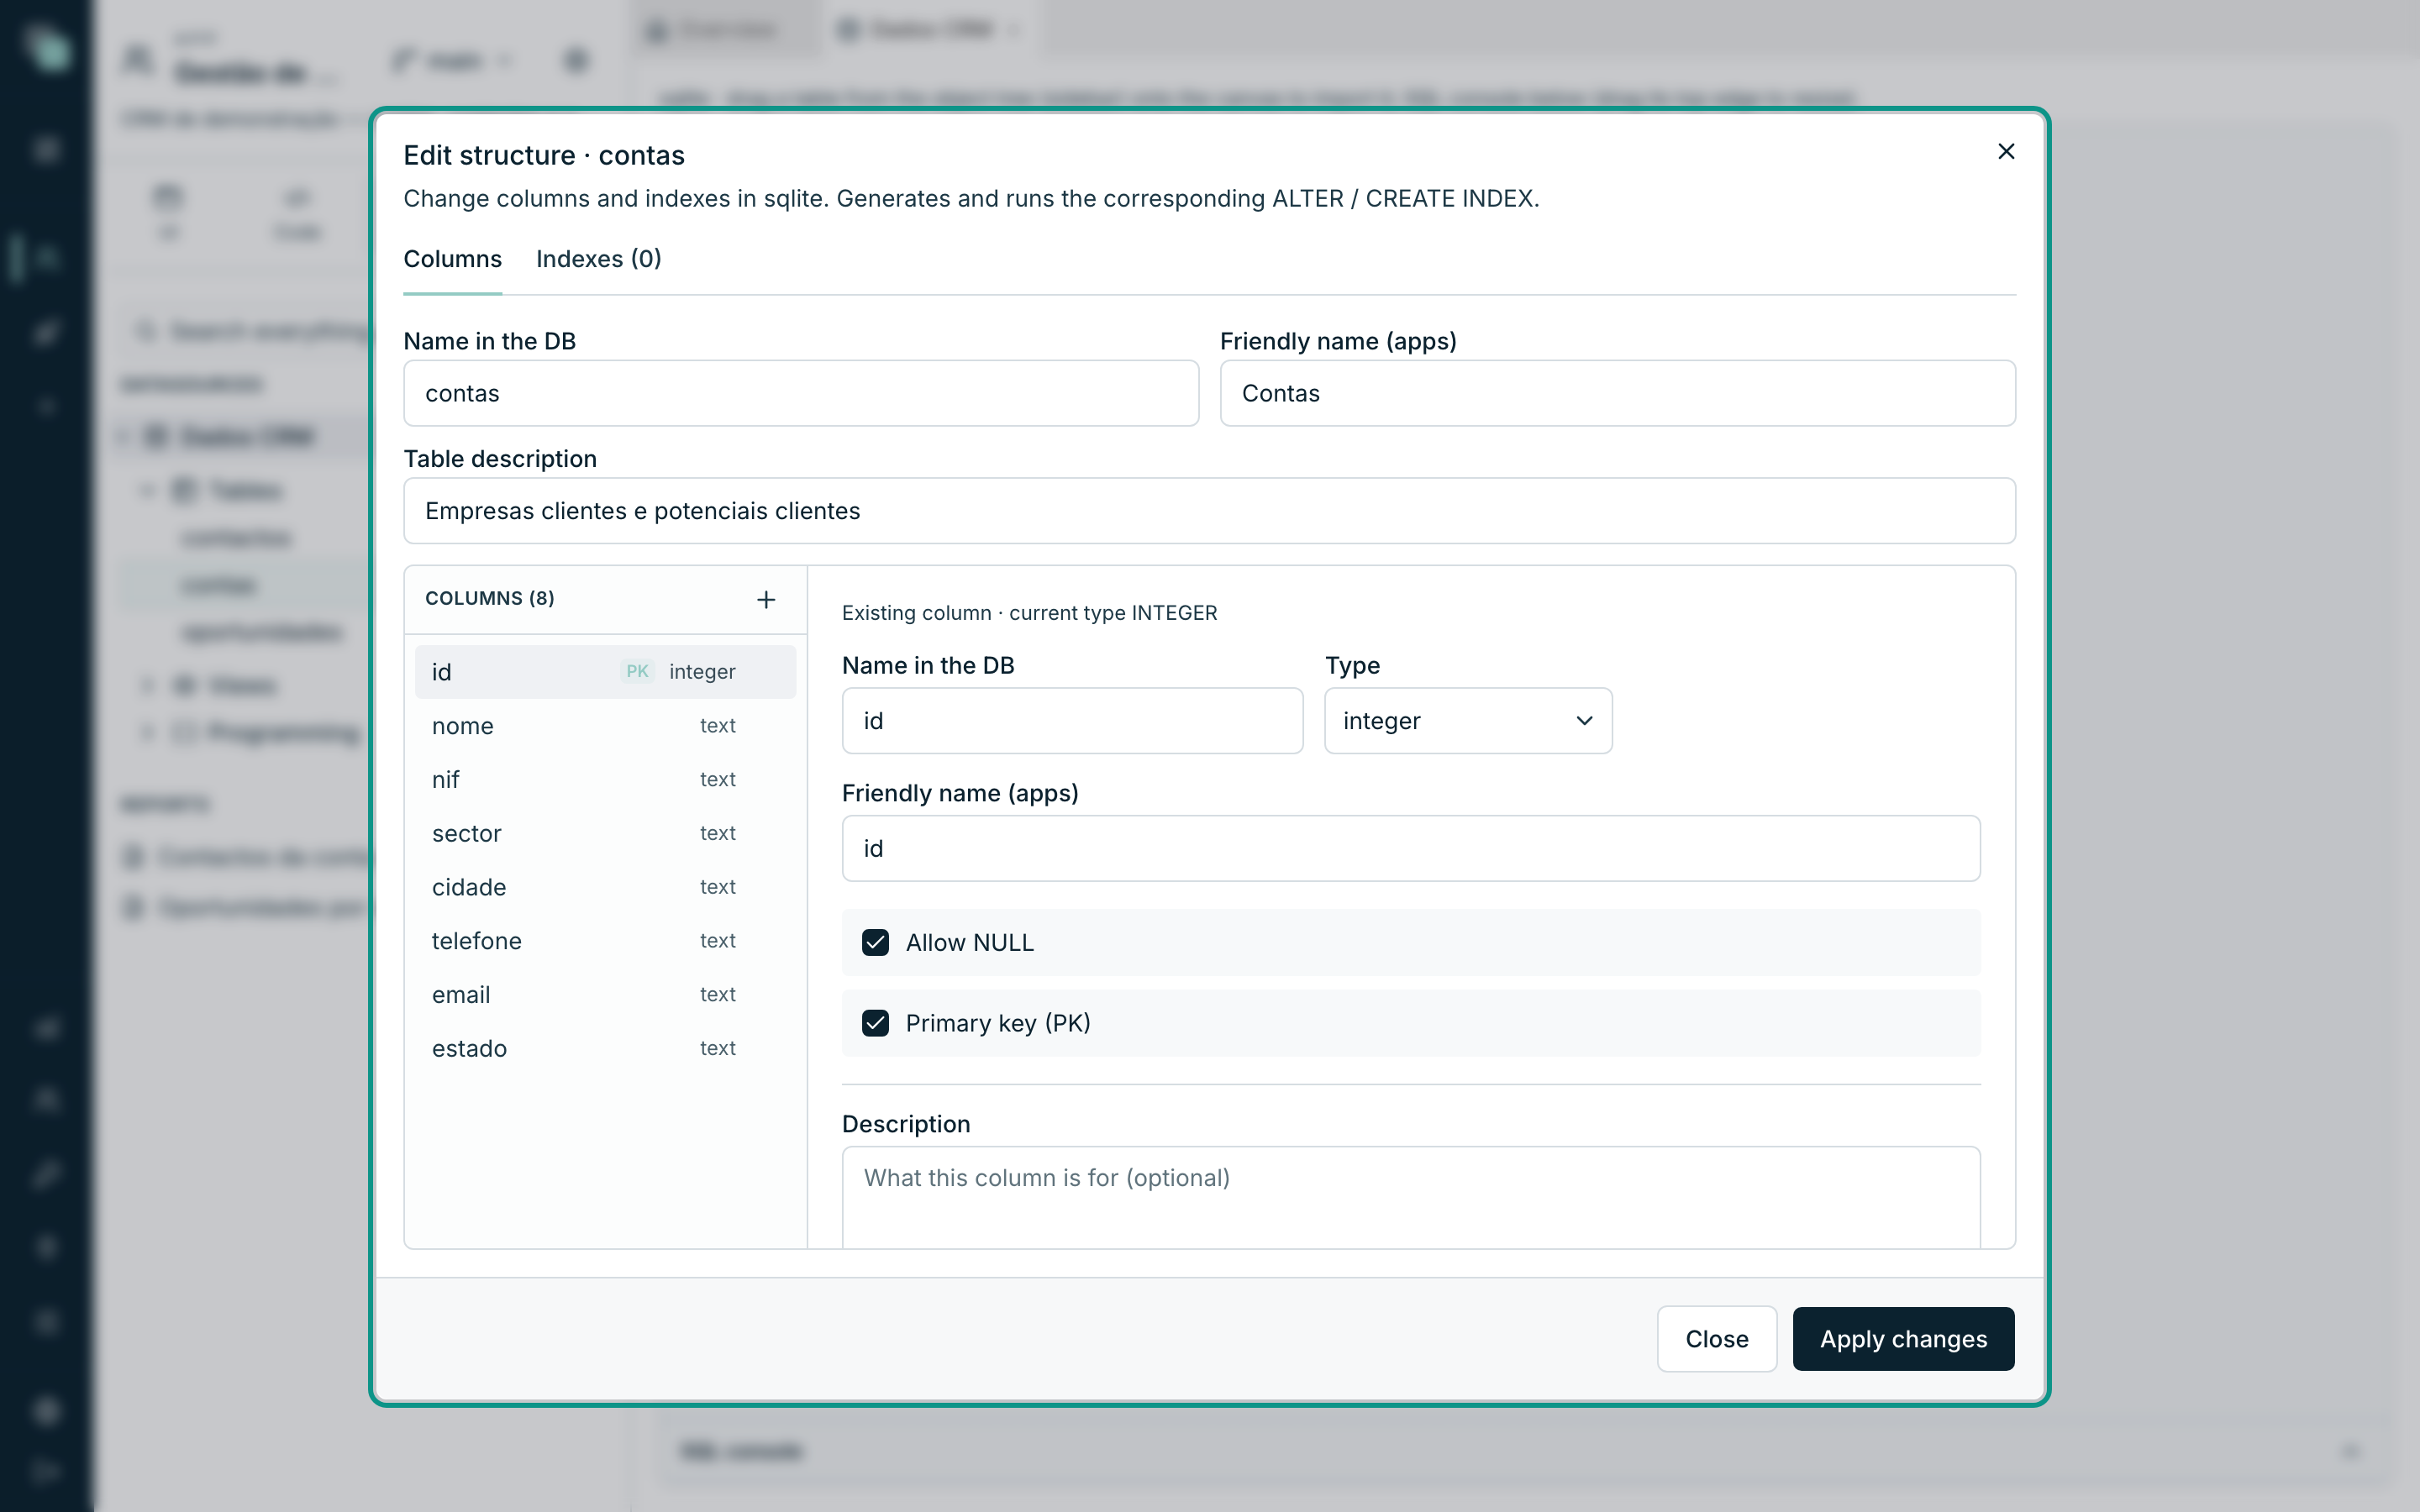
- In the tree, open the ⋯ menu of the table and choose Edit structure.
- The dialog has two tabs: Columns and Indexes. At the top sit the Name in the DB, the Friendly name (apps) — the name the screens will show — and the description.
- Click a column on the left to edit it on the right, or use the + to add one. New columns are marked "New column — created when the changes are applied."; deleted columns are marked "Marked for deletion (DROP) on apply.", and the deletion is cancelled as long as you have not applied.
- Click Apply changes.
Warning
Deleting a column deletes its data. The platform only runs the change when you press Apply changes — until then everything is a draft, and closing the dialog spoils nothing.
Seeing and seeding the data
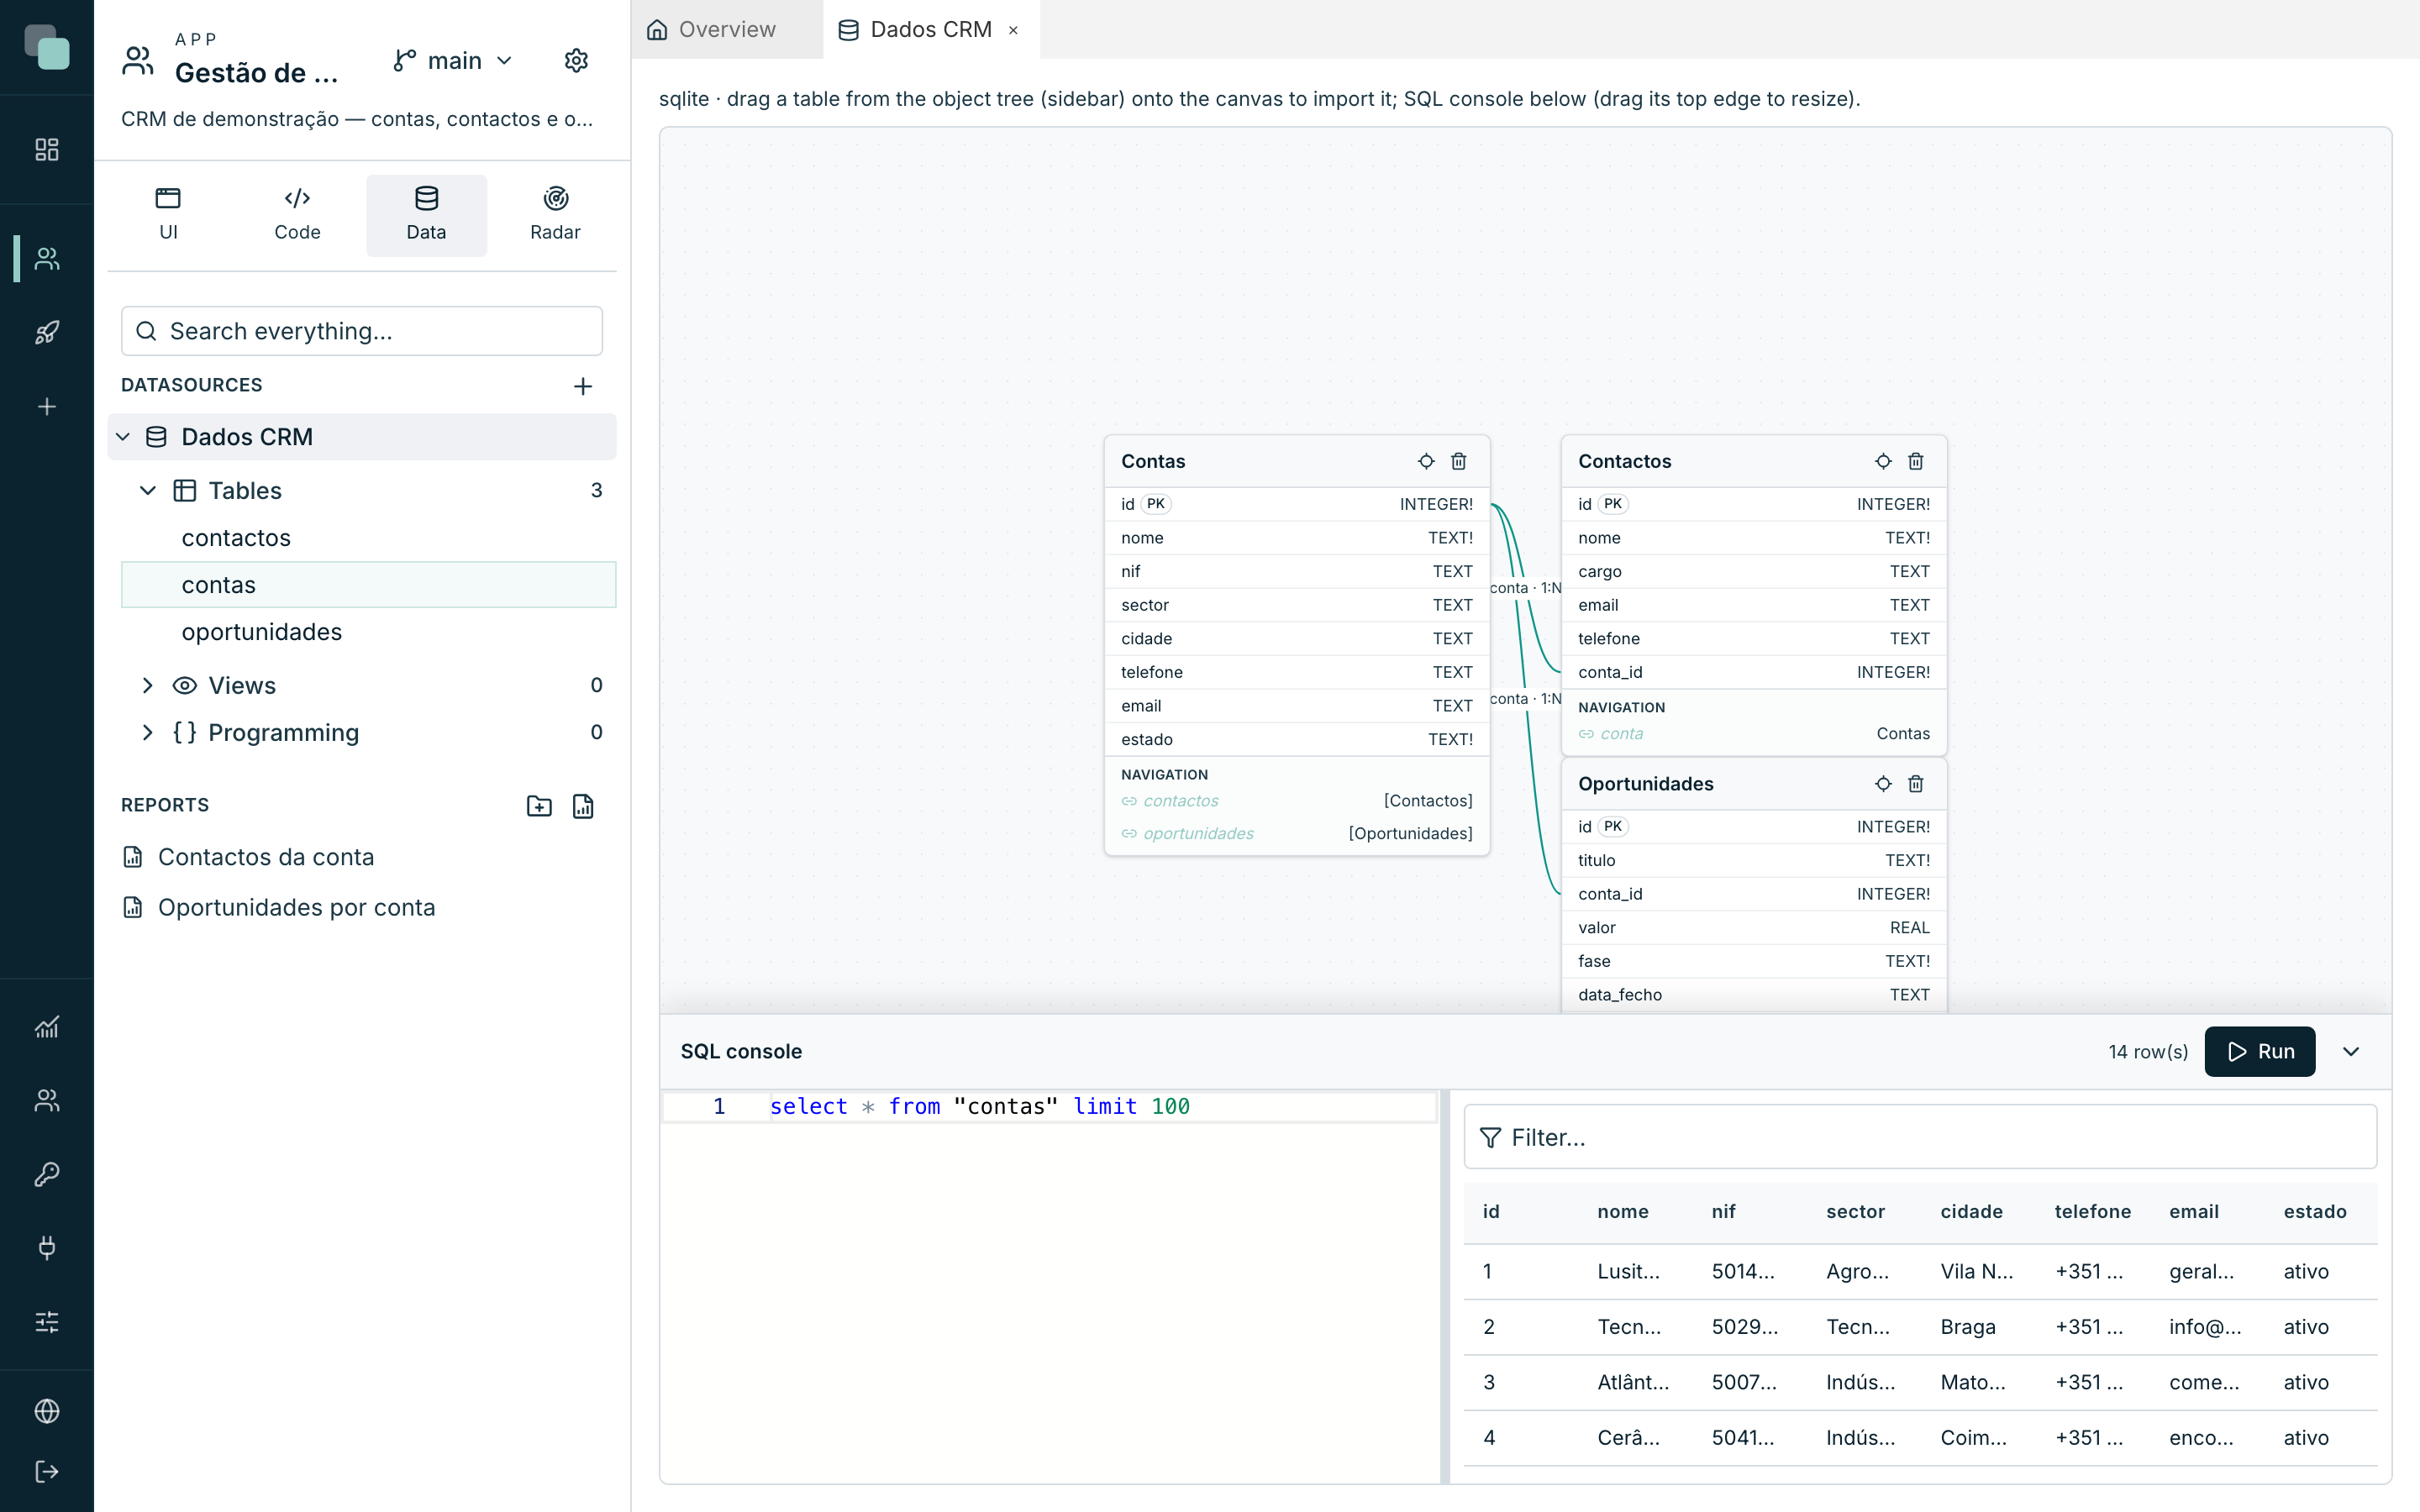
The tree of objects has a console underneath the model, and it is where you peek at (or seed) the data:
- Open the ⋯ menu of a table and choose View data. The SQL console
opens at the bottom, already with a
selectready for that table. - Click Run. The results appear on the right, with the number of rows and a Filter… field.
- To put the first rows in, write whatever
insertyou like in the console and run it. It is the fastest way of having example data before there are screens to create it with.
Importing the tables into the model
The tables exist, but the platform does not yet know that it wants to use them. That is what importing does:
- In the tree, expand Dados CRM ▸ Tables. All three are there.
- For each one, open the ⋯ menu and choose Import to model — or drag the table from the tree onto the model canvas, which amounts to the same thing.
- Each table becomes a card on the canvas: the entity. The card shows the fields, the type of each one and the PK mark on the primary key.
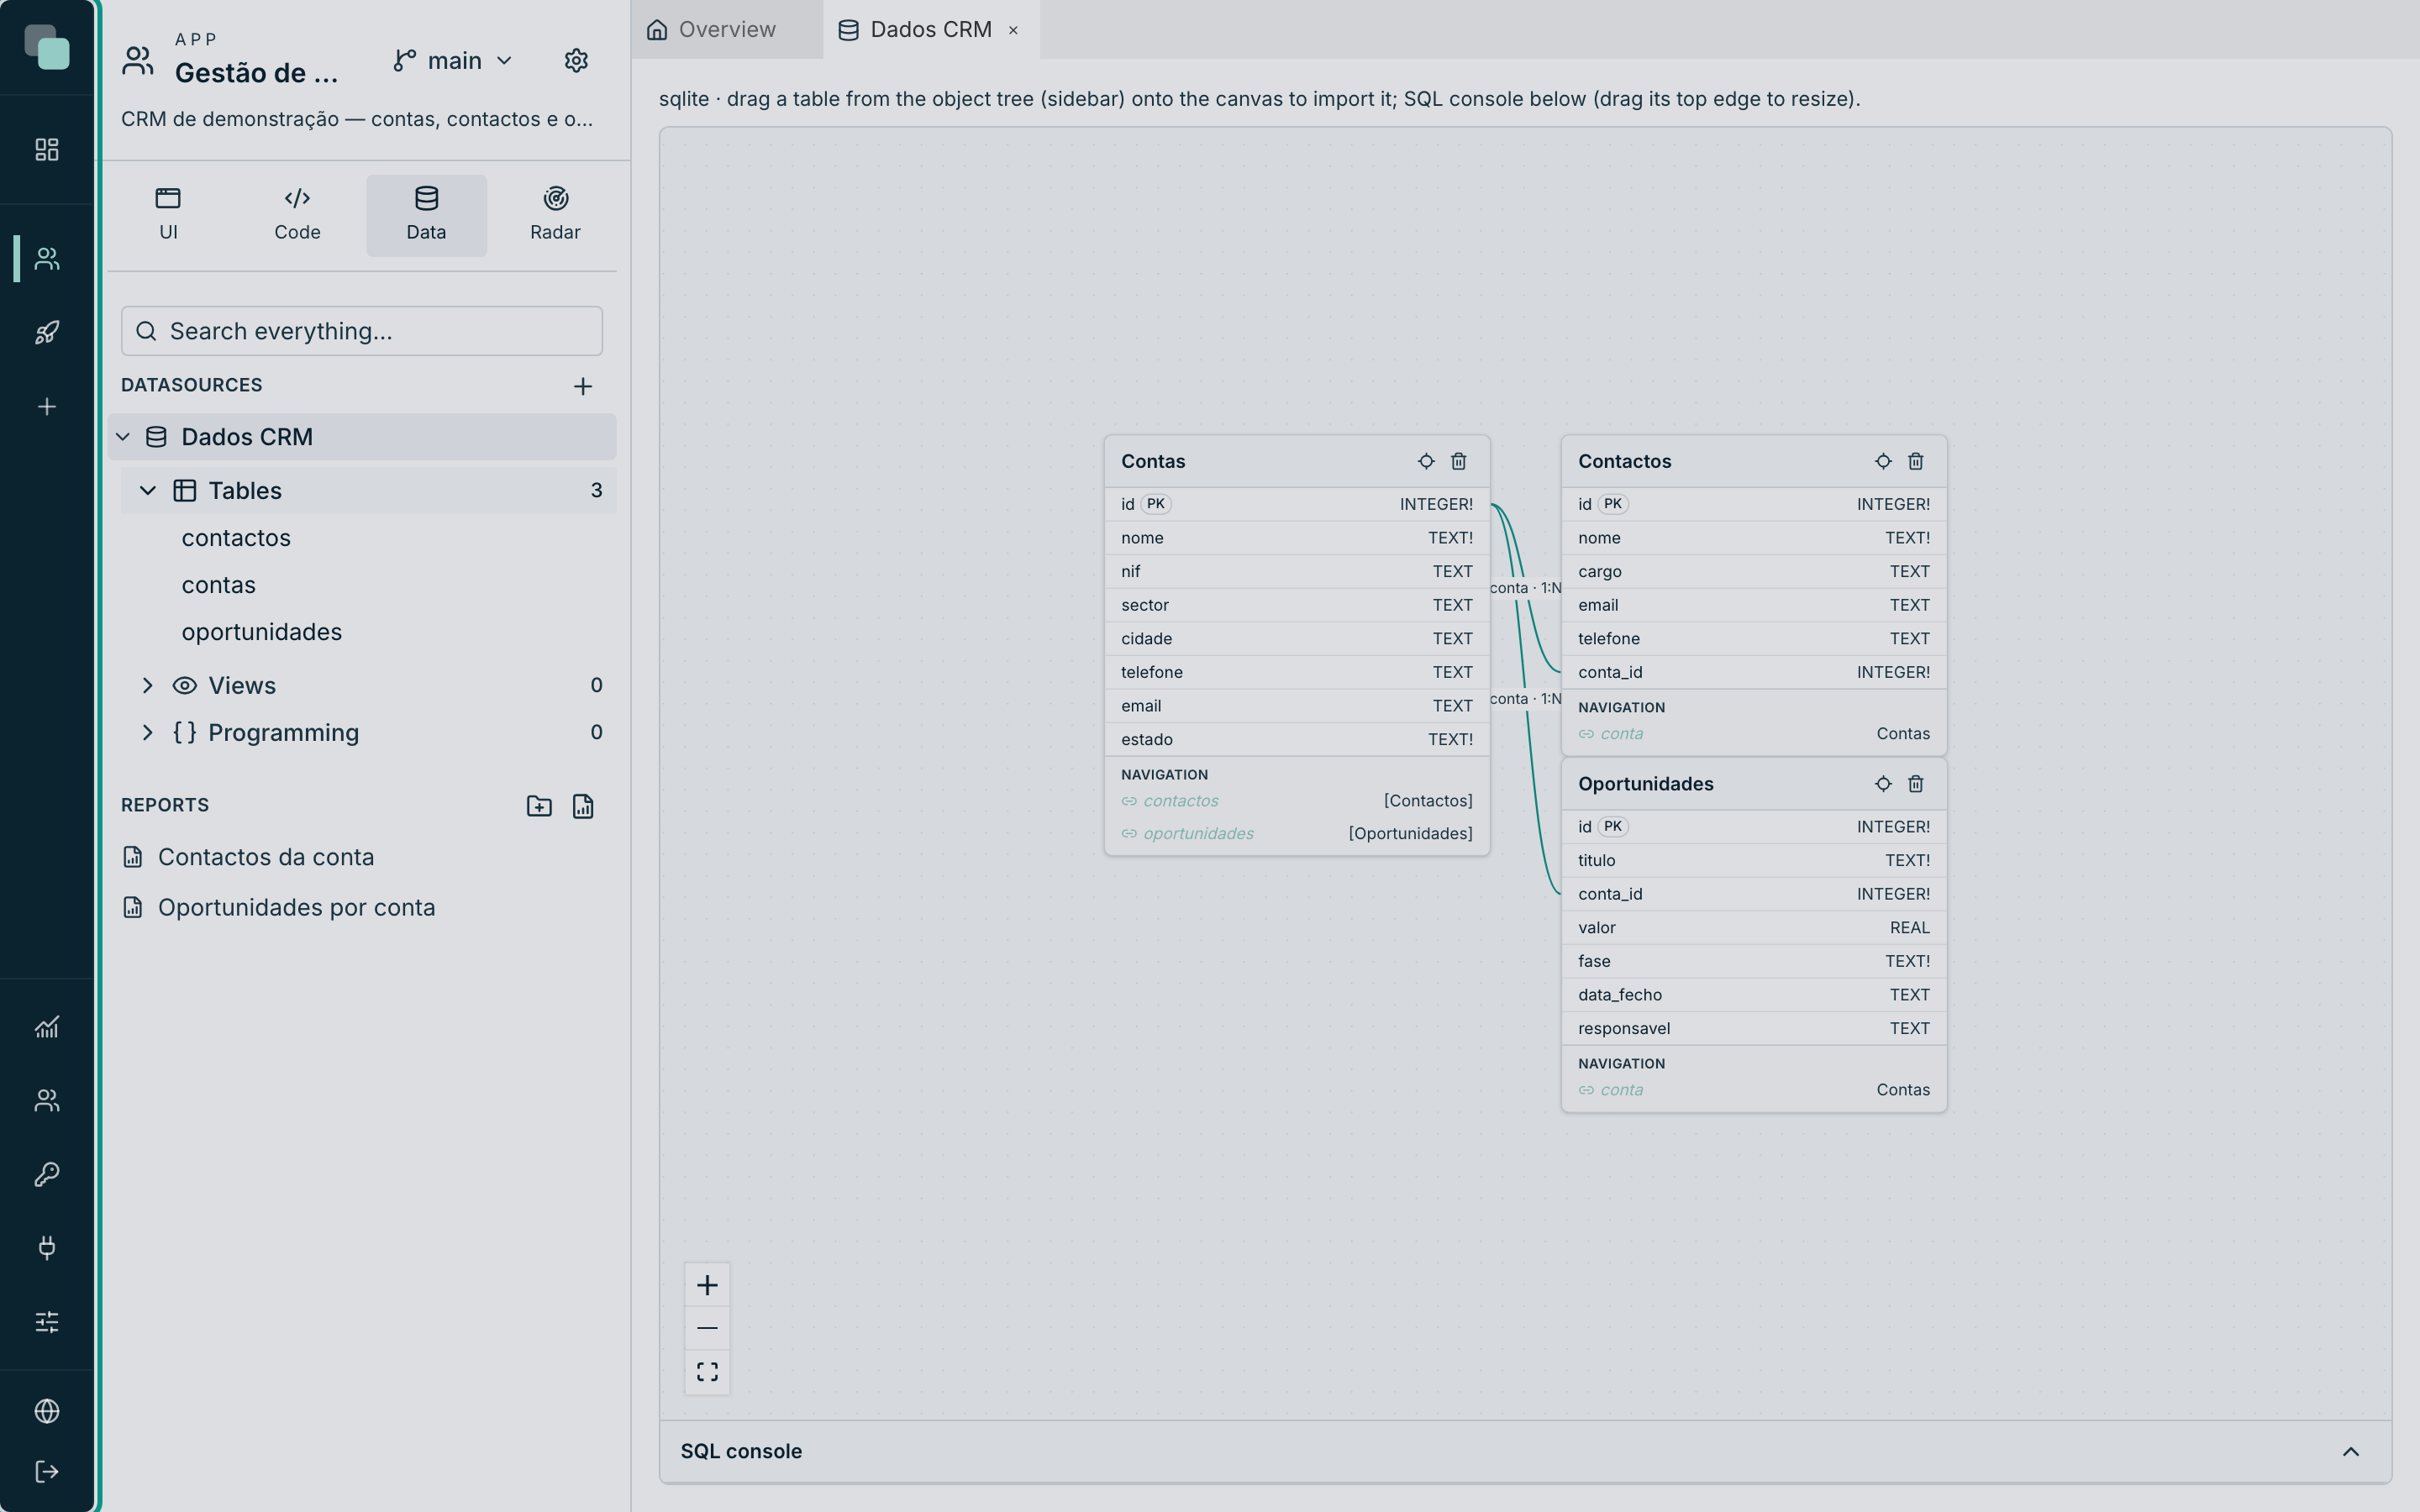
The names of the entities get an initial capital — contas becomes Contas —
because that is how they appear in the APIs and in the screens. The table in the
database goes on being called contas.
Note
Importing copies no data and creates nothing in the database. And removing an entity from the model does not delete the table either — "It does NOT change the table in the database", as the warning itself says.
Linking the entities — the two relations
A CRM with no relations is three loose lists. Two links are missing: each contact belongs to an account, each opportunity belongs to an account.
To create a relation, drag the conta_id field of the Contactos entity onto
the id field of the Contas entity — the hint on the card reminds you:
"Drag to a field of another table to link". The New relation dialog opens,
already with the entities and the columns filled in:
| Field | What to choose | Why |
|---|---|---|
| Cardinality | One-to-many (1:N) | An account has many contacts; each contact has one account. |
| Parent (referenced) | Contas ▸ id |
The "one" side. |
| Child (holds the FK) | Contactos ▸ conta_id |
The "many" side — it is the one that holds the reference. |
| Relation type | Physical — creates the FK in the database | The database now guarantees that there are no orphan contacts. |
| Navigator on Contactos → Contas | conta |
The virtual field that, from a contact, gives you its account. |
| Navigator on Contas → Contactos | contactos |
The virtual field that, from an account, gives you its contacts. |
| When the parent is deleted (ON DELETE) | Nothing (blocks if there are children) | Deleting an account with contacts is now refused — better an error than a hole. |
Confirm with Create relation and repeat the gesture between
Oportunidades ▸ conta_id and Contas ▸ id, with the reverse navigator
oportunidades.
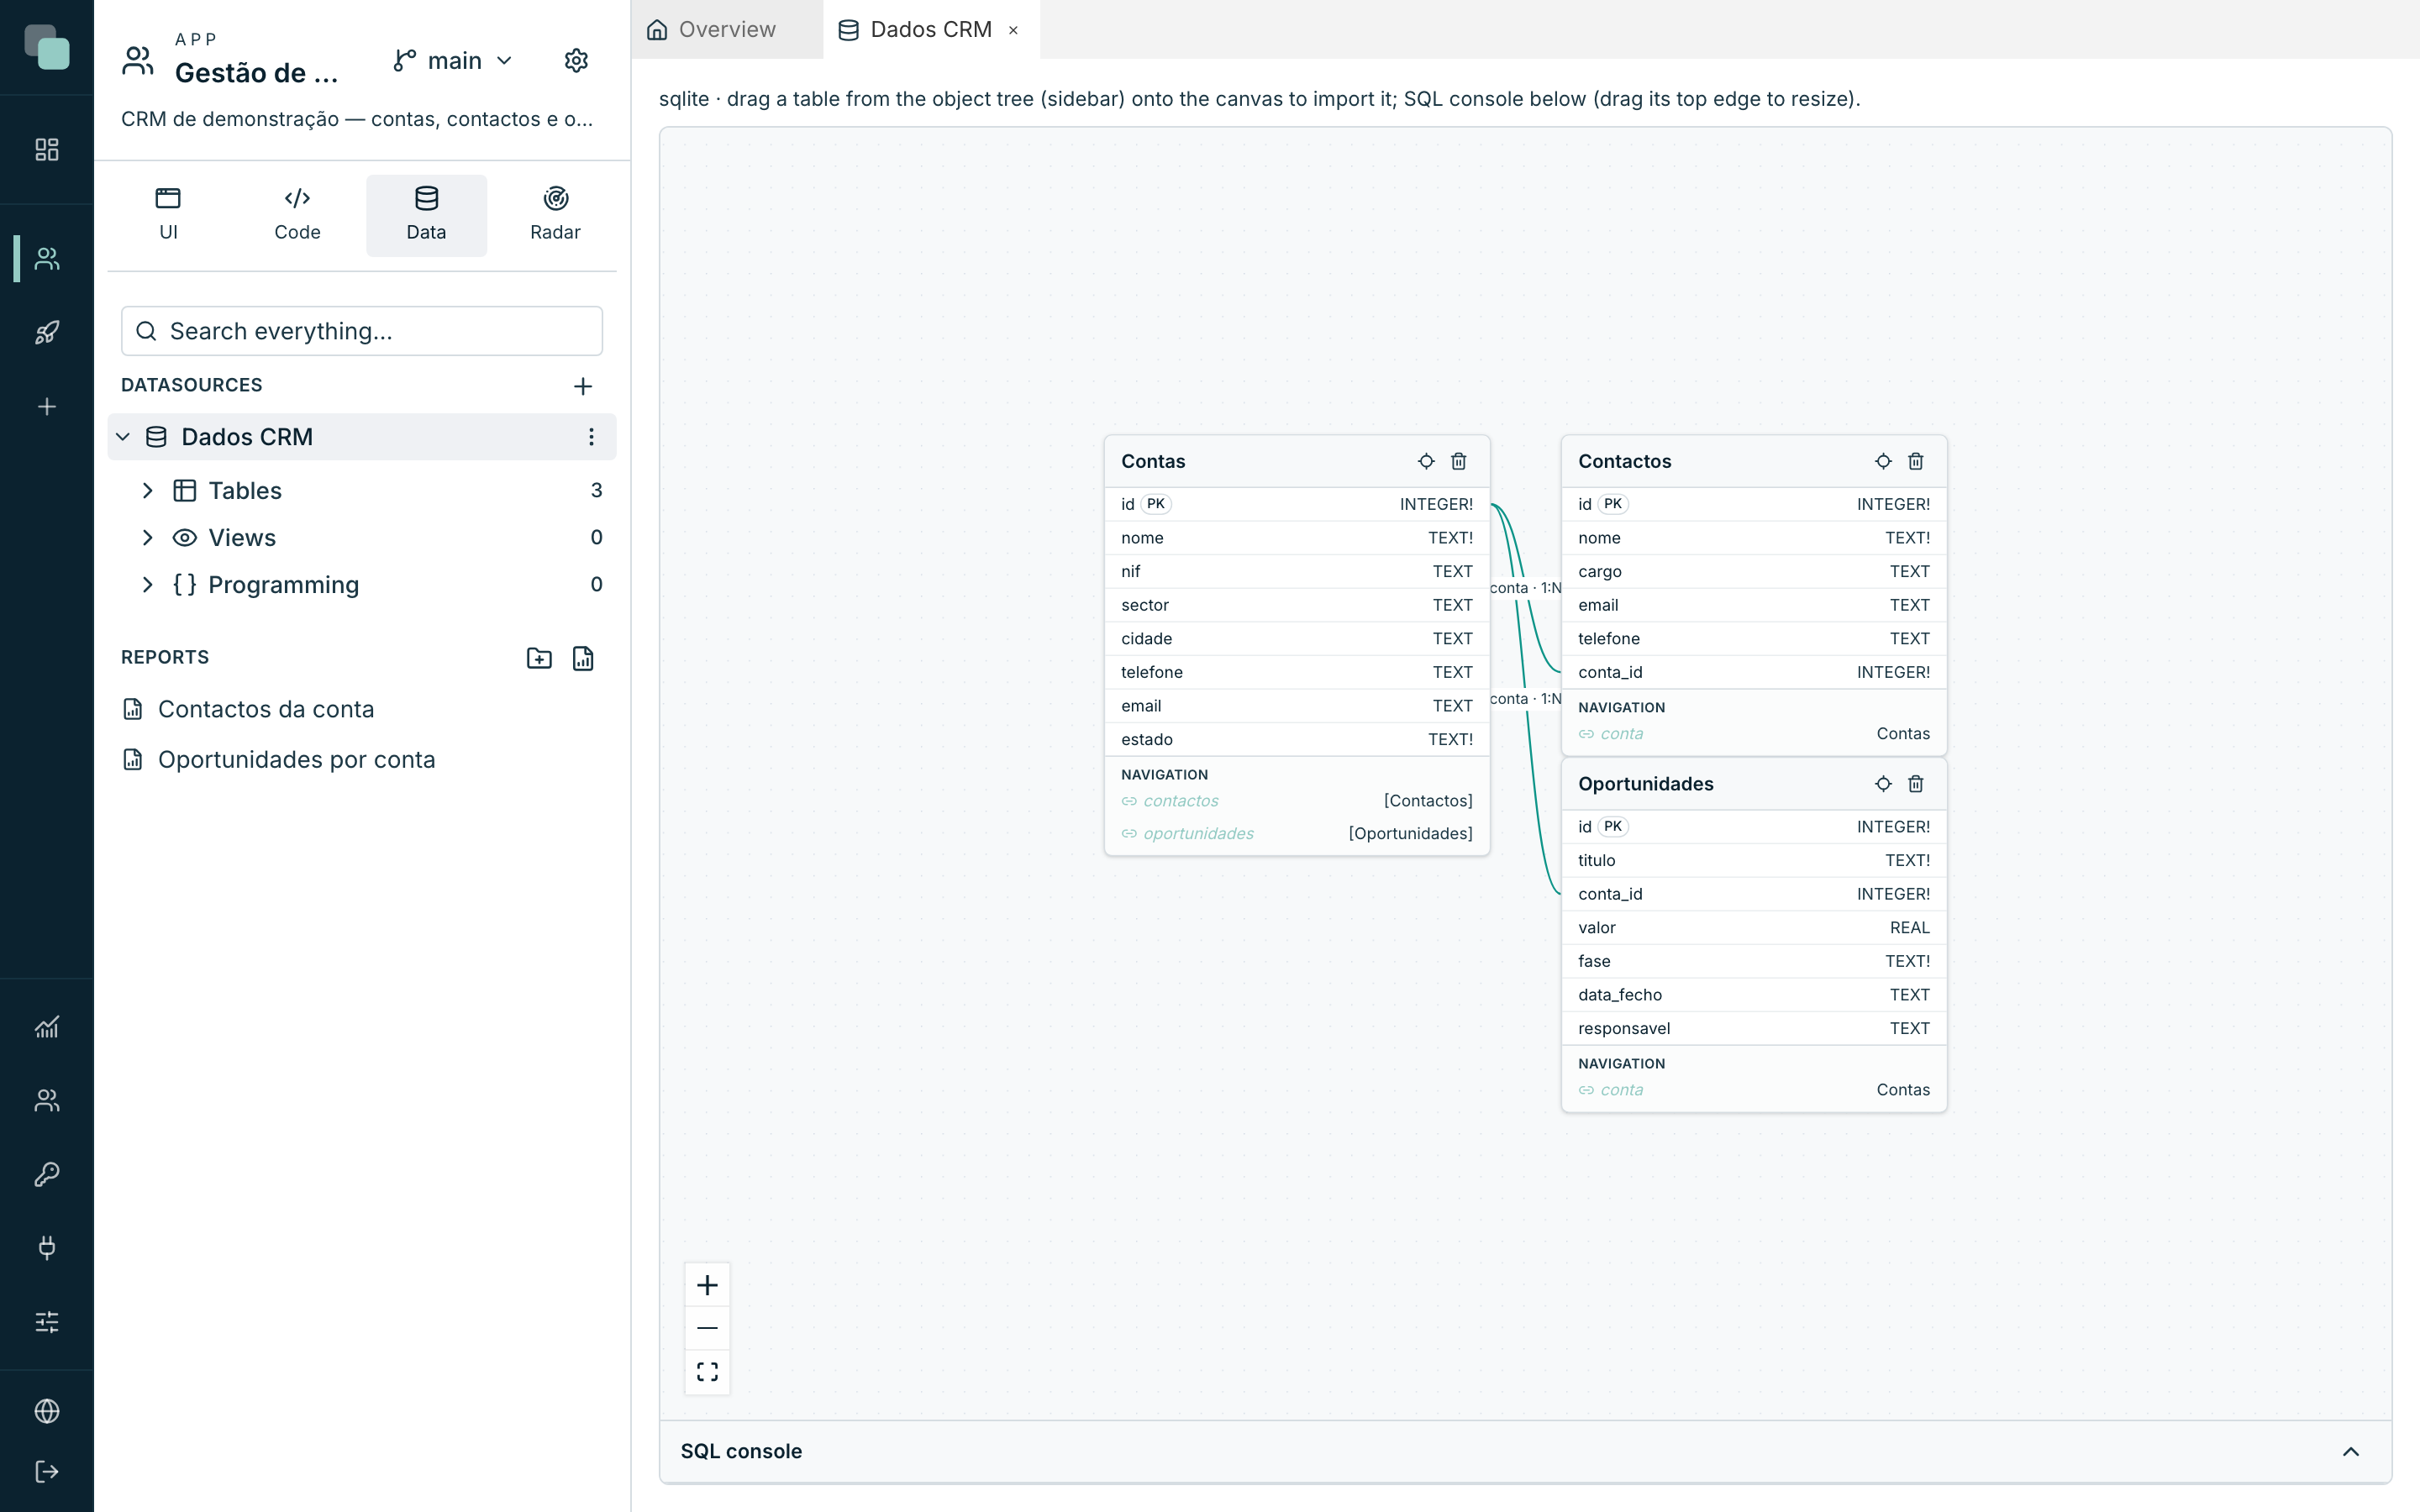
The navigators are the part that pays off most. They are fields that do not
exist in the database but do exist in the model: with them, a query of
opportunities returns conta.nome without anyone writing a join. That is
exactly what the dashboard table is going to do in the next stage, in the
Conta column.
Tip
Physical really does create the foreign key in the database; Virtual — only in the platform model is for databases where you cannot (or do not want to) touch the schema. In this guide the database is ours, so physical.
What got unlocked
With the model ready, the app has gained things for free:
- The app's GraphQL API already knows Contas, Contactos and Oportunidades, with the relations — see The GraphQL API of the model.
- The table APIs can now point at an entity and generate reads and writes without a line of SQL. It is the first step of the next stage.
- The screens are going to read from these APIs through datastores.
Why doesn't…?
- Why doesn't my table appear in the tree? The tree of objects is read from the database — use Refresh objects in the ⋯ menu of the datasource after changing things outside the platform.
- Why can't I create the relation? The two columns have to be compatible: an
integerprimary key links to aninteger. If you dragged onto the wrong field, cancel and repeat — the dialog says that the columns are still to be chosen. - Why doesn't the
contafield appear in my data? Navigators are not columns: they only exist through the model. If you are querying through the SQL console you see the real columns; it is in the APIs and in the screens that the navigators show up. - Why won't the platform let me delete an account? You chose Nothing (blocks if there are children) in the ON DELETE — and there are contacts or opportunities pointing at it. Delete them first, or change the rule of the relation.
The foundation is laid. Next stage: the screens.