Tables and fields
The model editor — creating tables, choosing column types, defining keys and indexes, and bringing existing tables into the app's model.
Before there are screens there is data: the tables where the application keeps accounts, contacts, orders or holiday requests. In Keplin that data lives in a database connected to the app (a datasource) and is described in a model — the design of tables, fields, keys and relations that everything else on the platform reads.
This page is about the first half of that work: creating and changing tables, choosing types, defining keys and indexes. Relations and enumerated fields have a page of their own in Relations and enums.
The examples are from the Customer Management app: a CRM with three
tables — contas, contactos and oportunidades.
Two layers: the database and the model
It is worth separating right away two things that look alike:
| Layer | What it is | Who uses it |
|---|---|---|
| The database | The tables, columns and indexes that really exist in the engine connected to the app. | The database engine. Changing it means running real commands. |
| The model | The description of those tables for the platform: entities, fields, friendly names, descriptions, relations and enums. | The APIs, the screens, the scripts and the reports. |
A table only enters the model when you import it — and leaving the model deletes nothing in the database. That is why the platform always distinguishes Remove from model from Delete.
Opening the model
- Open the app and choose the Data tab in the sidebar.
- In Datasources, click the datasource's name — in Customer Management, Dados CRM.
- A tab opens with the model diagram at the center, the SQL console at the bottom, and the datasource's tree of objects expanded in the sidebar.
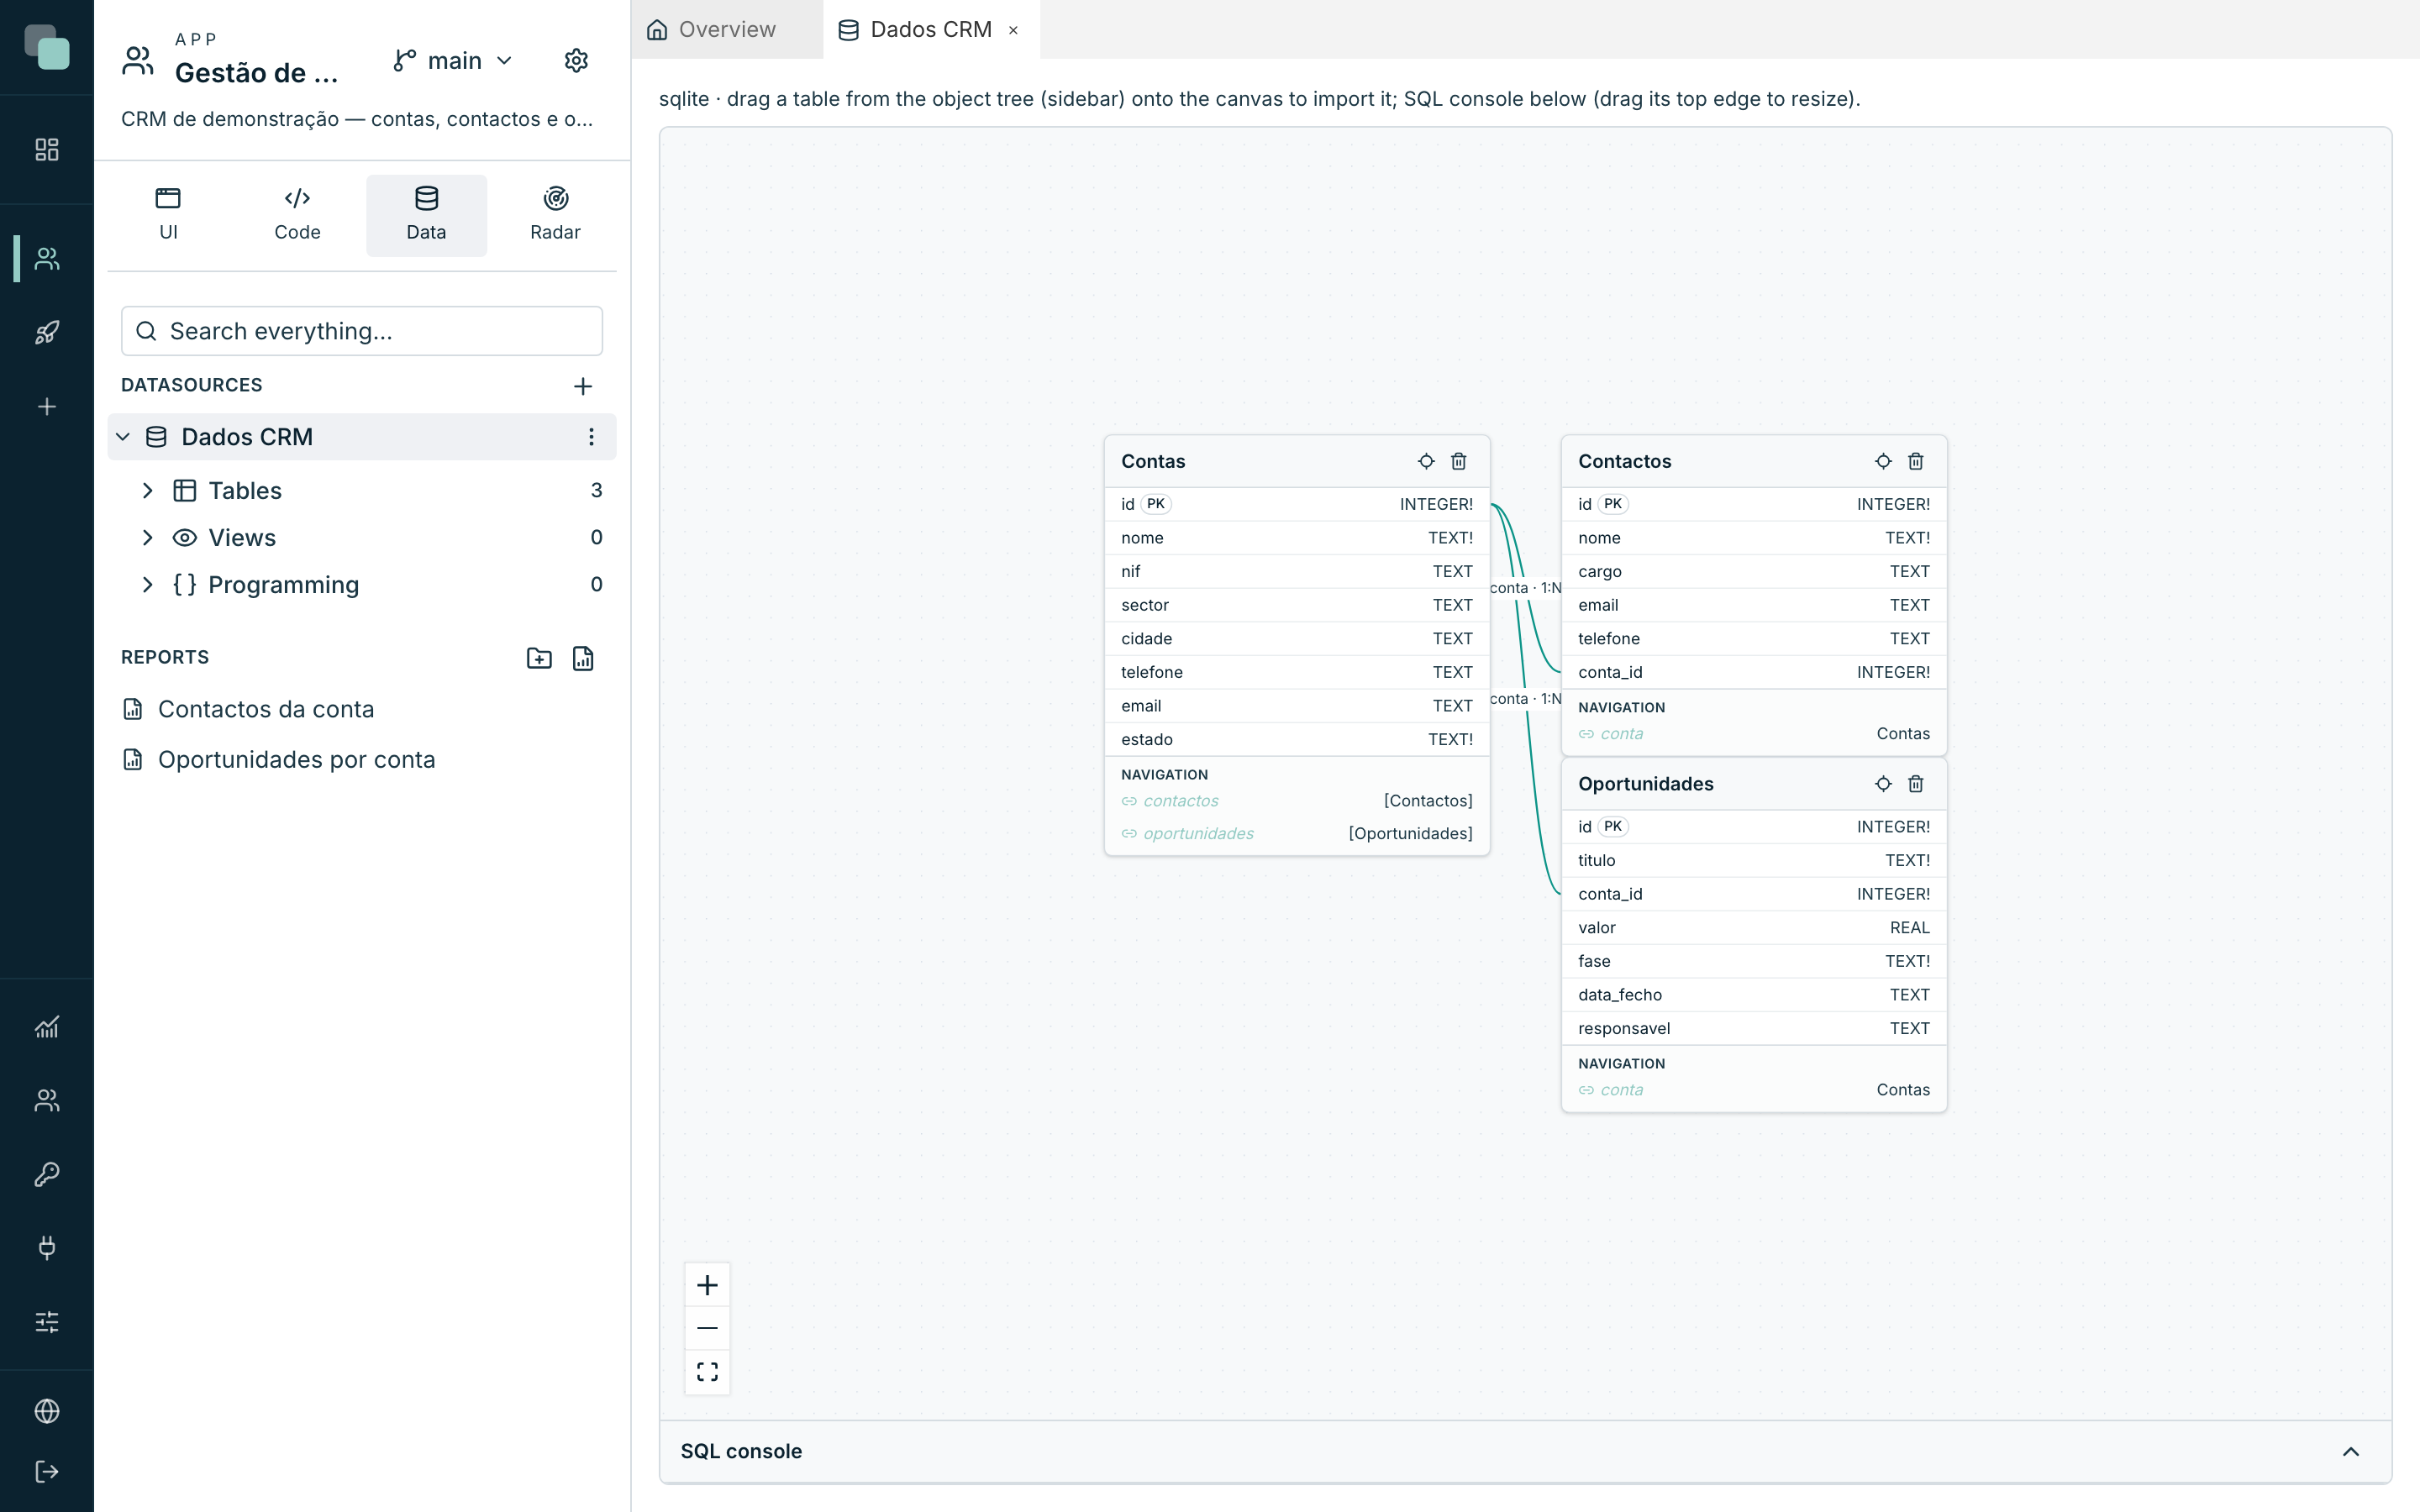
The diagram is dragged with the mouse; the buttons in the bottom left corner zoom and frame everything. Each entity's position is stored — you arrange the diagram once and that is how it opens again.
The tree of objects
Under the datasource, the tree shows what exists in the database, grouped and with each group's count:
| Group | What it lists |
|---|---|
| Tables | The engine's tables. Each one has its own menu (⋯). |
| Views | The views (named, saved queries). |
| Programming | Functions / Procedures and Triggers — see Triggers. |
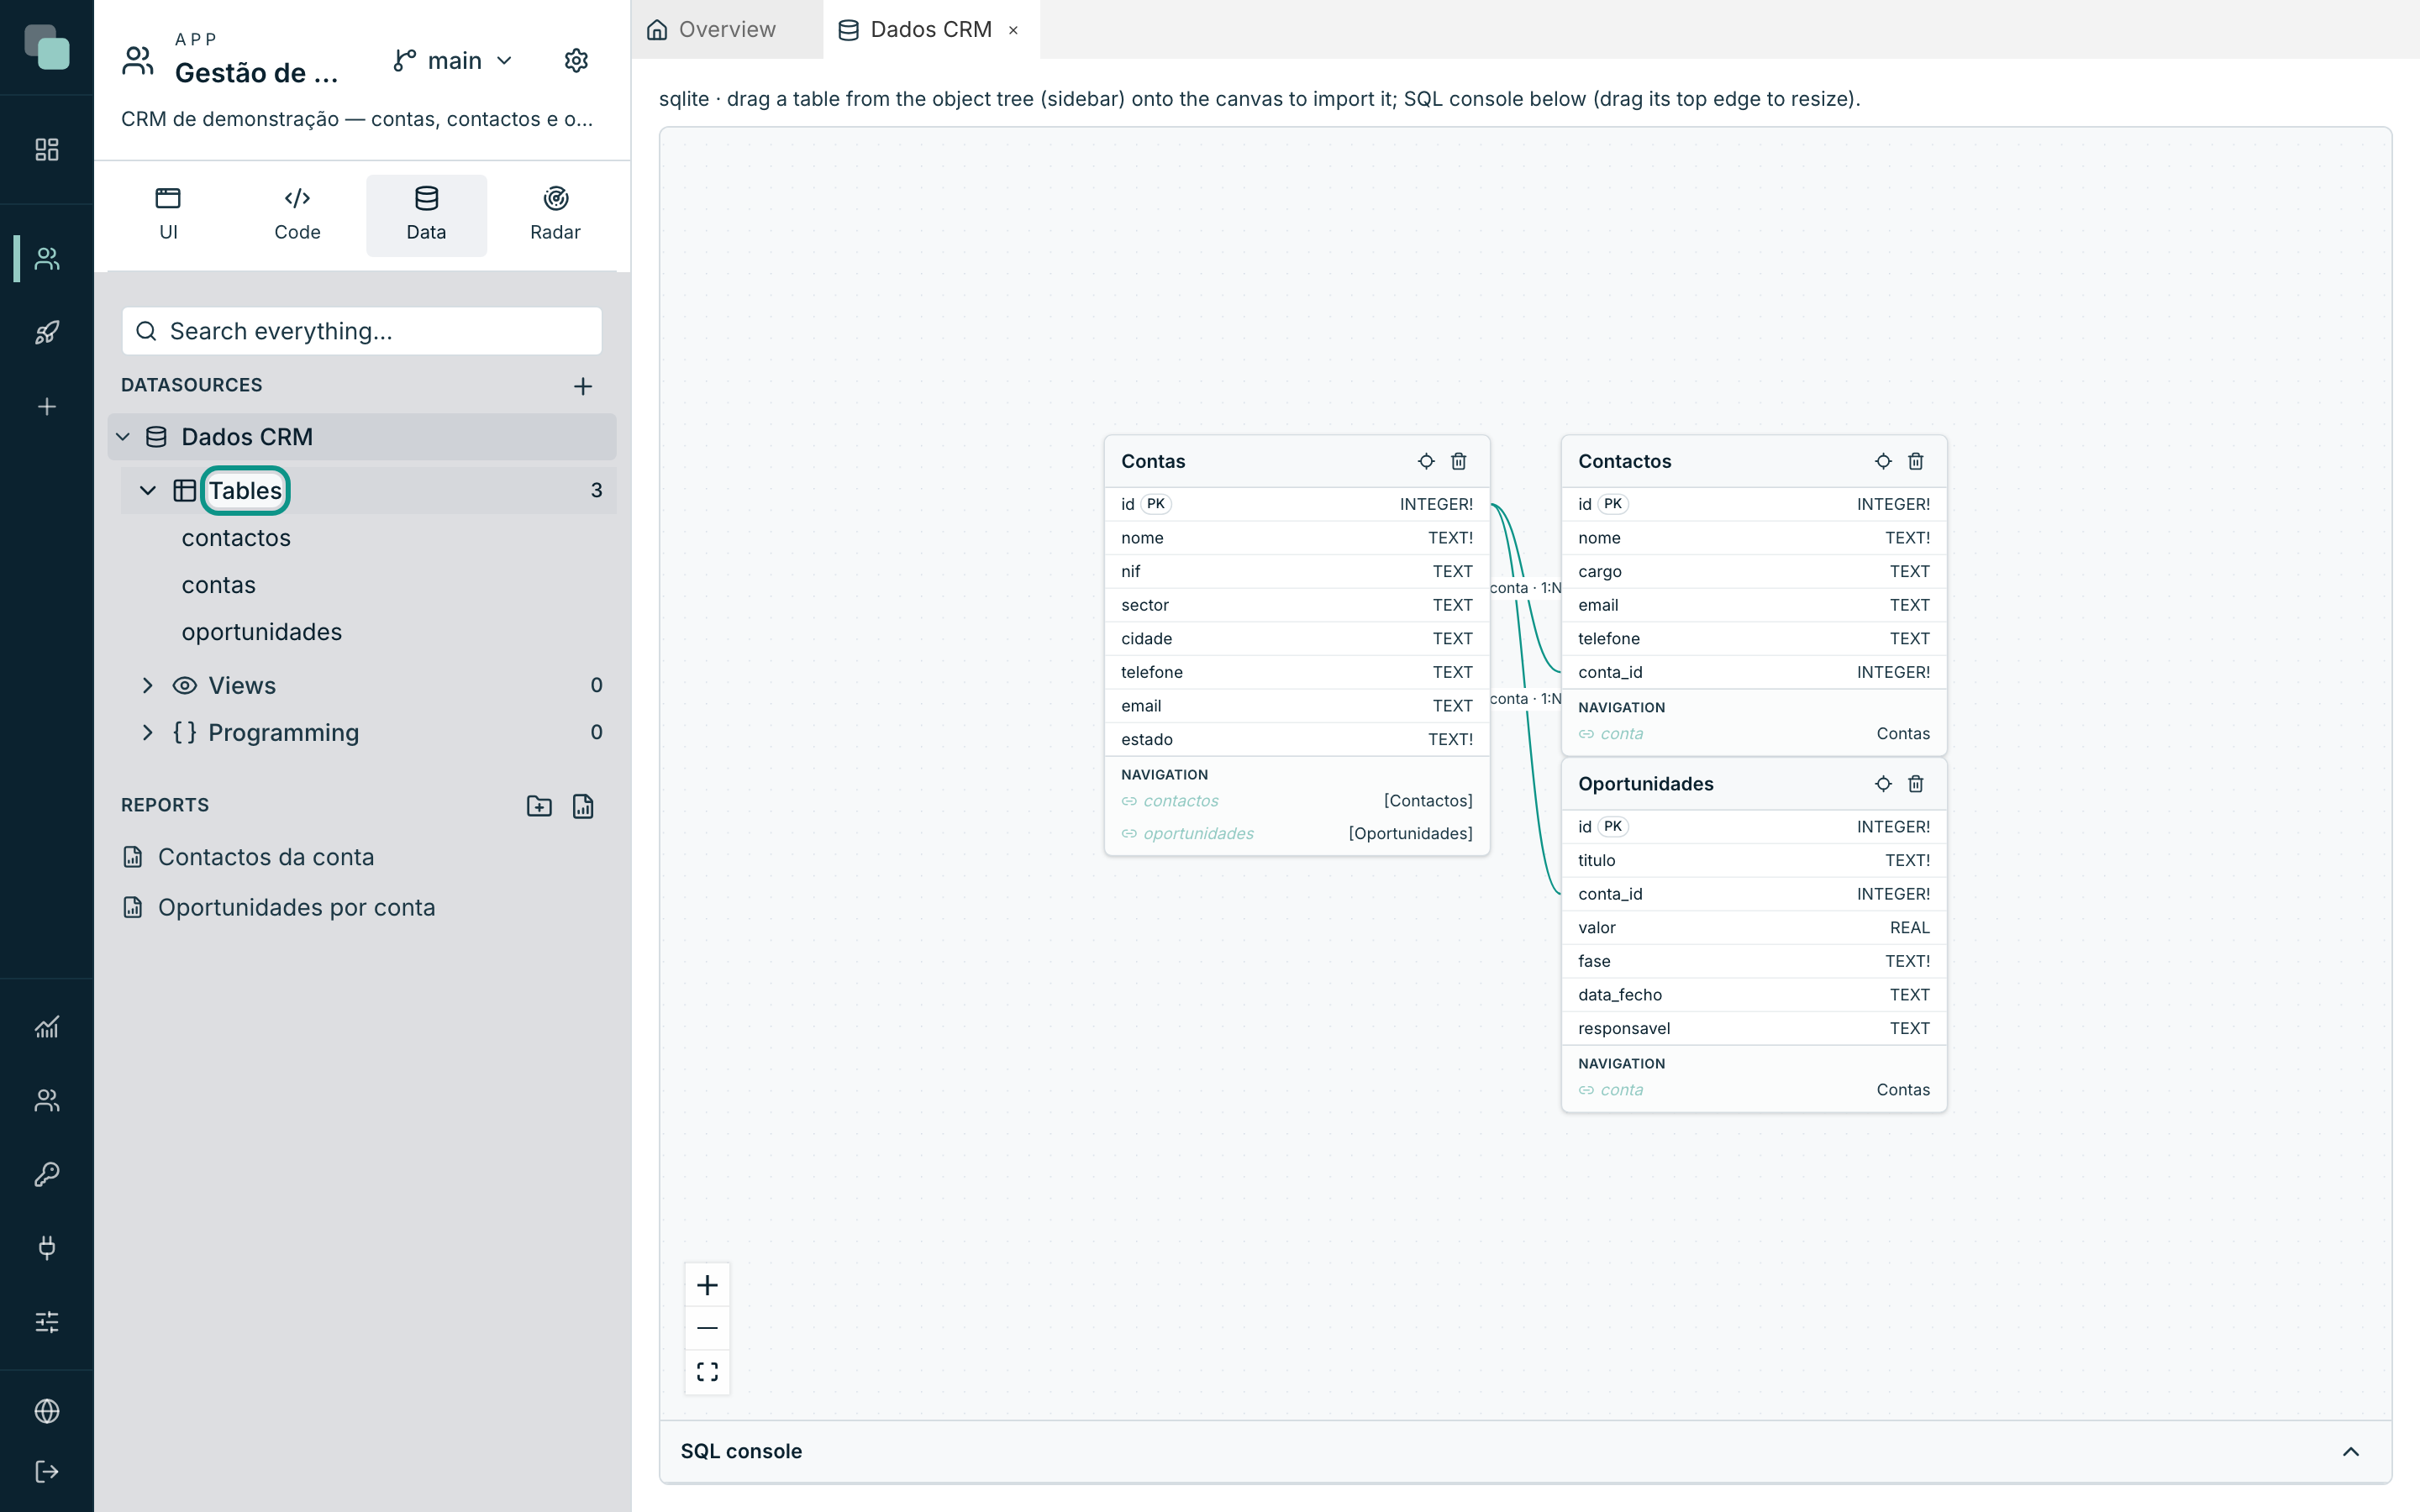
The Search everything… box at the top of the sidebar filters the tree; with a search active the groups open by themselves and a group with no results disappears.
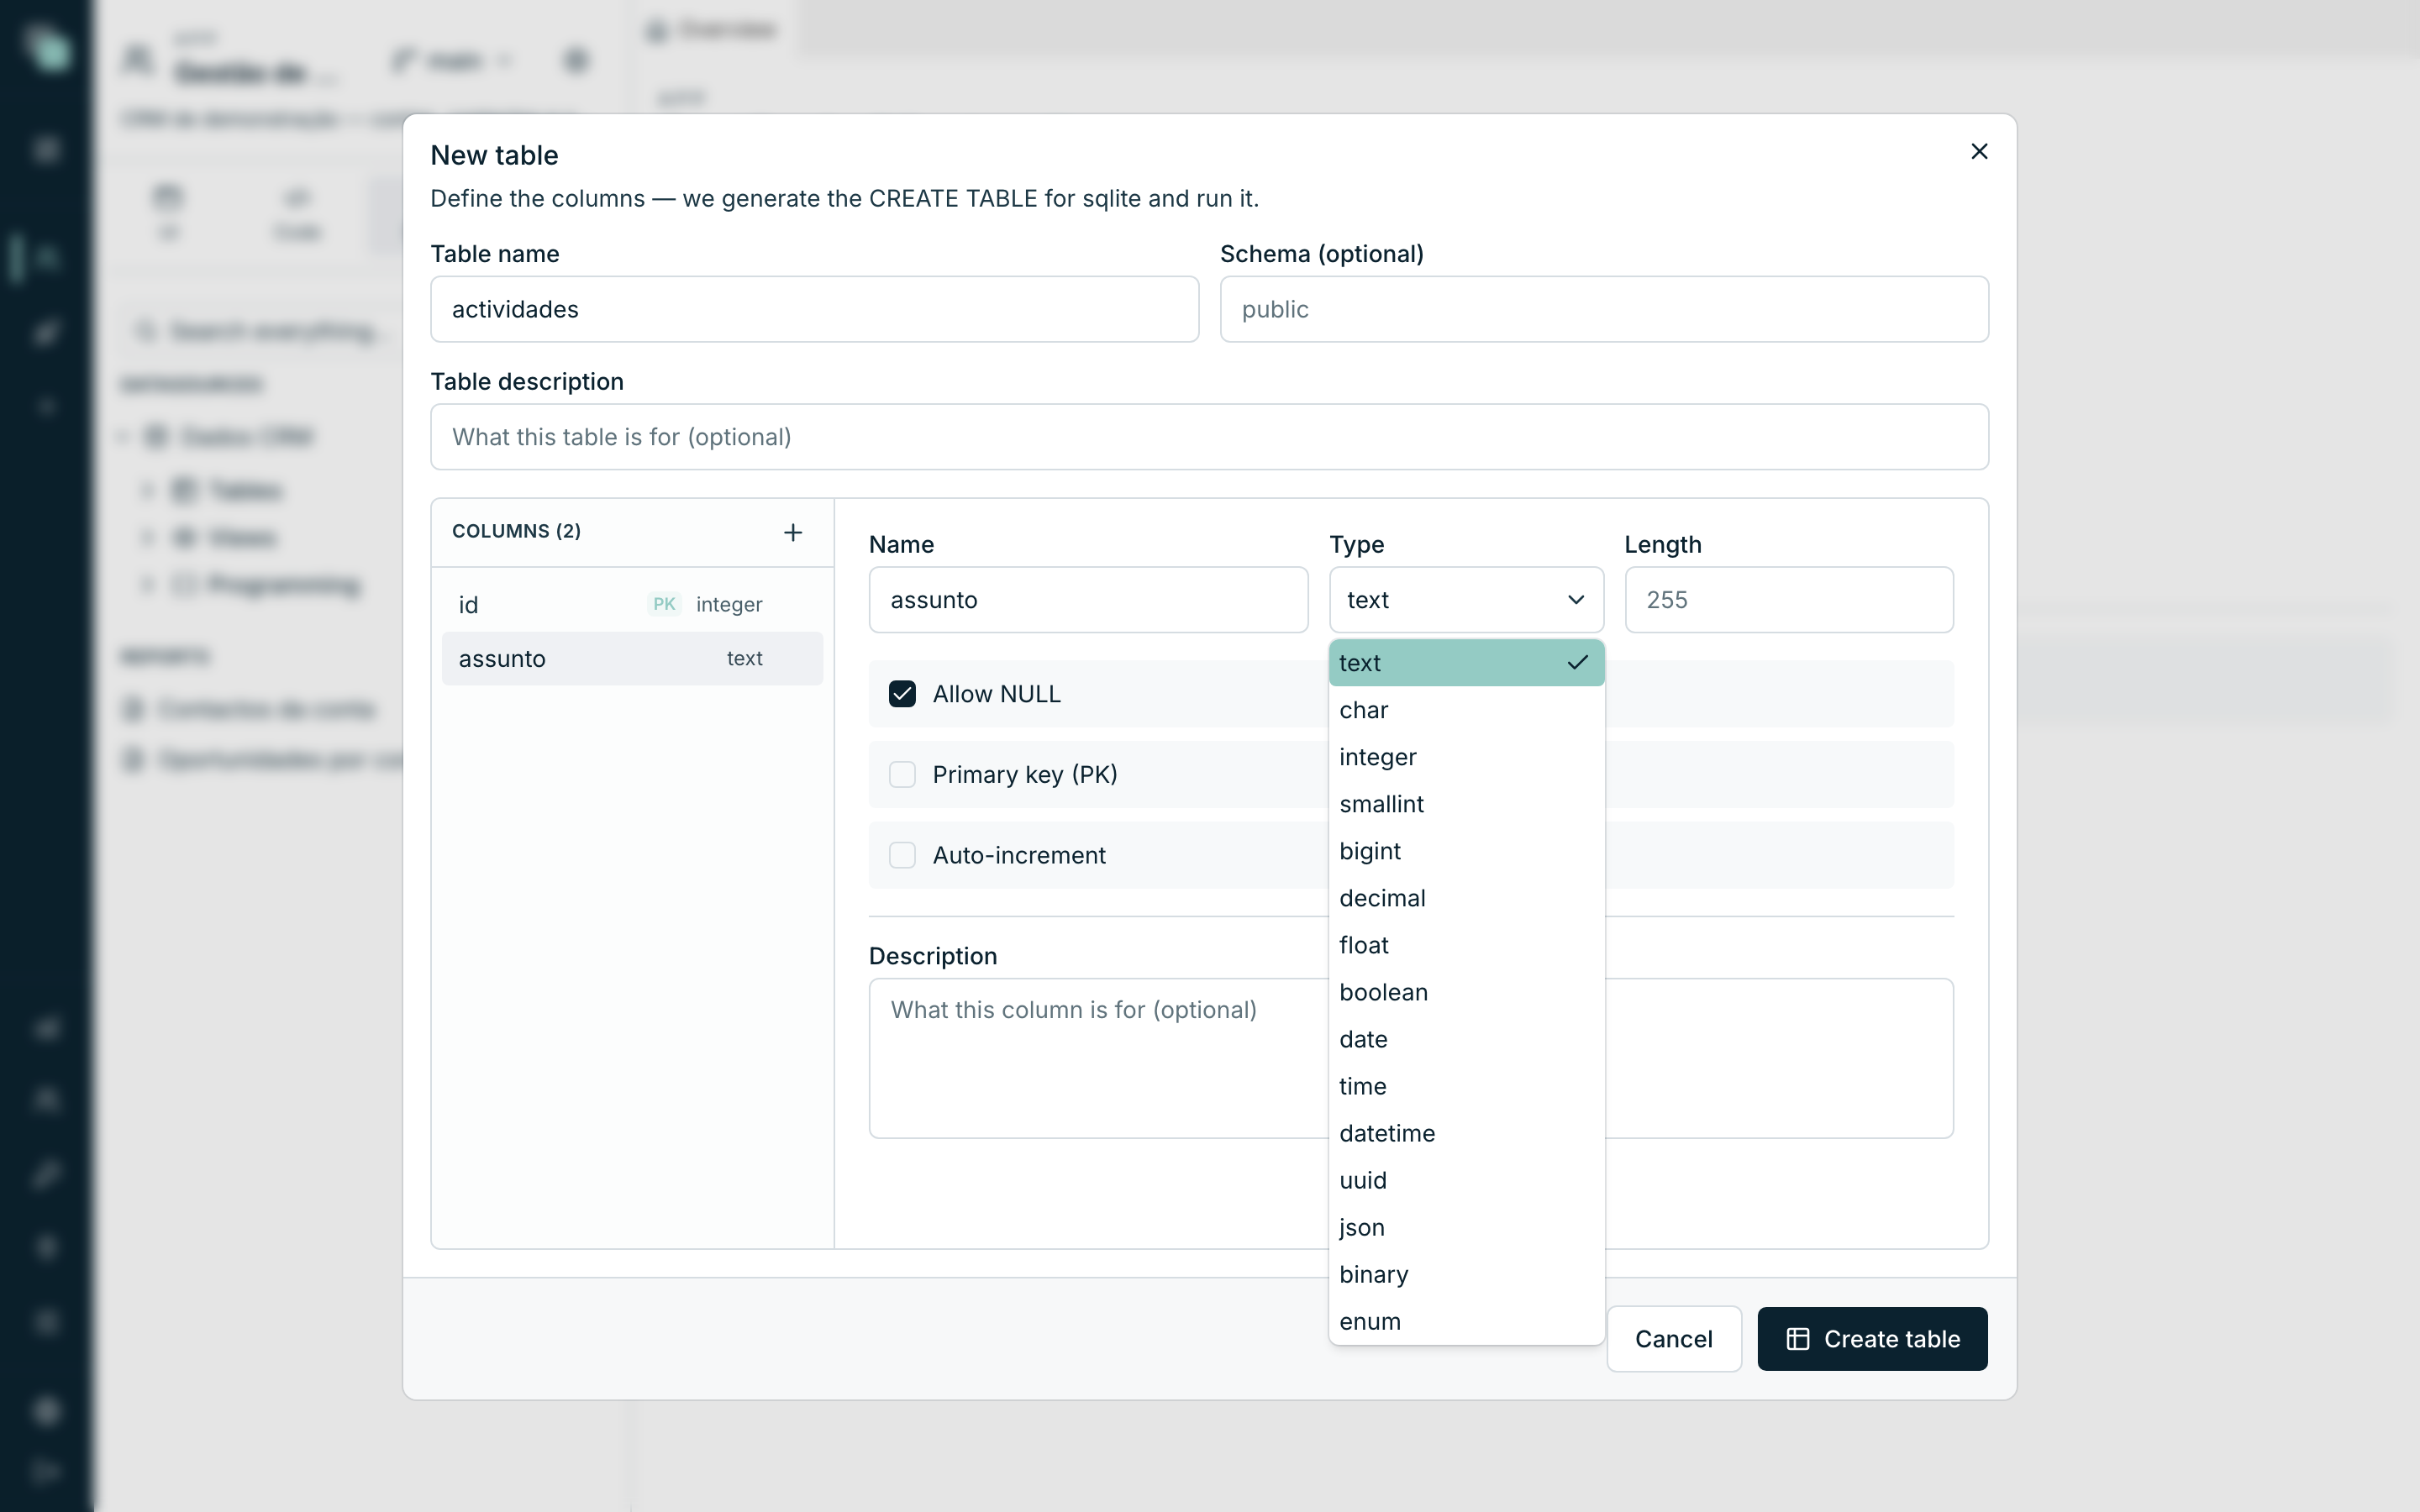
Creating a table
- Hover over the datasource and open the ⋯ menu (Actions for …).
- Choose New table.
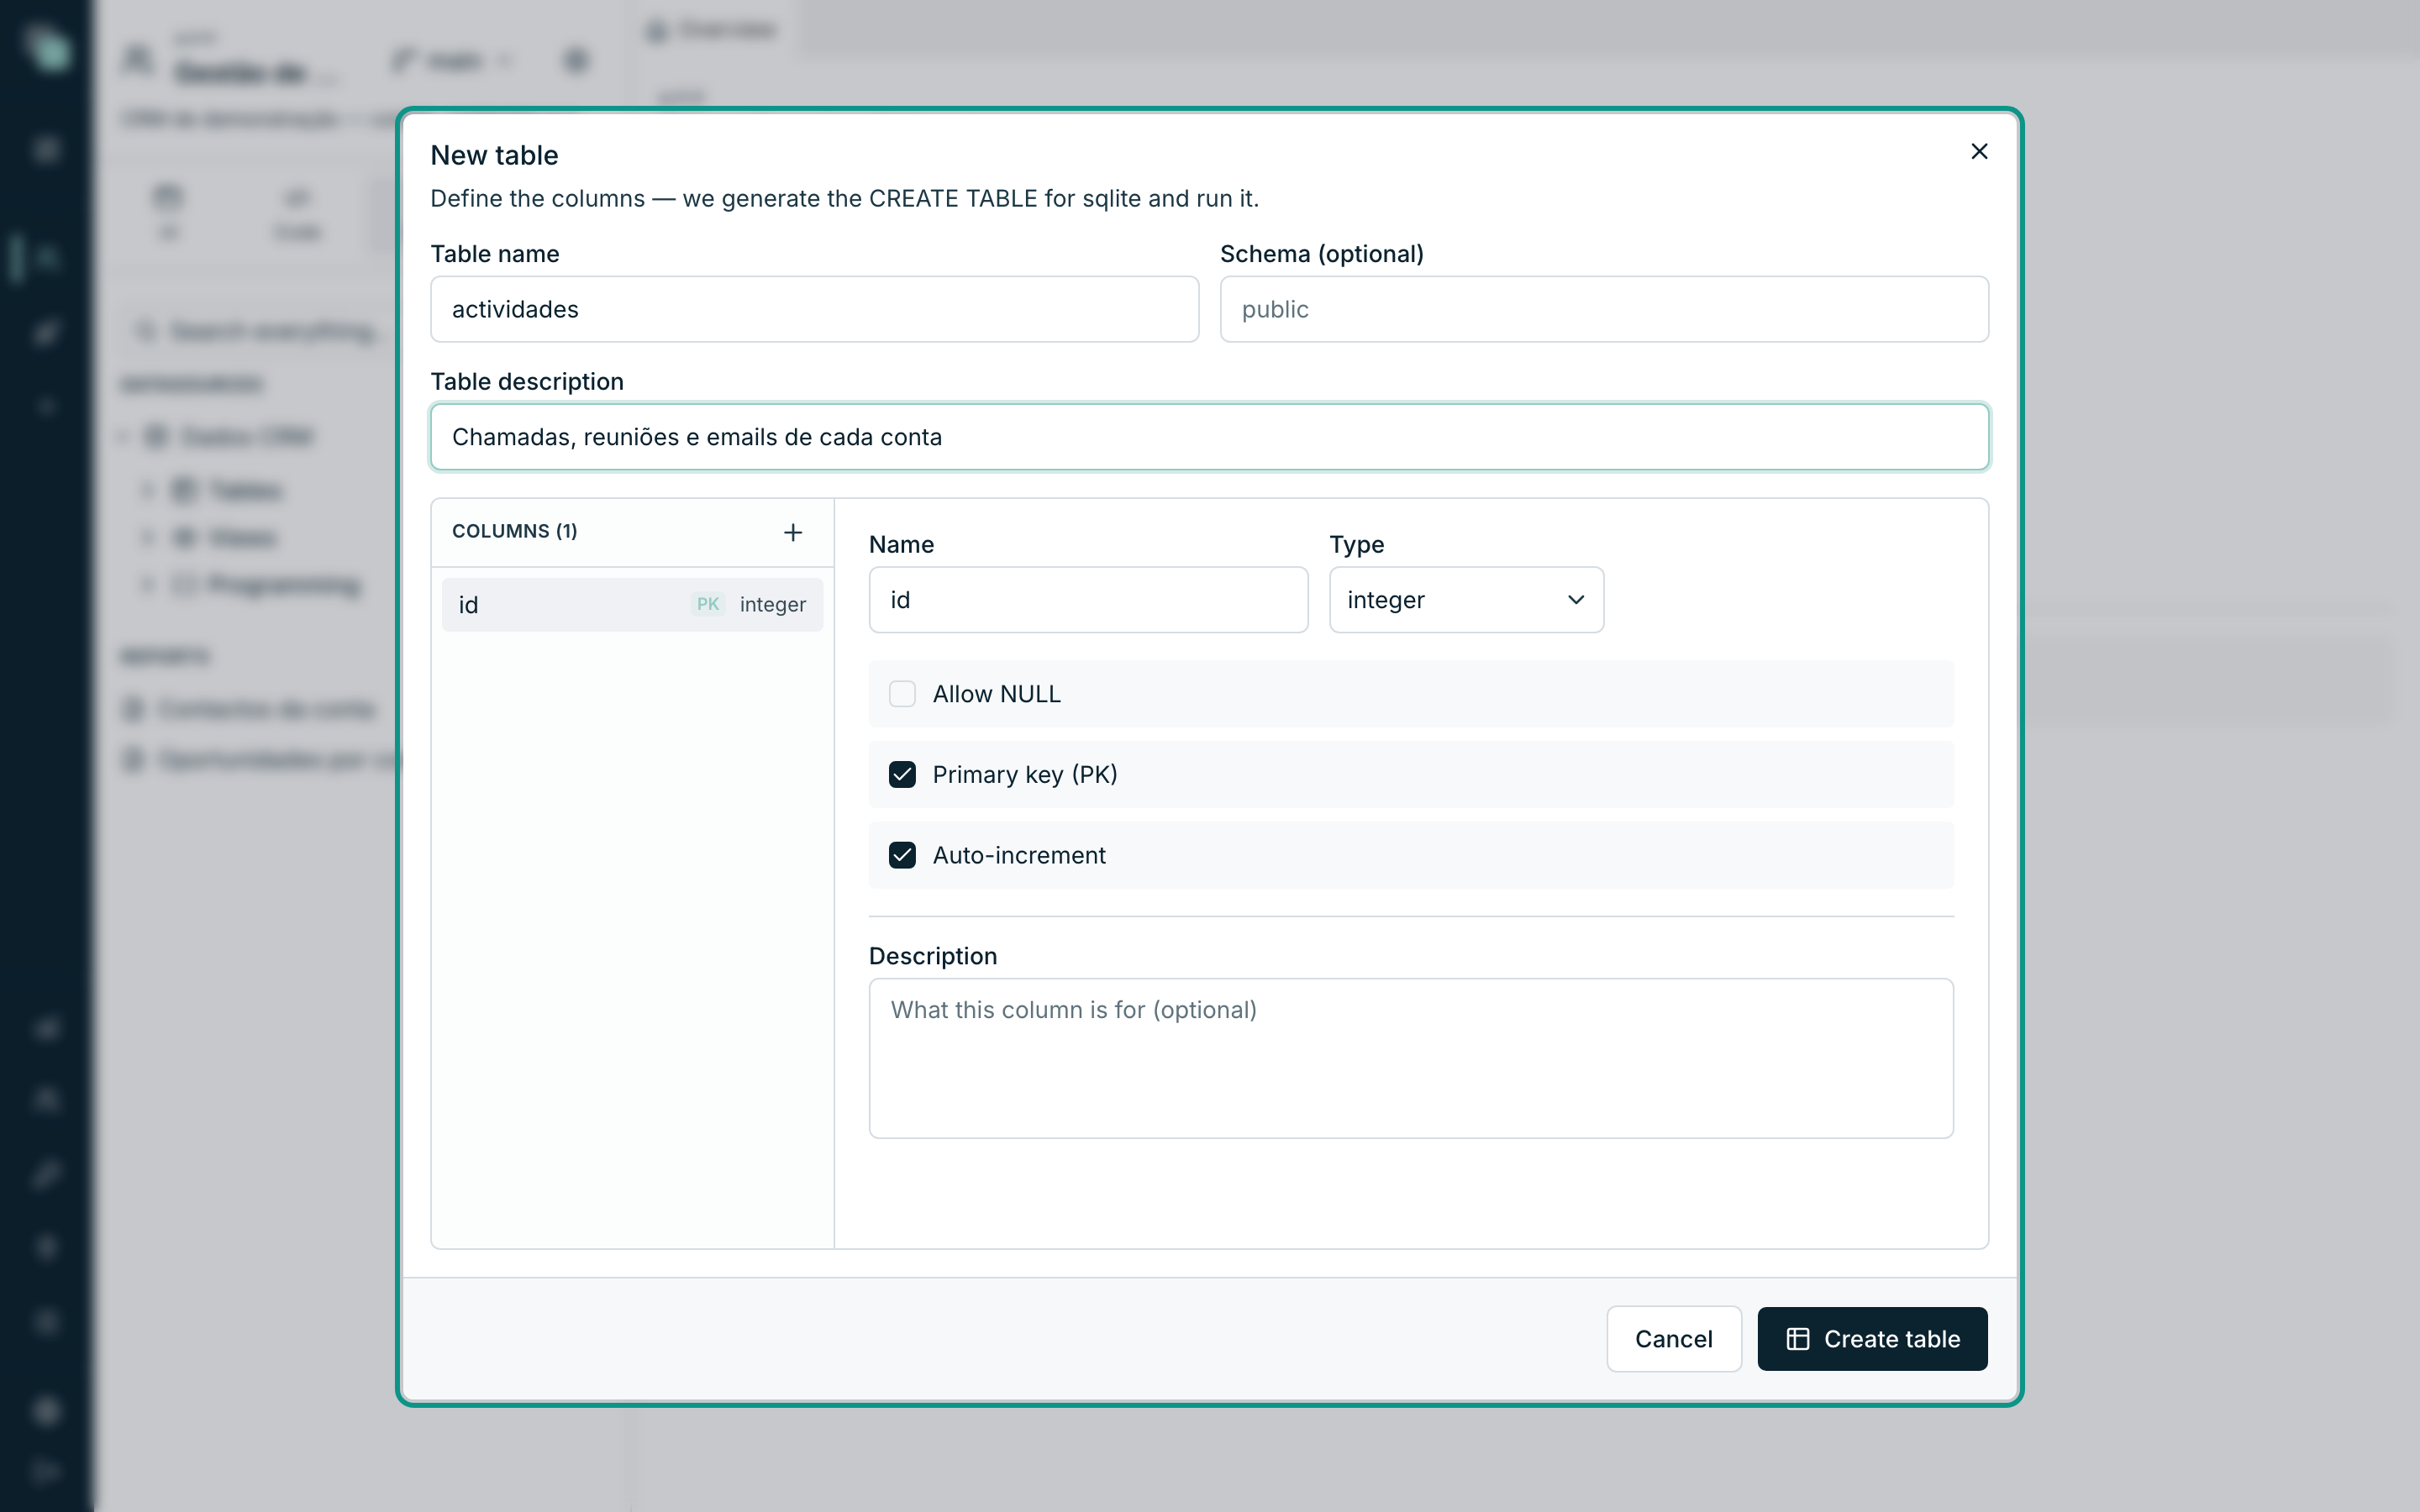
- Fill in the Table name — it is the name that stays in the database
(lowercase and underscores spare you headaches:
actividades,linhas_encomenda). - Schema (optional) only matters on engines with schemas; leave it empty if you do not use them.
- In Table description, write what it is for. It is not decoration: this description follows the table around the platform and is what explains the table to whoever gets there after you.
- Define the columns (next) and confirm with Create table.
Note
The table is created for real, in the connected database. If the connection is to a production database, that is where the table is born.
The columns
The left panel of the dialog is the list of columns (Columns (N)) and the + button adds one. Click a column in the list to edit it on the right.
The table always starts with an id column, of type integer, with
Primary key (PK) and Auto-increment on — the starting point that
serves 9 in every 10 tables.
| Field | What it does |
|---|---|
| Name | The column's name in the database. |
| Type | The column's logical type (full list below). |
| Length | Only on text and char — how many characters fit. |
| Precision · Scale | Only on decimal — total digits and how many sit right of the decimal point (18 · 2 for money). |
| Enum items | Only on enum — see Relations and enums. |
| Allow NULL | Whether the column accepts being empty. Off, the database refuses records without a value. |
| Primary key (PK) | Identifies the record uniquely. |
| Auto-increment | The engine generates the value on each insert. |
| Description | What this column is for. |
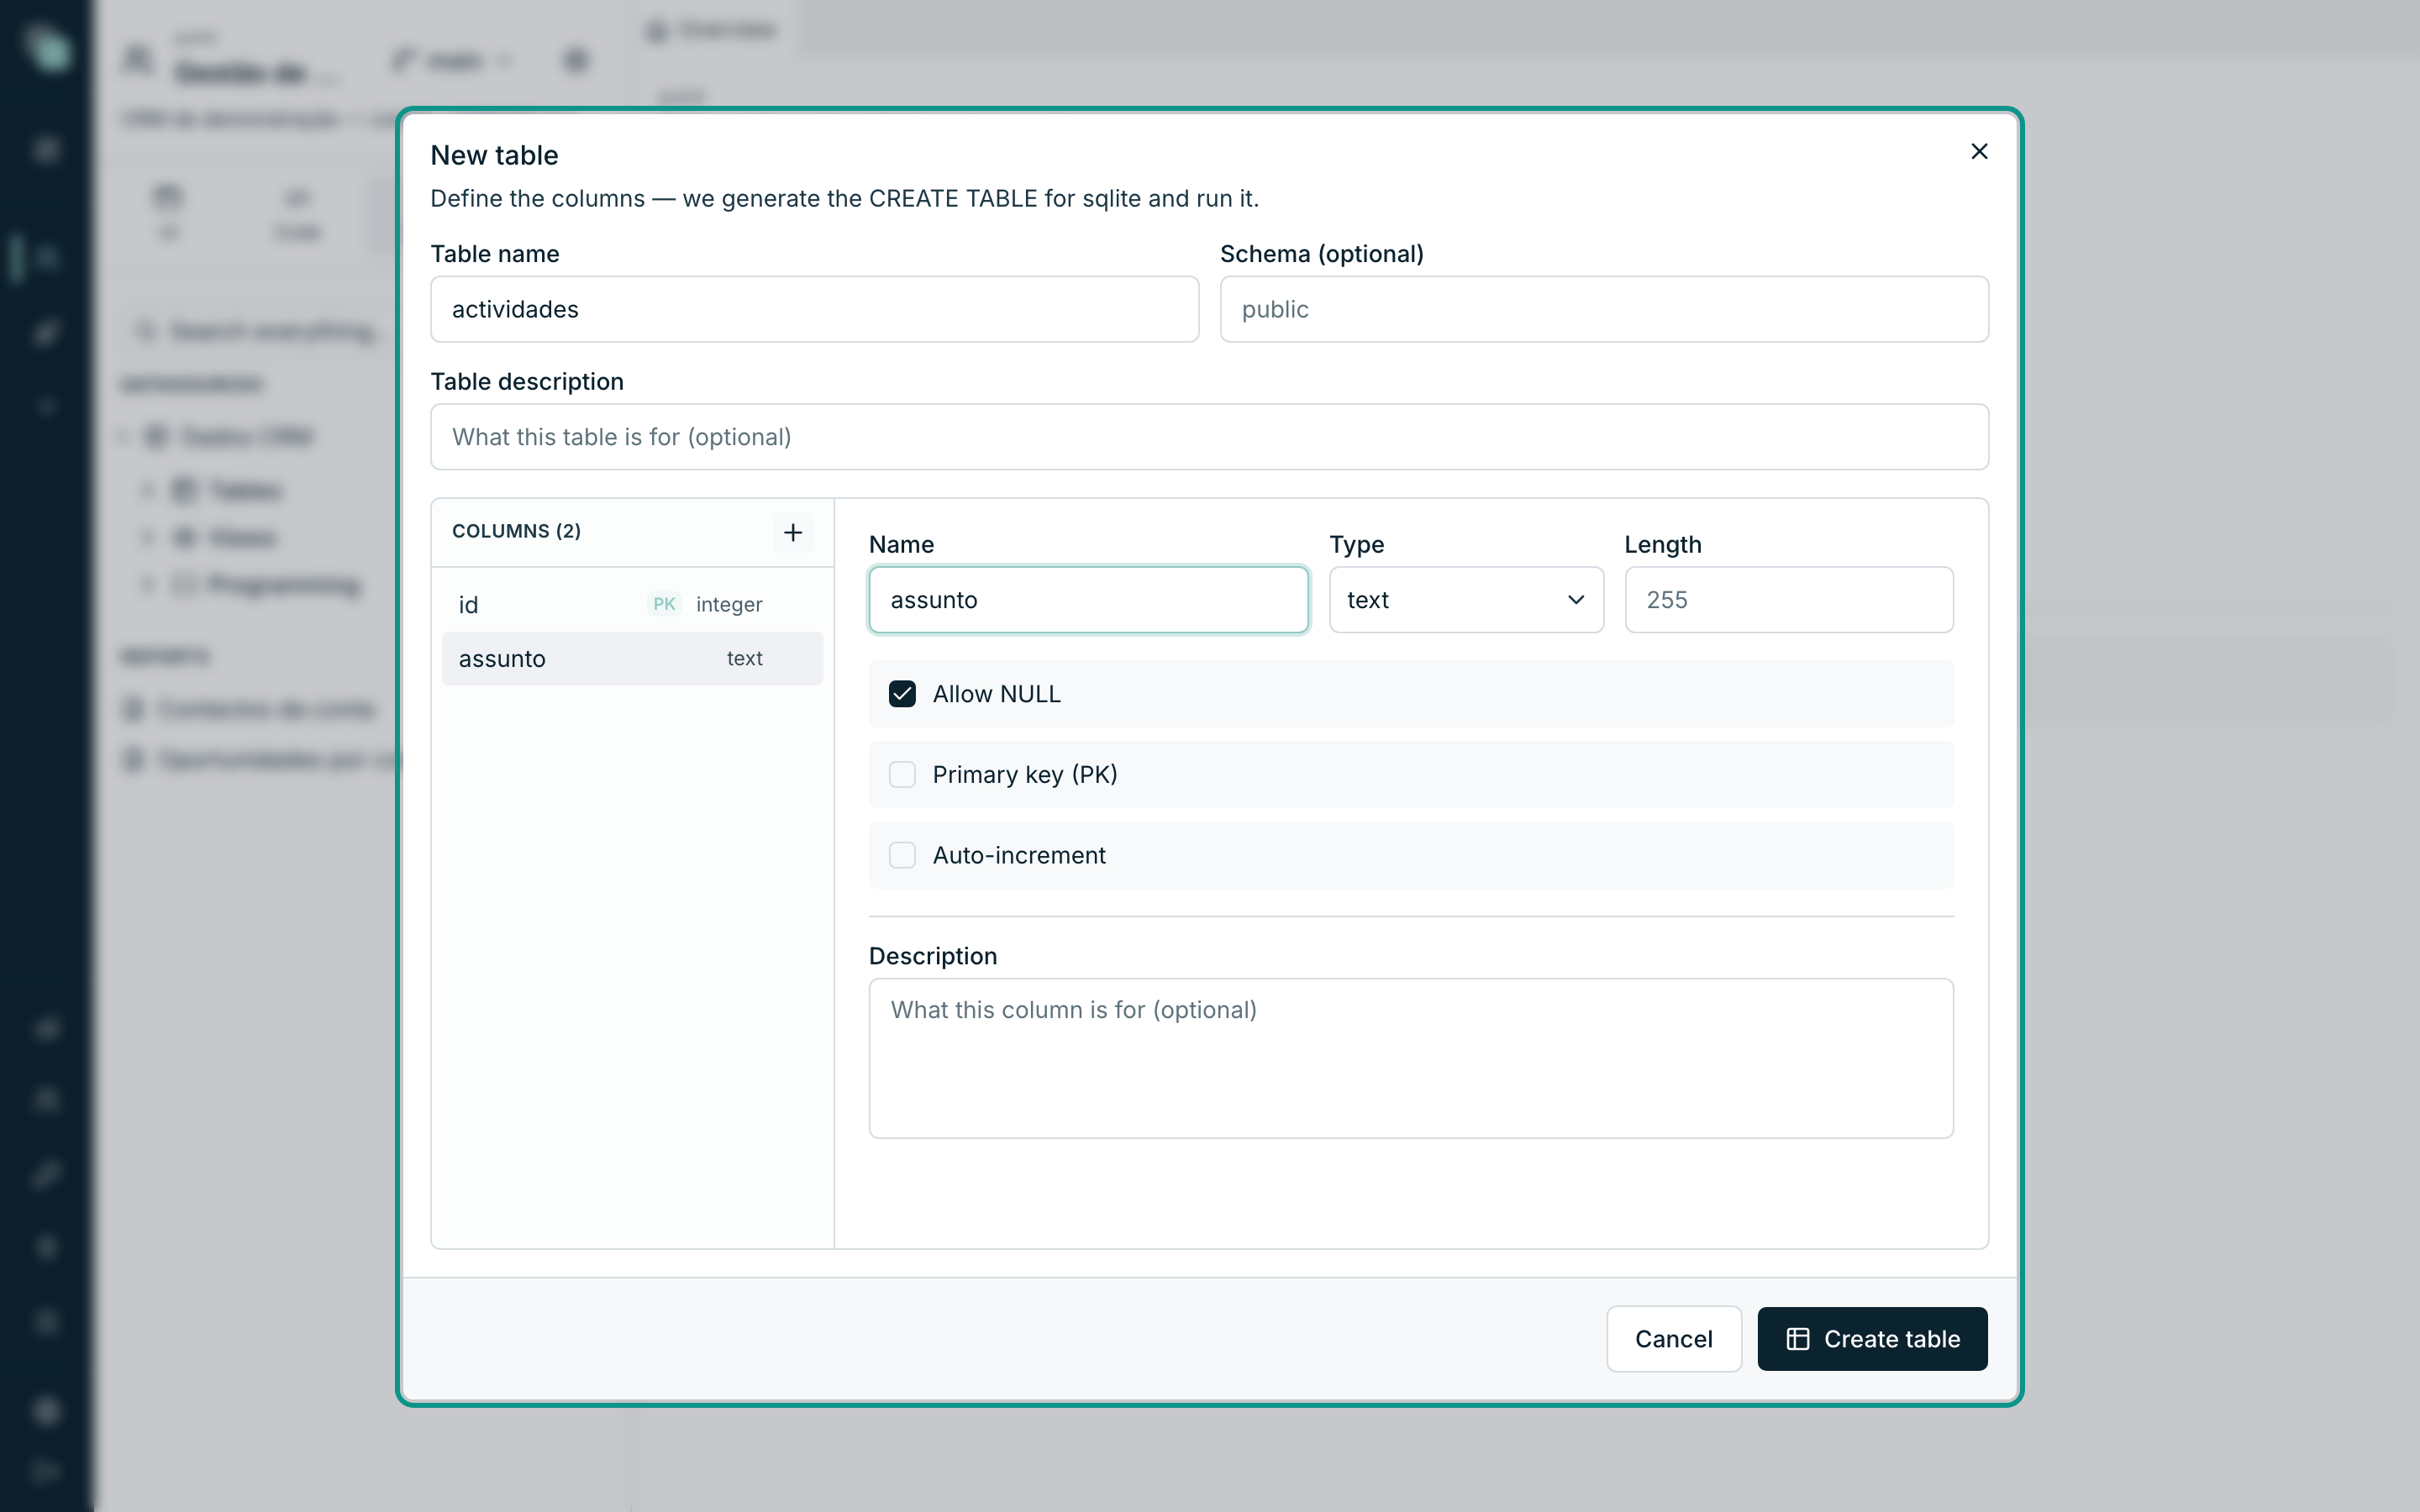
The trash can that appears when hovering over a column in the list removes it (on a new table, it leaves the list right away).
The column types
The types are logical: you describe what the column stores and the platform translates it to the connected engine's right type. The same design serves any supported database.
| Type | For what |
|---|---|
text |
Variable-length text — names, descriptions, notes. |
char |
Fixed-length text — country codes, acronyms. |
integer |
Whole numbers. The natural type of an id. |
smallint |
Small integers. |
bigint |
Large integers — counters, external identifiers. |
decimal |
Exact numbers with decimal places. It is the type for money. |
float |
Approximate numbers — measurements, scientific percentages. |
boolean |
Yes/No. |
date |
A date, without time. |
time |
A time, without date. |
datetime |
Date and time. |
uuid |
Universal identifiers. |
json |
Free structures stored as structured text. |
binary |
Binary content. |
enum |
A closed set of values, defined right there — see Relations and enums. |
Tip
For monetary values use decimal with precision and scale (18 · 2),
never float. The float stores approximations — and a cent lost to
rounding on an invoice is a problem that shows up months later.
Primary keys
The Primary key (PK) is what identifies a record. It is not optional in practice: without a PK, a table can be read but cannot be edited or deleted from the screens — the Table warns The datastore needs a primary key, and the Kanban turns off dragging. If the key is composed of more than one column, turn on Primary key (PK) on each of them.
Auto-increment hands the numbering work to the engine. It only makes sense on integer columns.
Bringing a table into the model
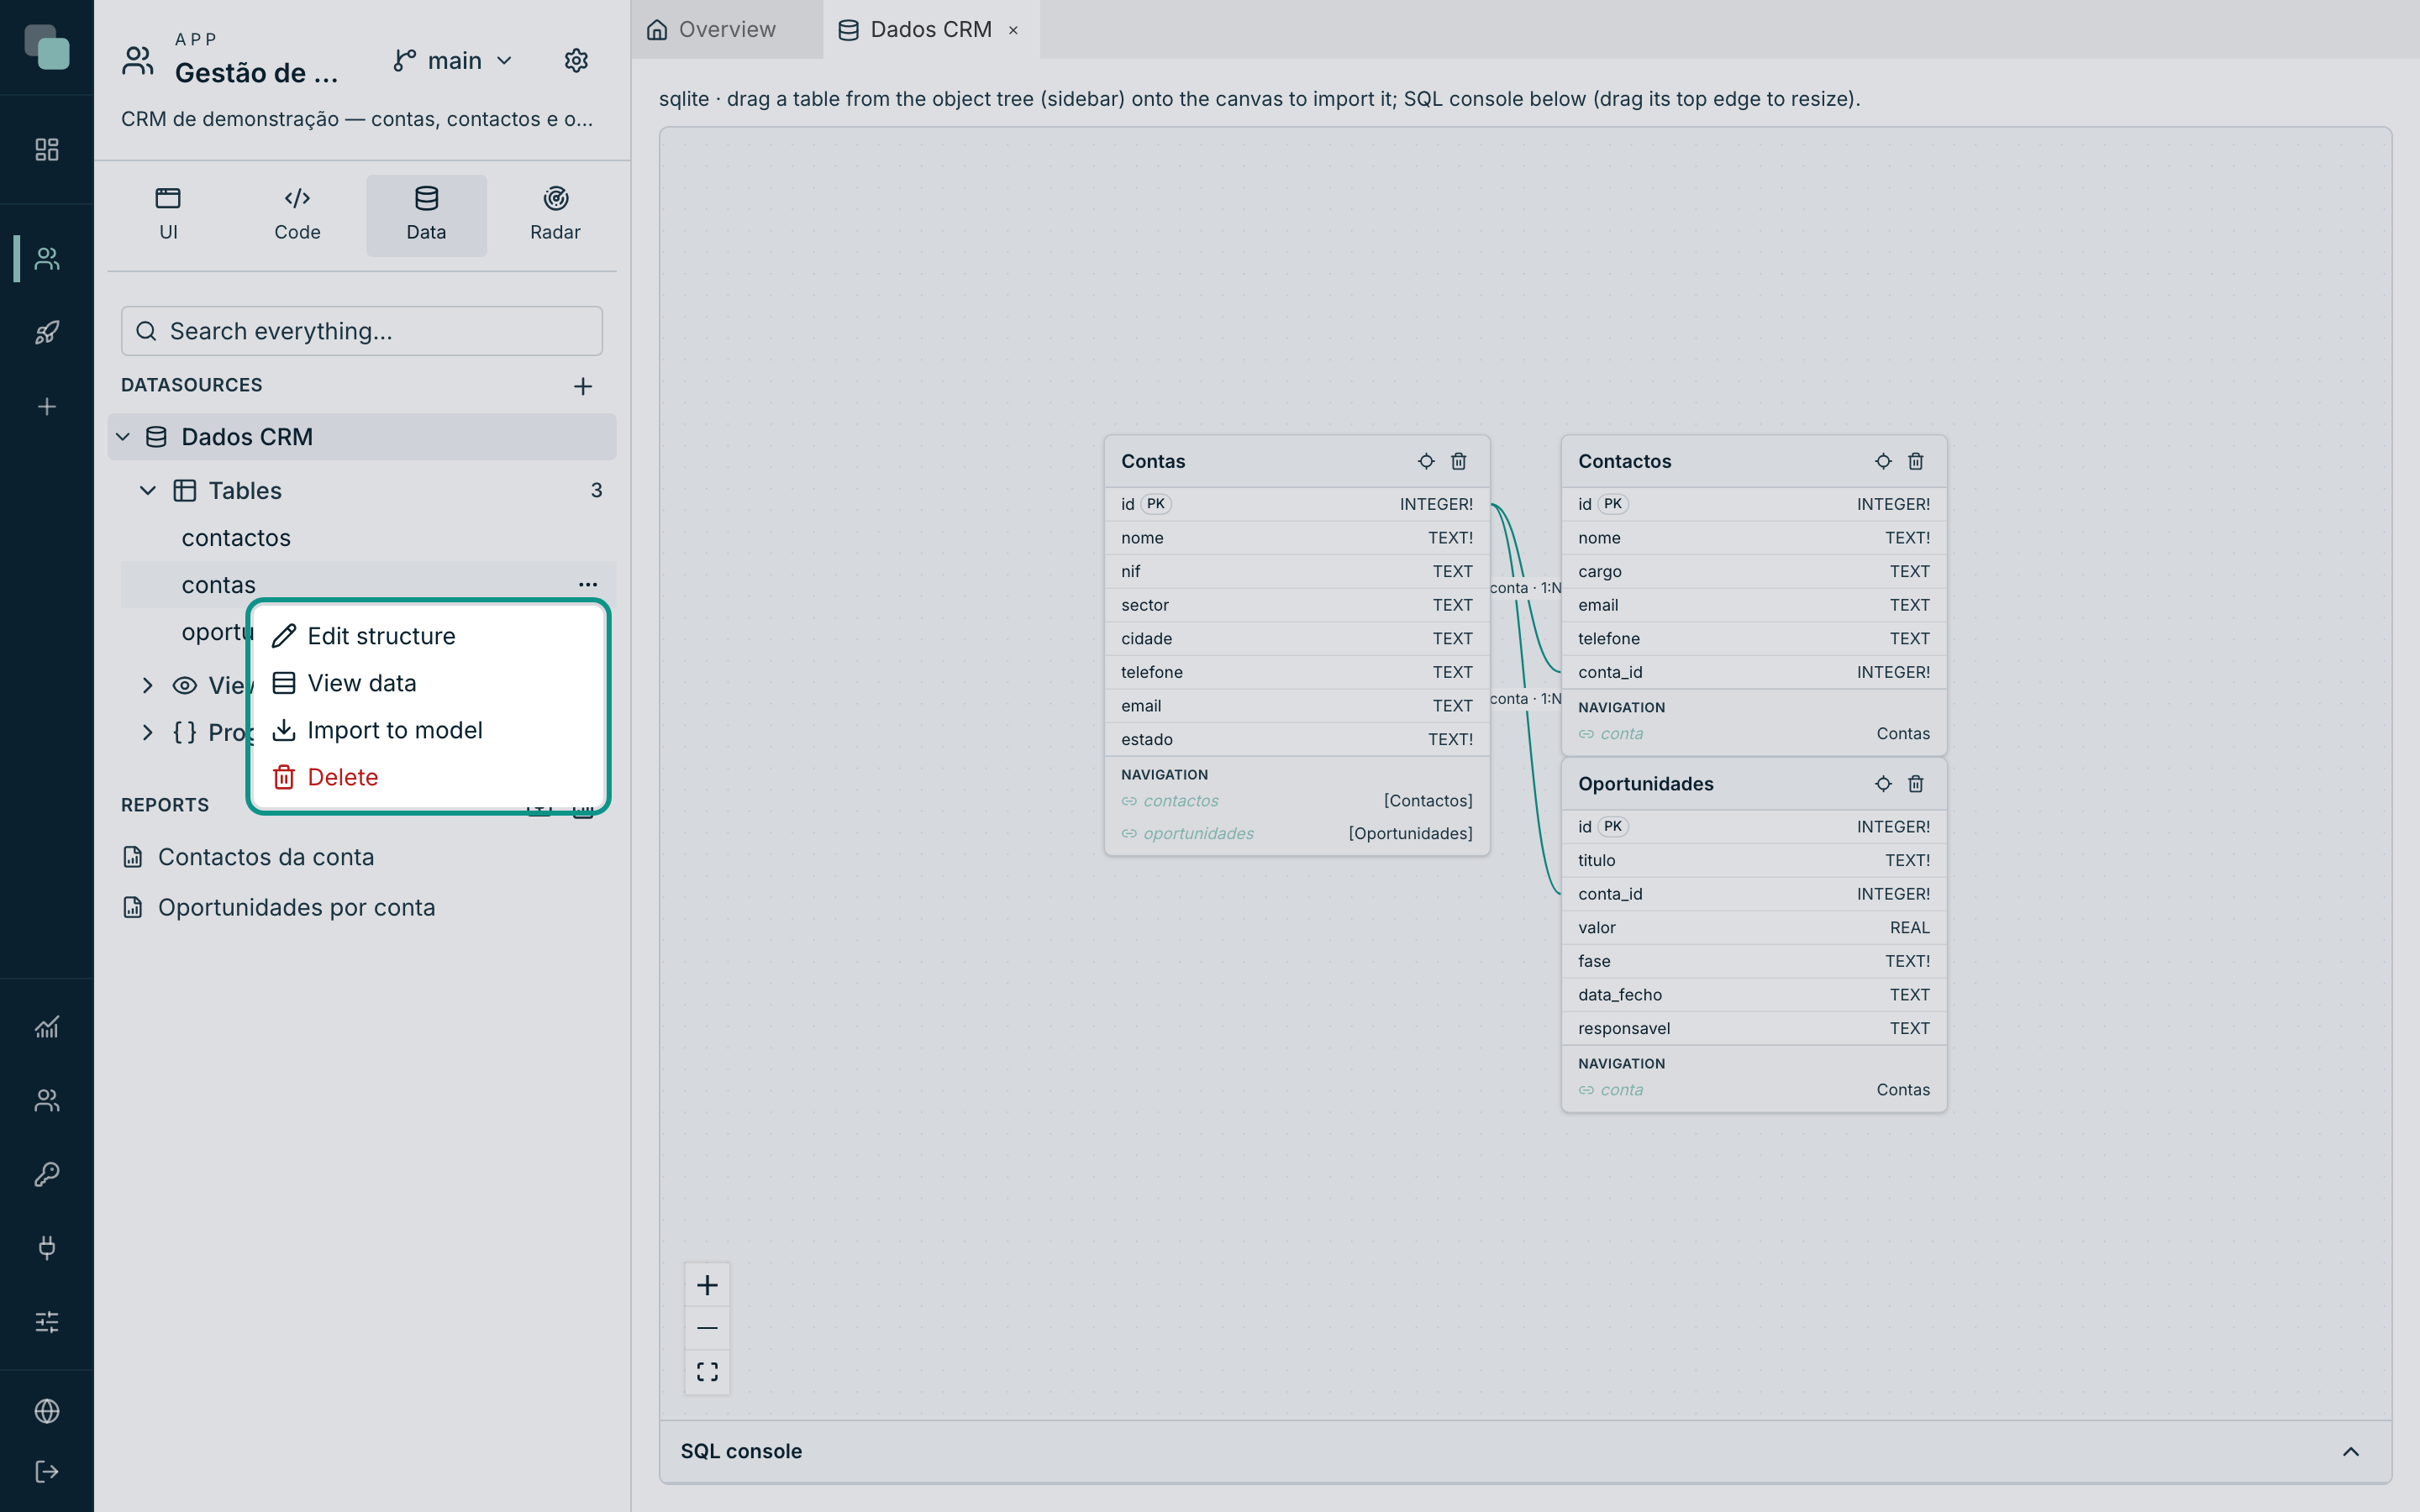
A table that already exists in the database (created by you here, or that was there before) has to enter the model for the APIs and the screens to see it. There are two paths, and they come to the same:
- Drag the table from the tree onto the diagram — it lands where you drop it.
- Open the table's ⋯ menu and choose Import to model.
The platform reads the table's structure and creates the entity: a
name with an initial capital (contas → Contas), the fields, the keys
and the relations it finds declared in the database.
The import also reads whether each column has a default value in the database,
or is generated by it (an identity, a computed column): those fields are not
required in forms or APIs, and keep the database's value when they are not
sent. Entities imported before this information existed are brought up to date
by the platform update, which reads the catalogue of every database it can
reach, in every app and version (one commit per version, «Valor por omissão
das colunas lido da base de dados»); a database that does not answer at that
moment waits for the next update, or for the pnpm model:refresh-defaults
command on the platform machine. Importing the table again (drag it, or
Import to model) does the same for one entity.
A 64-bit integer key (bigint, or a wide NUMBER in Oracle), primary or
foreign, enters the model as ID: it travels as text, and an id above
9,007,199,254,740,991 arrives exactly, which a number didn't guarantee. An
ID is filtered with eq, neq, in and nin. A bigint that isn't a
key stays a number, and entities that were already imported keep the type
they had.
Imported relation names never repeat a column's or another relation's name: a
cliente column that points to the cliente table gives the relation
clienteRel, and two keys to the same table get names taken from the columns
(moradaEntrega, moradaFaturacao). Creating a relation by hand with a name
already in use is refused.
An entity's card
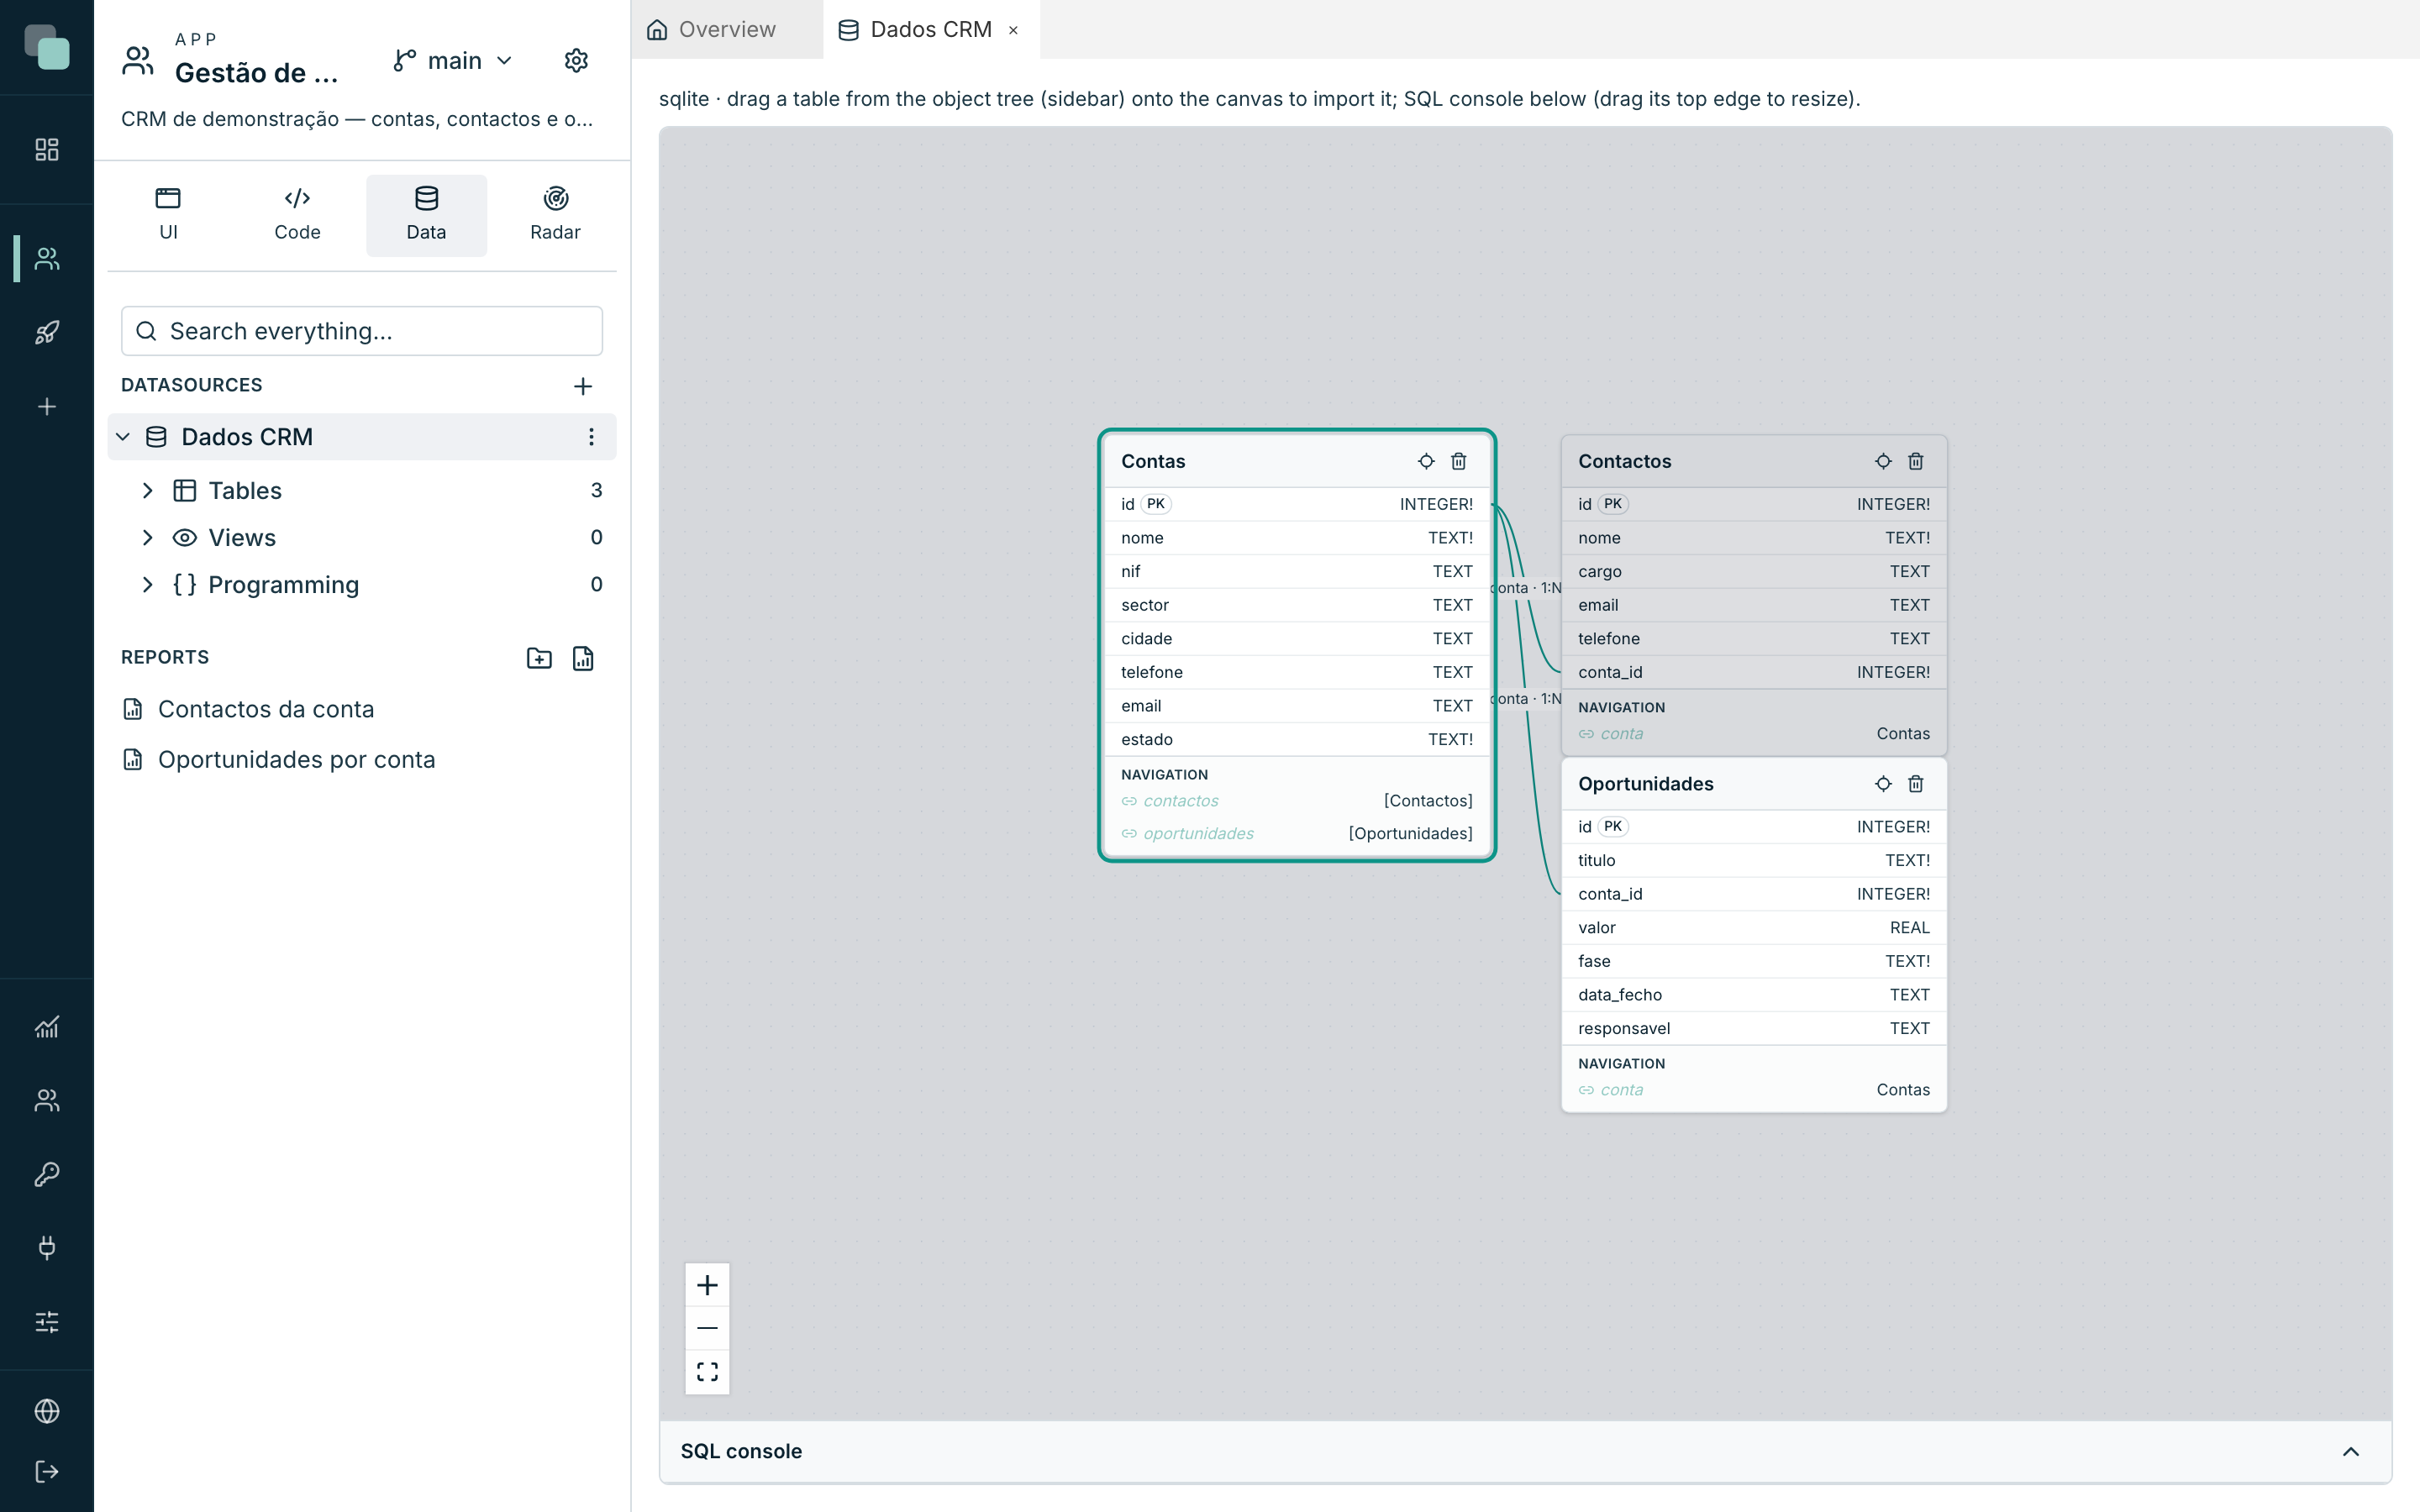
Each entity is a card on the diagram:
- The entity name in the header, and two buttons: Locate in tree (marks the corresponding table in the sidebar) and Remove from model.
- One field per row, with the name on the left and the type on the right. The PK mark flags the primary key, and a ! after the type means the field does not accept empty.
- Enumerated fields appear in italics, with the enum's name instead of the type.
- With many fields, the card shrinks and offers Show N more fields / Show less.
- At the bottom, the Navigation section lists the paths to the related entities — the subject of Relations and enums.
Warning
Remove from model does exactly that: the entity and its fields and relations leave the platform's model, and the table in the database is not touched. It is the APIs that used the entity that stop working.
Changing a table
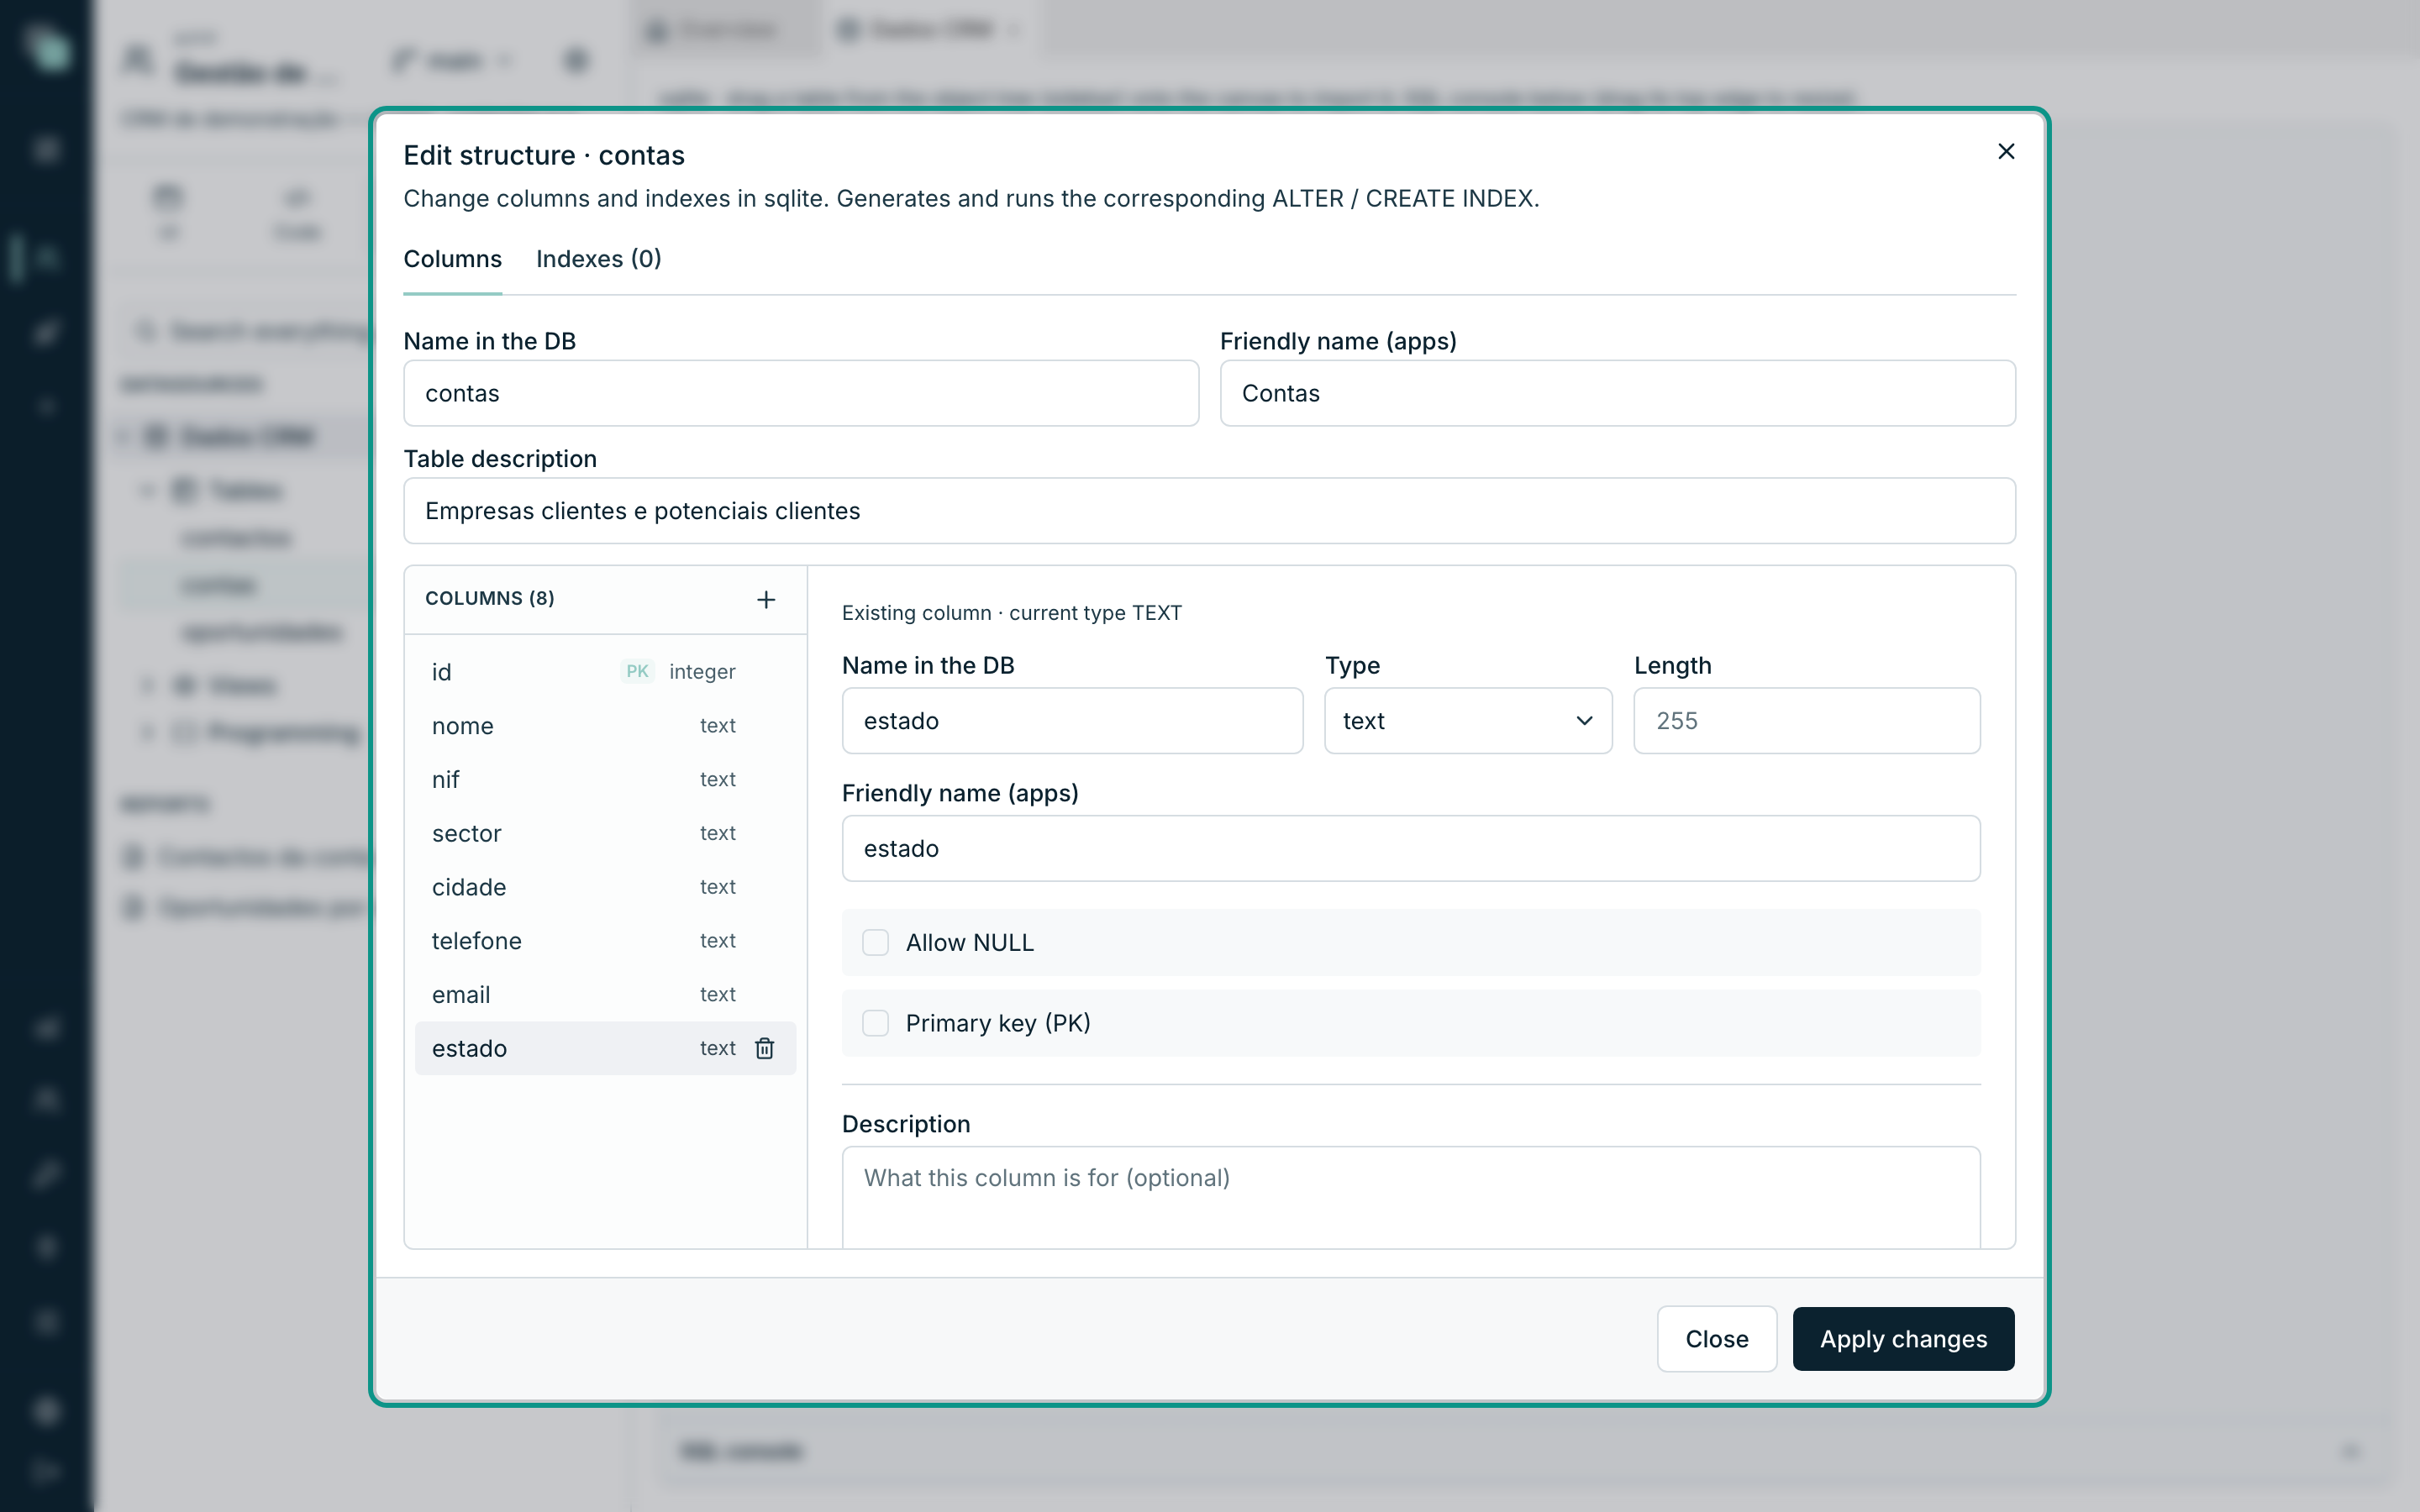
A table's ⋯ menu → Edit structure opens the structure editor, with two tabs: Columns and Indexes (N).
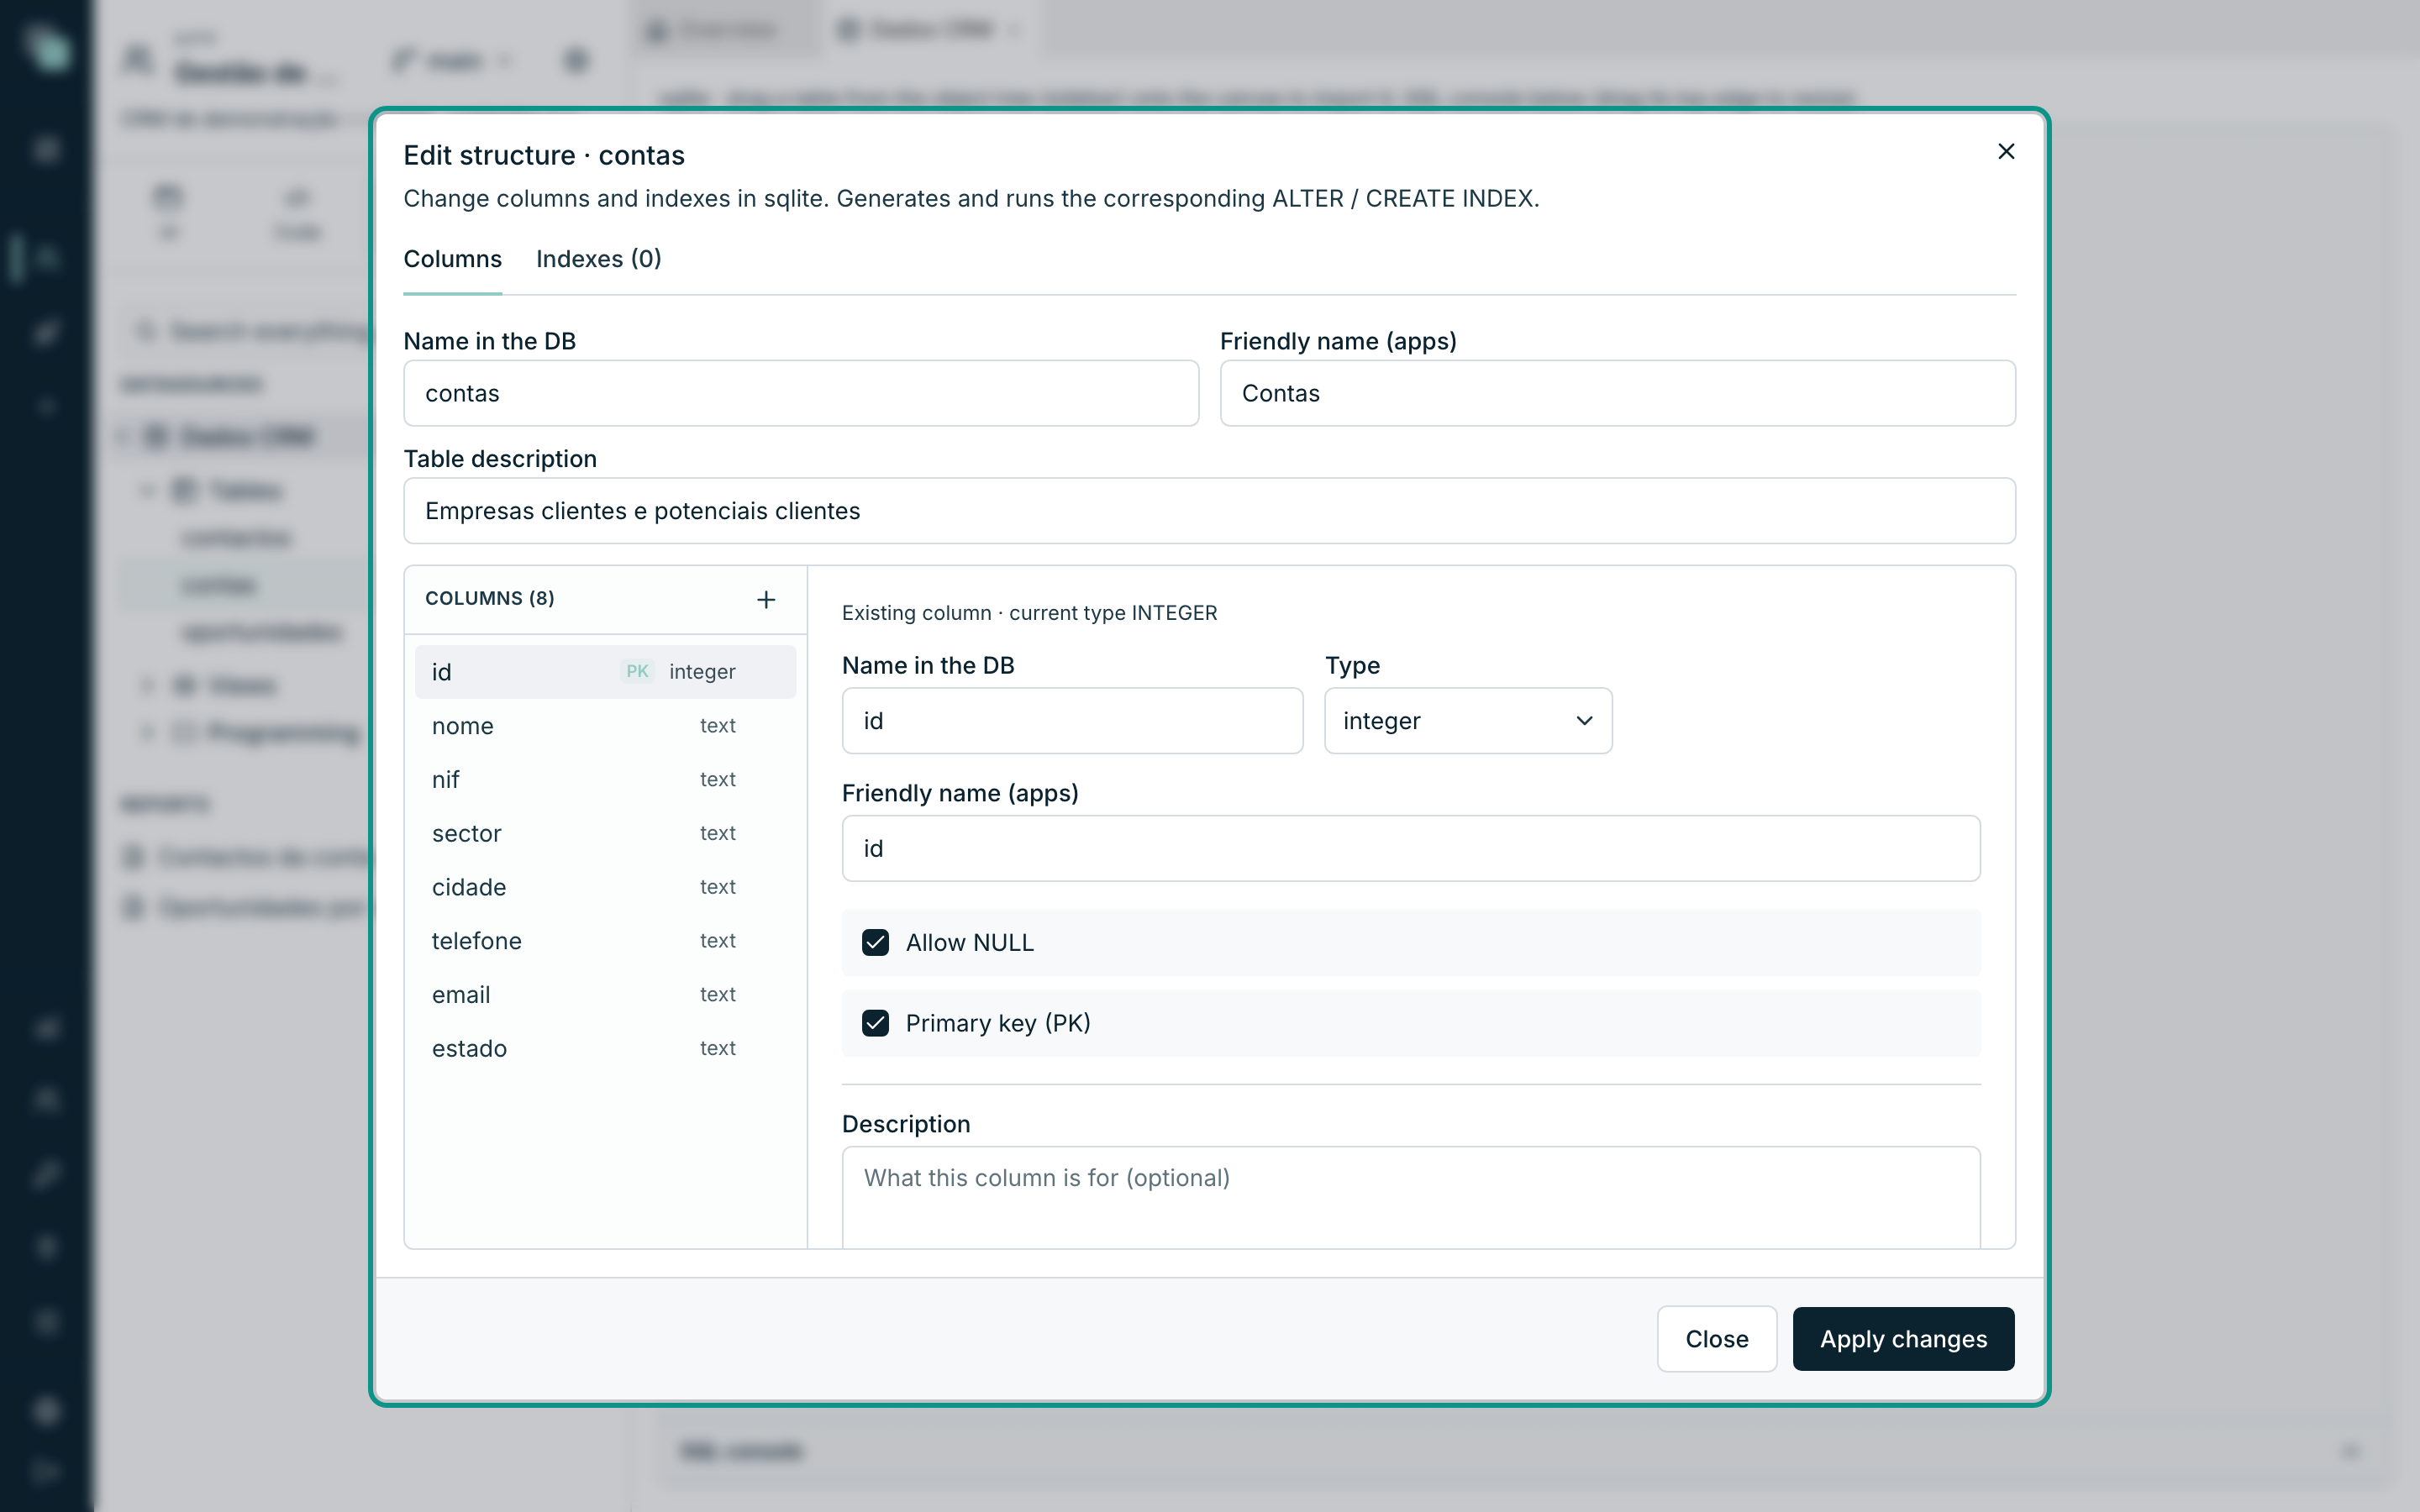
At the top sit the three things that describe the table:
| Field | What it is |
|---|---|
| Name in the DB | The table's real name. |
| Friendly name (apps) | The name the table goes by in the app. |
| Table description | What it is for. |
The Friendly name (apps) is the bridge between a database you
inherited and a readable app: the column can be called cli_nm_fis in the
database and nome in the app. It also exists per column — and it is the
friendly name that appears in the APIs, in the datastores and in the
screens.
Changing a column's Friendly name (apps) updates the table APIs that select it and the permission data rules that use it. Screens and reports that already ask for the field by its old name do not change on their own: review them after changing the name.
Working on the columns
Click a column in the left list to edit it. The changes are not immediate: they accumulate and only happen when you press Apply changes.
- A column added with + appears marked as new and carries the note New column — created when the changes are applied.
- Deleting an existing column (the trash can at the end of the row) strikes it through and shows Marked for deletion (DROP) on apply; Undo takes it back.
- If there is nothing to apply, the platform says No changes.
Warning
Changing the type of a column that already exists depends on the engine. Some engines do not know how to do it, and the platform tells you so instead of trying blindly — the way out, in those cases, is to create a new column, move the data over and delete the old one. Deleting a column deletes the data in it: there is no Undo after Apply changes.
Indexes
The Indexes (N) tab lists the table's indexes — name, unique mark
and the columns — and lets you create and delete them.
To create an index:
- Write the name (the
ix_alguma_coisaconvention is good and is the one the field suggests). - Check unique if the index also serves to prevent repeated values — that is how you guarantee there are no two customers with the same tax number.
- Click the columns that make up the index (the order you click in is the index's order).
- Create index.
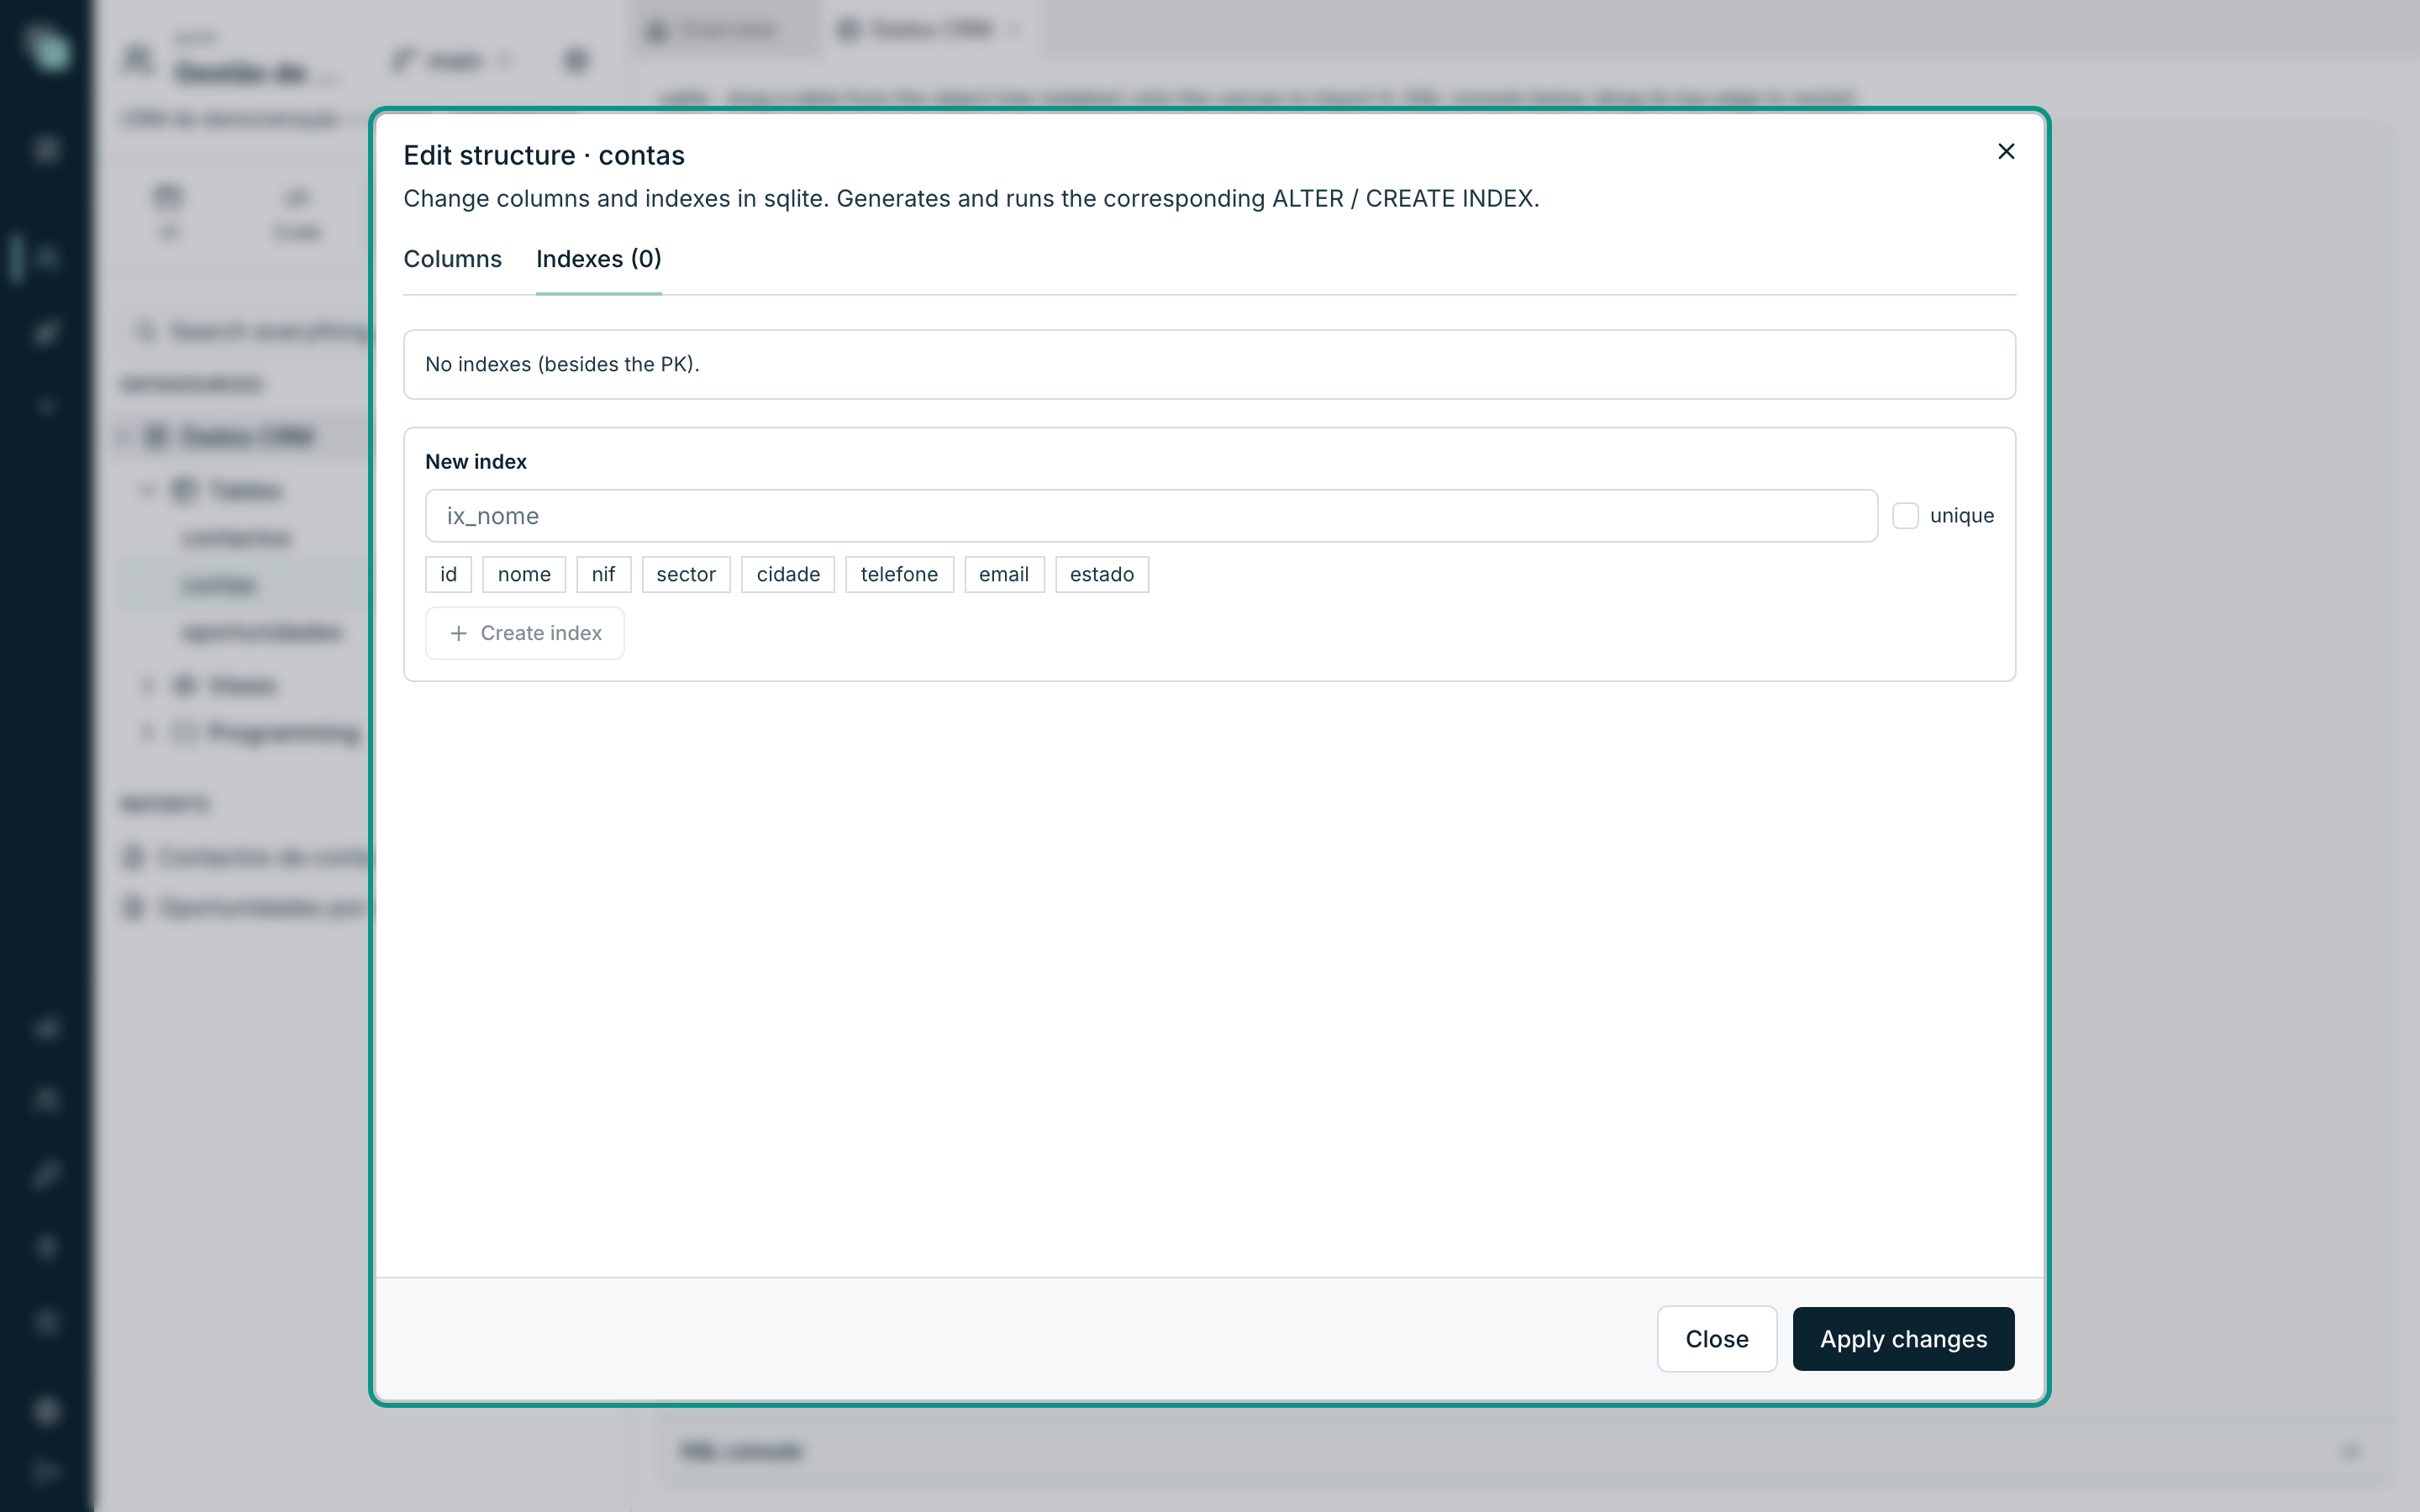
A table with no indexes of its own says No indexes (besides the PK) — the primary key is already an index, it does not need creating.
Tip
The indexes that matter are on the columns you filter and sort
by every day: the conta_id of a detail table, the date of a history,
the status the list is filtered by. Too many indexes make writes slower
— do not create them "just in case".
Seeing the data
A table's ⋯ menu → View data opens the SQL console at the bottom, the query already written and the result in view. It is the quick way of confirming what is in there without leaving the model.
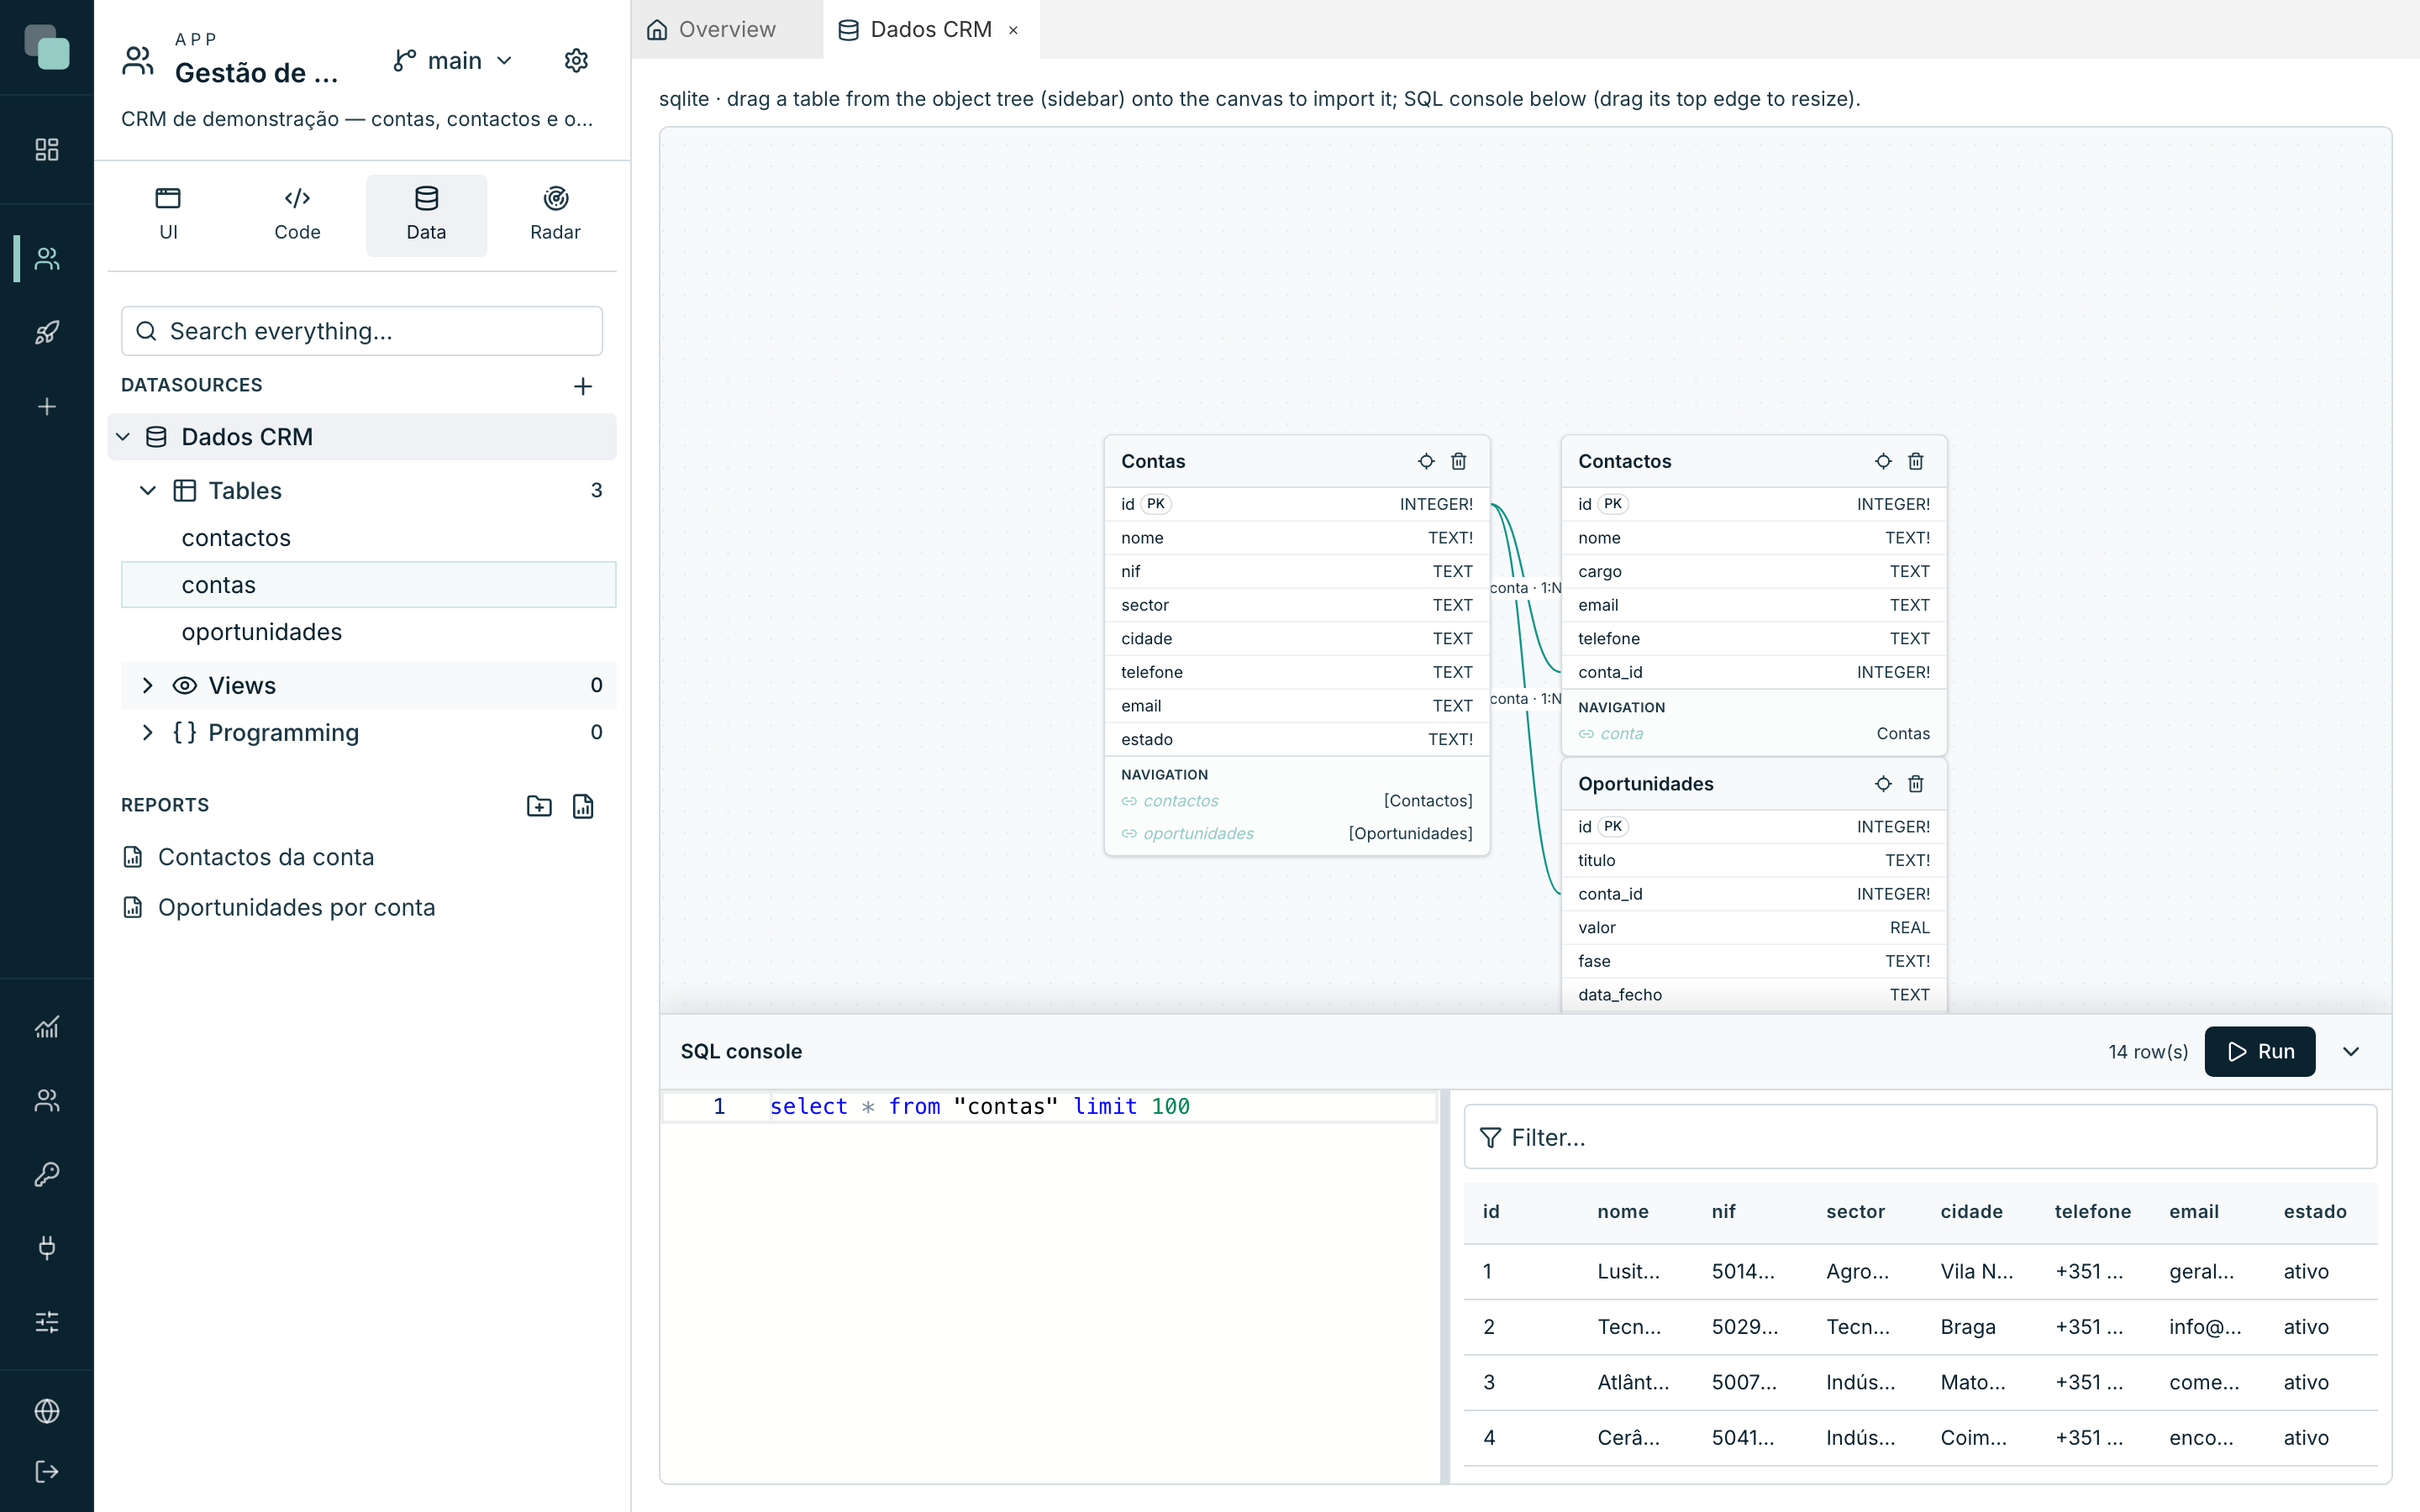
The console also takes SQL written by you: write on the left, Run, and the result appears on the right with the row count. The bar separating the console from the diagram can be dragged, and the arrow in the corner collapses it.
Deleting a table
A table's ⋯ menu has Delete, with confirmation: This operation is permanent and removes the object from the database. Not to be confused with Remove from model, which only takes the entity out of the app's description.
Why doesn't…?
- Why can't I see my table in the APIs? It is probably not in the model yet. Drag it from the tree onto the diagram, or use Import to model.
- Why did I create a column and it does not appear? Confirm that you pressed Apply changes — in the structure editor, nothing happens before that.
- Why won't my new table let records be edited on the screens? The Primary key (PK) is missing. Without it, the screens only know how to read.
- Why can't I change a column's type? Some engines have no "alter column". The platform warns you and the path is new column → copy the data → delete the old one.
- Why is the field's name in the app not the database's? That column's Friendly name (apps) is set. It is on purpose — and it is edited in the same place.
- Why did the entity vanish from the diagram while the table stays in the tree? It was removed from the model. Drag it from the tree onto the diagram again.